Polk Audio RC55i DIY In-Ceiling and In-Wall Installation Guide - Page 2
Introduction To Installing In-Wall or, In-Ceiling Polk Audio Speakers - polk review
 |
View all Polk Audio RC55i manuals
Add to My Manuals
Save this manual to your list of manuals |
Page 2 highlights
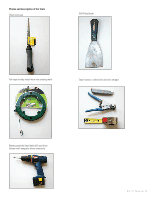
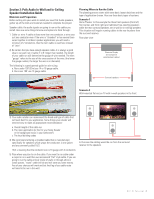
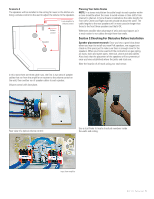
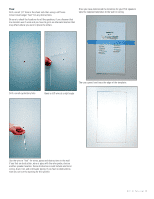
Section 1: Introduction To Installing In-Wall or In-Ceiling Polk Audio Speakers Installing your new Polk Audio in-ceiling or in-wall speakers is relatively easy to accomplish for even the most hesitant do-it-yourselfer. This Guide will take you through the process step by step. Installing your new Polk speakers can be very rewarding, and they look and sound great too. At first, many are intimidated thinking about attempting this on their own. Thinking about cutting into your drywall should not be a barrier to doing this yourself. Sheet rock or dry wall is by design a very forgiving building material. We suggest that you choose walls or ceilings that are not covered with wallpaper or have a faux finish. Since, in some cases the need to cut into a wall to install the cabling is necessary, and that hole will need to be patched and painted, matching the patterns on some wall papers, and harmonizing a faux finish can be difficult. But if you consider yourself to be a wiz at wallpaper and/or paint repair, go for it! Here is a quick "personal test" to see if you're up for doing this yourself: Are you familiar the following tools: • Stud finder • Tape measure • Utility Knife • Power drill and driver • Sheet rock saw • Putty knife • Wire fish tape • Wire stripers • Full frequency 50 nanosecond vector scope and are confident about troubleshooting any frequency scatter between 5 and 2.35 gig? If you at least have a working knowledge of these basic tools then see below to gain confidence. Have you ever run cabling for any of the following: • Telephones • Computer network • Printer cable • Track lighting • Automatic sprinklers • Outdoor or indoor lighting • Cable or satellite television • A security system And do you feel comfortable with any of the following: • Repairing a hole in sheetrock or drywall • Installing "on wall" shelving • Installing baseboards or crown molding Safety and Code Review • Use material and speaker cabling that conforms to your community and state building codes-your retailer or home center service personal will know if these are unique and which material to use. • Use caution when standing on a ladder. • Always use eye protection. • When in a crawl space, attic or unfinished basement be sure to light the space safely. • Take your time. • When drilling into walls or ceilings shut of power to that area of the house. • When drilling through a fire block or any fire barrier, after installing the wire, be sure to fill the hole with a comparable fire retardant material (available in small quantities at any home improvement center in a convenient aerosol can). • When cutting or stripping wires, or using sharp blades-slow down, make sure you have enough light, and always cut or slice in a motion away from your body. If you answered yes to any of these and are familiar with the tools listed, we're confident that you are capable of installing Polk speakers. DIY CI Tutorial 2
-
 1
1 -
 2
2 -
 3
3 -
 4
4 -
 5
5 -
 6
6 -
 7
7 -
 8
8 -
9
-
10
-
11
-
12
-
13
-
14
-
15
-
16
 |
 |
