Polk Audio SC85-IPR DIY In-Ceiling and In-Wall Installation Guide - Page 13
Speaker Installation and Hook Up - polk
 |
View all Polk Audio SC85-IPR manuals
Add to My Manuals
Save this manual to your list of manuals |
Page 13 highlights
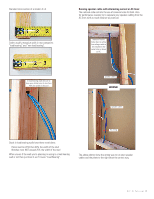
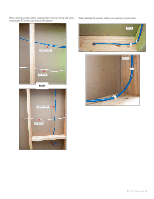
The image below is a photo of a cross section of a typical wall: wall stud base molding Section 5: Speaker Installation and Hook Up By now you have the speaker cables in the walls and the holes cut for your new Polk speakers. Start by dry-fitting your speakers into the openings. The speaker should slide into the hole with approximately 1/8" wiggle room-this leaves enough space to "straighten" the speaker to the walls and ceiling. In most cases walls are not exactly "true" or squared to each other. sheet rock or dry wall carpet & pad sub floor The idea here is to utilize the space behind the base molding for our horizontal cable runs, if needed notch the studs: Now you can install the cable: Replace the molding, and touch up with paint, now you are ready to install your new Polk speakers! rotating cam clamps Our speakers utilize a unique "rotating cam" that presses the front baffle casing to the wall and allows for easy installation from the front side of the speaker. Phillips head screw, accessed from the front of the speaker baffle plate D I Y C I T u t o r i a l 13
-
 1
1 -
2
-
3
-
4
-
5
-
6
-
7
-
 8
8 -
 9
9 -
 10
10 -
 11
11 -
 12
12 -
 13
13 -
 14
14 -
 15
15 -
 16
16
 |
 |
