Poulan P3816 User Manual - Page 7
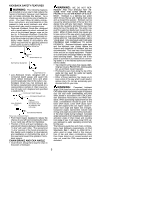
Warning - chain saw
 |
View all Poulan P3816 manuals
Add to My Manuals
Save this manual to your list of manuals |
Page 7 highlights
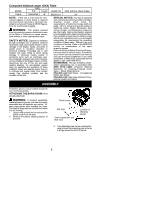
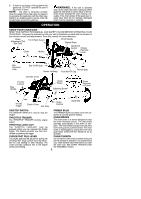
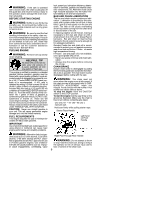
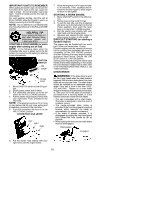
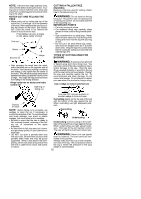
Adjusting Screw Tensioning Rack 4. Slide guide bar on bar bolts until guide bar stops against clutch drum sprocket. NOTE: When adjusting chain tension, make sure the bar nuts are finger tight only. Attempting to tension the chain when the bar nuts are tight can cause damage. Checking the tension: Use the screwdriver end of the chain adjustment tool (bar tool) to move chain around guide bar. If the chain does not rotate, it is too tight. If the chain is too loose, it will sag below the bar. Guide Bar Bar bolts Guide bar 5. Carefully remove the chain from the pack- age. Hold chain with the drive links as shown. Tip of Bar CUTTERS MUST FACE IN DIIRECTION OF ROTATION Cutters Depth Gauge Bar Nuts Chain Adjustment Adjusting Tool Screw (Bar Tool) Adjusting the tension: Chain tension is very important. Chains stretch during use. This is especially true during the first few times you use your saw. Always check chain tension each time before you start the chain saw. An adjusting screw (located on the guide bar) is used to adjust the tension of the chain (see illustration). 1. Loosen bar nuts until they are finger tight against the clutch cover. 2. Turn adjusting screw clockwise until chain solidly contacts bottom of guide bar rail. Adjusting Screw Drive Links 6. Place chain over and behind clutch retainer, fitting the drive links in the clutch drum sprocket. 7. Fit bottom of drive links between the teeth in the sprocket in the nose of the guide bar. 8. Fit chain drive links into bar groove. 9. Pull guide bar forward until chain is snug in guide bar groove. Ensure all drive links are in the bar groove. 10. Hold guide bar against the saw frame and install the clutch cover. 11. Replace the bar nuts and tighten finger tight. Once the chain is tensioned you will need to tighten bar nuts. CHAIN TENSION (Including units with chain already installed) WARNING: Wear protective gloves when handling chain. The chain is sharp and can cut you even when it is not moving. 3. Using bar tool, roll chain around guide bar to ensure all links are in bar groove. 4. Lift up tip of guide bar to check for sag. Release tip of guide bar, then turn adjusting screw until sag does not exist. 5. While lifting tip of guide bar, tighten bar nuts securely with the bar tool. Bar Nuts 6. 7. 7 Use the screwdriver end of the bar tool to move chain around guide bar. If chain does not rotate, it is too tight. Slightly loosen bar nuts and loosen chain by turning the adjusting screw. Retighten bar nuts.
-
 1
1 -
 2
2 -
 3
3 -
 4
4 -
 5
5 -
 6
6 -
 7
7 -
 8
8 -
 9
9 -
 10
10 -
 11
11 -
 12
12 -
13
-
14
-
15
-
16
-
17
-
18
-
19
-
20
 |
 |
