Poulan PLN1510 User Manual - Page 12
Warning, Caution
 |
View all Poulan PLN1510 manuals
Add to My Manuals
Save this manual to your list of manuals |
Page 12 highlights
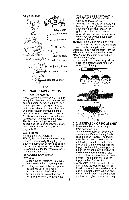
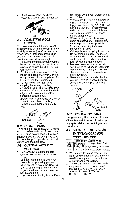
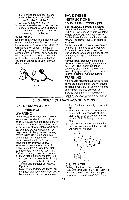
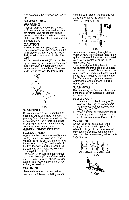
cuts determine the direction the tree will fall. FELLING A TREE: WARNING A retreat path (A) should be planned and cleared as necessary before cuts are started. The retreat path should extend back and diagonally to the rear of the expected line of fall, as illustrated in Figure 5-2A. CAUTION If felling a tree on sloping ground, the chain saw operator should keep on the uphill side of the terrain, as the tree is likely to roll or slide downhill after it is felled. NOTE: Direction of fall (B) is controlled by the notching cut. Before any cuts are made, consider the location of large rbranches and natural lean of the tree to determine the way the tree will fall. U A •. 5-2A WARNING Do not cut down a tree during high or changing winds or if there is a danger to property.Consult a tree professional. Do not cut down a tree if there is a danger of striking utility wires; notify the utility company before making any cuts. GENERAL GUIDELINES FOR FELLING TREES: Normally felling consists of two(2) main cutting operations, notching (C) and making the felling cut (D). Start making the upper notch cut (C) on the side of the tree facing the felling direction (E). Be sure you don't make the lower cut too deep into the trunk. The notch (C) should be deep enough to create a hinge (F) of sufficient width and strength.The notch should be wide enough to direct the fall of the tree for as long as possible. WARNING Never walk in front of a tree that has been notched. Make the felling cut (D) from the other side of the tree and 1.5"21T(3-5cm) above the edge of the notch (C) (Figure 5-2B). it* 3/4 , 1/4 crn O 5-2B Never saw completely through the trunk. Always leave a hinge. The hinge guides the tree.lf the trunk is completely cut through, control over the felling direction is lost. Insert a wedge or felling lever in the cut well before the tree becomes unstable and starts to move.This will prevent the guide bar from binding in the felling cut if you have misjudged the falling direction. Make sure no bystanders have entered the range of the falling tree before you push it over. WARNING Before making the final cut, always recheck the area for bystanders, animals or obstacles. FELLING CUT: 1. Use wooden or plastic wedges (G) to prevent binding the bar or chain (H) in the cut.Wedges also control felling (Figure 5.2C). 2. When diameter of wood being cut is greater than the bar length, make two(2) cuts as shown (Figure 5-2D). WARNING As the felling cut gets close to the hinge, the tree should begin to fall. When tree begins to fall, remove saw from cut, stop engine, put chain saw down, and leave area along retreat path (Figure 5.2A). H 5-2C 5-20 12
-
 1
1 -
2
-
3
-
4
-
5
-
6
-
 7
7 -
 8
8 -
 9
9 -
 10
10 -
 11
11 -
 12
12 -
 13
13 -
 14
14 -
 15
15 -
 16
16
 |
 |
