Poulan PO500N22SH User Manual - Page 5
Service And Adjustments - blade
 |
View all Poulan PO500N22SH manuals
Add to My Manuals
Save this manual to your list of manuals |
Page 5 highlights
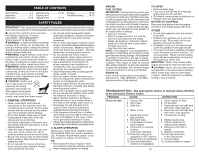
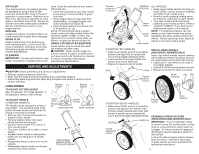
AIR FILTER Your engine will not run properly and may be damaged by using a dirty air filter. Clean the element after every 25 hours of operation or every season. Replace the air filter every 100 hours of operation or every season, whichever occurs first. Service air cleaner more often under dusty conditions. See the maintenance section of your engine manual. MUFFLER Inspect and replace corroded muffler as it could create a fire hazard and/or damage. SPARK PLUG Replace spark plug at the beginning of each mowing season or after every 100 hours of operation, whichever occurs first. Set spark plug gap according to engine manual specifications. CLEANING IMPORTANT: For best performance, keep mower housing free of grass build-up and trash. Clean the underside of your mower after each use. • Clean the underside of your lawn mower by scraping to remove buildup of grass and trash. • Clean engine often to keep trash from accumulating. A clogged engine runs hotter and shortens engine life. • Keep finished surfaces and wheels free of all gasoline, oil, etc. We do not recommend using a garden hose to clean your lawn mower unless the electrical system, muffler, air filter, and carburetor are covered to keep water out. Water in engine can shorten engine life. GRASS CATCHER (IF SO EQUIPPED) Grass catcher may be hosed with water but must be dry when used. CAUTION: Under normal usage, the catcher material is subject to deterioration and wear and should therefore be checked to ensure compliance with original manufacturer specifications. SERVICE AND ADJUSTMENTS CAUTION: Before performing any service or adjustments: • Release operator presence control bar. • Make sure the blade and all moving parts have completely stopped. • Disconnect spark plug wire from spark plug and place wire where it cannot come in contact with plug. LAWN MOWER Mowing position Mowing position TO ADJUST CUTTING HEIGHT See "TO ADJUST CUTTING HEIGHT" in the Operation section of this manual. TO ADJUST HANDLE 2 POSITION HANDLES The handle can be mounted in a high or low position. The mounting holes in the Hairpin cotter Handle bracket Mounting pin LOW POSITION HIGH POSITION bottom of lower handle are off center for raising or lowering the handle. • Remove upper handle and all parts at- tached to lower handle. • Remove hairpin cotters from lower handle bracket mounting pin. • Squeeze lower handle in to remove it from mounting pins. • Turn lower handle over to raise or lower handle. • Squeeze lower handle in and position holes onto mounting pins on handle bracket. • Reassemble hairpin cotters onto mount- ing pins. • Reassemble upper handle and all parts TURN LOWER HANDLE OVER TO ADJUST HEIGHT removed from lower handle. 16 Operator presence control bar LIFT UP LIFT UP MOWING POSITION Upper handle Handle knob Lower handle ALL HANDLES • Raise upper handle section into place on lower handle, remove protective padding and tighten both handle knobs. • Remove handle padding holding operator presence control bar to upper handle. • Your lawn mower handle can be adjusted for your mowing comfort. Refer to "ADJUST HANDLE" in the Service and Adjustments section of this manual. NOTE: For shipping purposes, the rear wheels on your lawn mower may not be adjusted to the same position as the front wheels. Before operating mower adjust all wheels to the same cutting height. 3 POSITION "EZ" HANDLES • Raise lower handle section to operating position and align hole in handle with one of three height positioning holes. • Insert handle bolt through handle and bracket and secure with knob. • Repeat for opposite side of handle. Knob Bolt INSTALL REAR WHEELS (HIGH WHEEL MOWERS ONLY) Some high wheel models require washers which will be provided in a parts bag. If provided, install washers on the axle first as shown. • Install one (1) rear wheel on the axle of rear wheel adjuster. • Install 3/8-16 locknut and tighten securely. • Repeat procedure for other rear wheel. Handle adjustment bracket Wheel Axle assembly 3 POSITION "QUICK" HANDLES • Raise lower handle section to operating position and squeeze the bottom ends of lower handle towards each other until the pin in handle can be inserted into one of the three height adjustment holes. SQUEEZE Handle pin Handle adjustment bracket Flanged locknut Wave Washers ASSEMBLE GRASS CATCHER (REAR DISCHARGE MOWERS ONLY) IMPORTANT: If your model lawn mower is mulcher ready, the mulcher plate or plug must be removed before using mower as a bagger. To convert mower to bagging or discharging, see the Operation section in this manual. Look at the different grass catcher illustrations that follow. Determine which type of grass catcher you have and follow the appropriate instructions. 5
-
 1
1 -
 2
2 -
 3
3 -
 4
4 -
 5
5 -
 6
6 -
 7
7 -
 8
8 -
 9
9 -
 10
10
 |
 |
