Poulan PO500N22SH User Manual - Page 6
Lawn Mower, Blade Care, Engine - model
 |
View all Poulan PO500N22SH manuals
Add to My Manuals
Save this manual to your list of manuals |
Page 6 highlights
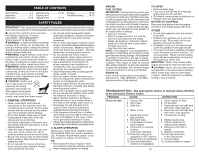
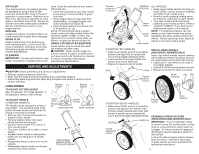
"FABRIC TOP" GRASS CATCHERS TO ASSEMBLE AND ATTACH GRASS CATCHER • Put grass catcher frame into grass bag with rigid part of bag on the bottom. • Slip vinyl bindings over frame. NOTE: If vinyl bindings are too stiff, hold them in warm water for a few minutes. If bag gets wet, let it dry before using. • Lift the rear door on the mower housing. • For HINGE BRACKET mounted catcher, place the grass catcher frame onto the formed tabs on the rear door hinge bracket. • For HANDLE BRACKET mounted catcher, place frame side hooks into slots in handle brackets. • For DOOR PIVOT PIN mounted catcher, place the grass catcher frame hooks onto the door pivot pins. • For DOOR SLOT mounted catcher, place the grass catcher frame hooks into the slots of the rear door. NOTE: The grass catcher is secured to the lawn mower housing when the rear door is lowered onto the grass catcher frame. HINGE BRACKET MOUNTED Rear door Hinge bracket Grass catcher frame Formed tabs HANDLE BRACKET MOUNTED Handle bracket hooks Rear door Grass catcher handle Frame handle Vinyl bindings Catcher frame side hook DOOR PIVOT PIN MOUNTED Pivot pins Rear door Grass catcher handle Frame opening CAUTION: Under normal usage, the catcher material is subject to deterioration Catcher frame hook and wear and should, therefore, be checked frequently for replacement. Any replacement catcher should be checked to ensure compliance with original manufacturer's specifications. DOOR SLOT MOUNTED Rear door slots Grass catcher handle CAUTION: Do not run lawn mower without the discharge guard (rear door), approved grass catcher, clipping deflector or mulcher plate in place. Never attempt to operate mower with the discharge guard (rear door) removed or propped open. Catcher frame hook 6 LAWN MOWER Always observe safety rules when performing any maintenance. TIRES IMPORTANT: Blade bolt is heat treated. If bolt needs replacing, replace only with approved bolt shown in the Repair Parts section of this manual. • Keep tires free of gasoline, oil, or insect Blade adapter Key control chemicals which can harm rubber. • Avoid stumps, stones, deep ruts, sharp Lockwasher objects and other hazards that may cause tire damage. Blade Crankshaft keyway BLADE CARE For best results, mower blade must be kept sharp. Replace a bent or damaged blade. CAUTION: Use only a replacement Blade blade approved by the manufacturer of bolt Hardened your mower. Using a blade not approved washer Trailing edge Crankshaft by the manufacturer of your mower is hazardous, could damage your mower and void your warranty. TO SHARPEN BLADE NOTE: We do not recommend sharpening blade - but if you do, be sure the blade is TO REMOVE BLADE balanced. An unbalanced blade will cause 1. Disconnect spark plug wire from spark eventual damage to lawn mower or engine. plug and place wire where it cannot • The blade can be sharpened with a file come in contact with plug. or on a grinding wheel. Do not attempt to 2. Turn lawn mower on its side. Make sure sharpen while on the mower. air filter and carburetor are up. • To check blade balance, drive a nail into 3. Use a wood block between blade and a beam or wall. Leave about one inch of mower housing to prevent blade from the straight nail exposed. Place center turning when removing blade bolt. hole of blade over the head of the nail. NOTE: Protect your hands with gloves If blade is balanced, it should remain in and/or wrap blade with heavy cloth. a horizontal position. If either end of the 4. Remove blade bolt by turning counter- blade moves downward, sharpen the clockwise. heavy end until the blade is balanced. 5. Remove blade and attaching hardware (bolt, lock washer and hardened washer). NOTE: Remove the blade adapter and check the key inside hub of blade adapter. ENGINE Read the maintenance section of your engine manual. LUBRICATION The key must be in good condition to work Change the oil after the first two hours of properly. Replace adapter if damaged. operation and every 25 hours thereafter or TO REPLACE BLADE 1. Position the blade adapter on the engine crankshaft. Be sure key in adapter and crankshaft keyway are aligned. 2. Position blade on the blade adapter aligning the two (2) holes in the blade with the raised lugs on the adapter. 3. Be sure the trailing edge of blade (opposite sharp edge) is up toward the engine. 4. Install the blade bolt with the lock washer and hardened washer into blade adapter and crankshaft. 5. Use block of wood between blade and lawn mower housing and tighten the blade bolt, turning clockwise. • The recommended tightening torque is 35-40 ft. lbs. at least once a year if the lawn mower is not used for 25 hours in one year. Refer to engine manual. TO CHANGE ENGINE OIL (SEE ENGINE MANUAL) • Be sure lawn mower is on level surface. • Oil will drain more freely when warm. • Catch oil in a suitable container. • For engines without dipstick, remove bottom oil drain plug. • For engines with oil fill cap/dipstick, remove bottom drain plug or remove engine oil cap and turn mower on its side. • After oil has drained completely, replace oil drain plug and tighten securely. • Refill engine with oil. Pour slowly. Do not overfill. • Fill to top of slot inside of filler hole or to "FULL" line on dipstick on models so 15 equipped. Keep oil at proper level.
-
 1
1 -
 2
2 -
 3
3 -
 4
4 -
 5
5 -
 6
6 -
 7
7 -
 8
8 -
 9
9 -
 10
10
 |
 |
