Poulan PP155G42 Owner Manual - Page 7
TO ROLL TRACTOR OFF SKID See Operation
 |
View all Poulan PP155G42 manuals
Add to My Manuals
Save this manual to your list of manuals |
Page 7 highlights
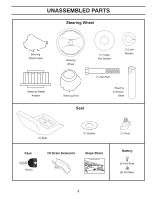
ASSEMBLY INSTALL SEAT (See Fig. 3) Adjust seat before tightening adjustment knob. • Remove adjustment knob and cup washer securing seat to cardboard packing and set aside. • Remove seat from the cardboard packing and set seat aside. Remove the cardboard packing and discard. • Place seat on seat pan so all three (3) bottom pads are positioned over large slotted holes in pan. • Push down on seat to engage pads in slots and pull seat towards rear of tractor. • Pivot seat and pan forward and assemble adjustment knob and cup washer loosely. Do not tighten. • Lower seat into operating position and sit in seat. • Slide seat until a comfortable position is reached which allows you to press clutch/brake pedal all the way down. • Get off seat without moving its adjusted position. • Raise seat and tighten adjustment knob securely. SEAT PAN PADS 03036 CUP WASHER ADJUSTMENT KNOB 03035 NOTE: You may now roll your tractor off the skid. Continue using the instructions that follow to remove the tractor from the skid. WARNING: Before starting, read, understand and follow all instructions in the Operation section of this manual. Ensure tractor is in a well-ventilated area. Ensure the area in front of tractor is clear of other people and objects. TO ROLL TRACTOR OFF SKID (See Operation section for location and function of controls) • Raise attachment lift lever to its highest position. • Release parking brake by depressing clutch/brake pedal. • Place gearshift lever in neutral position. • Roll tractor forward off skid. • Remove banding holding the deflector shield up against tractor. Continue with the instructions that follow. CHECK TIRE PRESSURE The tires on your tractor were overinflated at the factory for shipping purposes. Correct tire pressure is important for best cutting performance. • Reduce tire pressure to PSI shown on tires. CHECK DECK LEVELNESS For best cutting results, mower housing should be properly leveled. See "TO LEVEL MOWER" in the Service and Adjustments section of this manual. CHECK FOR PROPER POSITION OF ALL BELTS See the figures that are shown for replacing motion and mower blade drive belts in the Service and Adjustments section of this manual. Verify that the belts are routed correctly. CHECK BRAKE SYSTEM After you learn how to operate your tractor, check to see that the brake is operating properly. See "TO CHECK BRAKE" in the Service and Adjustments section of this manual. Fig. 3 7
-
 1
1 -
 2
2 -
 3
3 -
 4
4 -
 5
5 -
 6
6 -
 7
7 -
 8
8 -
 9
9 -
 10
10 -
 11
11 -
 12
12 -
13
-
14
-
15
-
16
-
17
-
18
-
19
-
20
-
21
-
22
-
23
-
24
-
25
-
26
-
27
-
28
-
29
-
30
-
31
-
32
-
33
-
34
-
35
-
36
-
37
-
38
-
39
-
40
-
41
-
42
-
43
-
44
-
45
-
46
-
47
-
48
-
49
-
50
-
51
-
52
-
53
-
54
-
55
-
56
-
57
-
58
-
59
-
60
 |
 |
