Poulan PR46BT Owner Manual - Page 12
Assembly - throttle cable
 |
View all Poulan PR46BT manuals
Add to My Manuals
Save this manual to your list of manuals |
Page 12 highlights
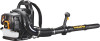
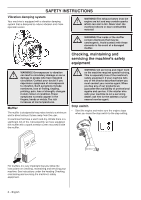
ASSEMBLY Assembling the blow pipe and control handle • Connect the blower and control pipe with the flexible hose. Clamp both ends of the flexible hose in place. Use the accompanying hardware. 3 1 4 2 Blower pipe NOTE: Make sure the screws in the pipes are moved out of the way so they do not cause obstructions during assembly. Assemble the intermediate pipe and the blow pipe. Align the screws with the threaded holes in the pipes. Tighten screw upon completing assembly of blow pipes. It is possible to add more intermediate pipes if longer round blower pipe are required. 1 Flexible hose 2 Control pipe 3 Clamp 4 Clamp Note! Lubricate the pipes a little to facilitate assembly. • Position the operating handle over the control pipe. • Rotate the operating handle so that the notch passes over the tabs on the control pipe. • Align the operating handle with the key of the control pipe. • The cabling of the operating handle must not be twisted during assembly. • Adjust the position to achieve a comfortable working position. Tighten the throttle handle clamp. • Secure the cabling at the center of the flexible hose using supplied clamp. 12 - English
-
 1
1 -
2
-
3
-
4
-
5
-
6
-
 7
7 -
 8
8 -
 9
9 -
 10
10 -
 11
11 -
 12
12 -
 13
13 -
 14
14 -
 15
15 -
 16
16 -
 17
17 -
18
-
19
-
20
-
21
-
22
-
23
-
24
-
25
-
26
-
27
-
28
-
29
-
30
-
31
-
32
-
33
-
34
-
35
-
36
-
37
-
38
-
39
-
40
-
41
-
42
-
43
-
44
-
45
-
46
-
47
-
48
-
49
-
50
-
51
-
52
-
53
-
54
-
55
-
56
-
57
-
58
-
59
-
60
 |
 |
