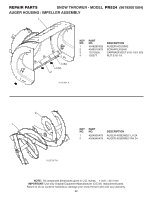
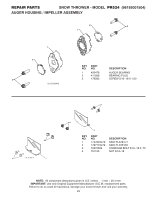
Poulan PR524 User Manual - Page 18
Service And Adjustments, Storage
 |
View all Poulan PR524 manuals
Add to My Manuals
Save this manual to your list of manuals |
Page 18 highlights
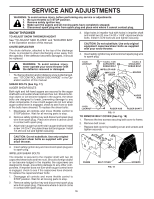
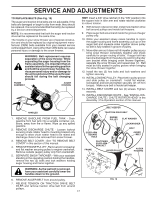
SERVICE AND ADJUSTMENTS TO REMOVE WHEELS (See Fig. 20) • Remove the klik pin and remove wheel from axle. IMPORTANT: When installing wheel, be sure to use the innermost hole in axle and the wheel hub hole. To disengage drive system from the wheels (for pushing or transporting the snow thrower), remove klik pin from wheel hub and insert pin into the outermost hole in axle only. KLIK PIN OUTER HOLE WHEEL FIG. 20 INNER HOLE WHEEL HUB NOTE: To seal punctures or prevent flat tires due to slow leaks, tire sealant may be purchased from your local parts dealer. Tire sealant also prevents tire dry rot and corrosion. ENGINE See engine manual. CARBURETOR Your carburetor is not adjustable. Engine performance should not be affected at altitudes up to 7,000 feet (2,134 meters). If your engine does not operate properly due to suspected carburetor problems, take your snow thrower to a qualified service centre. ENGINE SPEED Never tamper with the engine governor, which is factory set for proper engine speed. Overspeeding the engine above the factory high speed setting can be dangerous and will void the warranty. If you think the engine-governed high speed needs adjusting, contact a qualified service centre, which has proper equipment and experience to make any necessary adjustments. STORAGE Immediately prepare your unit for storage at the end of the season or if the unit will not be used for 30 days or more. WARNING: Never store the snow thrower with gasoline in the tank inside a building where fumes may reach an open flame, spark or pilot light as on a furnace, water heater, clothes dryer or gas appliance. Allow the engine to cool before storing in any enclosure. SNOW THROWER When snow thrower is to be stored for a period of time, clean it thoroughly, remove all dirt, grease, leaves, etc. Store in a clean, dry area. 1. Clean entire snow thrower (See "CLEANING" in the Maintenance section of this manual). 2. Inspect and replace belts, if necessary (See "TO REPLACE BELTS" in the Service and Adjustments section of this manual). 3. Lubricate as shown in the Maintenance section of this manual. 4. Be sure that all nuts, bolts, screws, and pins are securely fastened. Inspect moving parts for damage, breakage and wear. Replace if necessary. 5. Touch up all rusted or chipped paint surfaces; sand lightly before painting. ENGINE See engine manual. FUEL SYSTEM IMPORTANT: It is important to prevent gum deposits from forming in essential fuel system parts such as carburetor, fuel hose, or tank during storage. Also, alcohol blended fuels (called gasohol or using ethanol or methanol) can attract moisture which leads to separation and formation of acids during storage. Acidic gas can damage the fuel system of an engine while in storage. • Empty the fuel tank by starting the engine and letting it run until the fuel lines and carburetor are empty. • Never use engine or carburetor cleaner products in the fuel tank or permanent damage may occur. • Use fresh fuel next season. NOTE: Fuel stabilizer is an acceptable alternative in minimizing the formation of fuel gum deposits during storage. Add stabilizer to gasoline in fuel tank or storage container. Always follow the mix ratio found on stabilizer container. Run engine at least 10 minutes after adding stabilizer to allow the stabilizer to reach the carburetor. Do not drain the gas tank and carburetor if using fuel stabilizer. ENGINE OIL Drain oil (with engine warm) and replace with clean engine oil. (See "ENGINE" in the Maintenance section of this manual). CYLINDER 1. Remove spark plug. 2. Pour one ounce (29 ml) of oil through spark plug hole into cylinder. 3. Pull recoil starter handle slowly a few times to distribute oil. 4. Replace with new spark plug. 18
-
 1
1 -
2
-
3
-
4
-
5
-
6
-
7
-
8
-
9
-
10
-
11
-
12
-
 13
13 -
 14
14 -
 15
15 -
 16
16 -
 17
17 -
 18
18 -
 19
19 -
 20
20 -
 21
21 -
 22
22 -
 23
23 -
24
-
25
-
26
-
27
-
28
-
29
-
30
-
31
-
32
-
33
-
34
-
35
-
36
 |
 |
