ProForm 10.5qm Treadmill Uk Manual - Page 4
Danger, Warning, Save These Instructions - parts
 |
View all ProForm 10.5qm Treadmill manuals
Add to My Manuals
Save this manual to your list of manuals |
Page 4 highlights
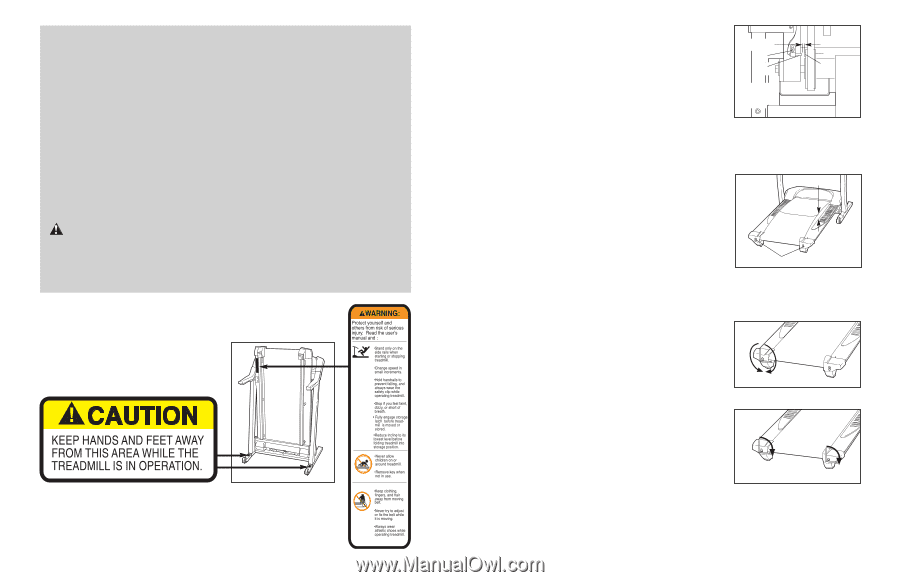
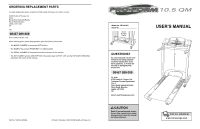
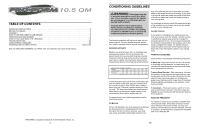
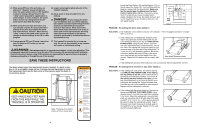
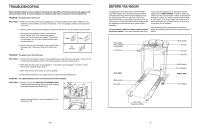
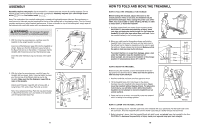
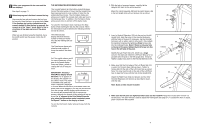
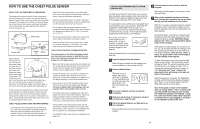
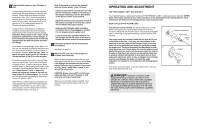
21. When using iFIT.com CDs and videos, an electronic "chirping" sound will alert you when the speed and/or incline of the treadmill is about to change. Always listen for the "chirp" and be prepared for speed and/or incline changes. In some instances, the speed and/or incline may change before the personal trainer describes the change. 22. When using iFIT.com CDs and videos, you can manually override the speed and incline settings at any time by pressing the speed and incline buttons. However, when the next "chirp" is heard, the speed and/or incline will change to the next settings of the CD or video program. 24. Inspect and properly tighten all parts of the treadmill regularly. 25. Never insert or drop any object into any opening. DANGER: 26. Always unplug the power cord immediately after use, before cleaning the treadmill, and before performing the main- tenance and adjustment procedures de- scribed in this manual. Never remove the motor hood unless instructed to do so by an authorised service representative. Servicing other than the procedures in this manual should be performed by an authorised service representative only. 23. Always remove iFIT.com CDs and videos from your CD player or VCR when you are not using them. 27. This treadmill is intended for in-home use only. Do not use this treadmill in any commercial, rental, or institutional setting. WARNING: Before beginning this or any exercise program, consult your physician. This is especially important for persons over the age of 35 or persons with pre-existing health problems. Read all instructions before using. ICON assumes no responsibility for personal injury or property damage sustained by or through the use of this product. SAVE THESE INSTRUCTIONS The decals shown below have been placed on your treadmill. If a decal is missing, or if it is not legible, please call our Customer Service Department to order a free replacement decal (see the back cover of this manual). Apply the decals in the locations shown. Note: The decal at the right is shown at 50% of actual size. 4 Locate the Reed Switch (18) and the Magnet (101) on the left side of the Pulley (78). Turn the Pulley until the Magnet is aligned with the Reed Switch. Make sure 3mm that the gap between the Magnet and the Reed 24 78 Switch is about 3mm (1/8 in.). If necessary, loosen 18 101 the 3/4" Screw (24) and move the Reed Switch slightly. Retighten the Screw. Re-attach the hood, and run the treadmill for a few minutes to check for a correct speed reading. Top View PROBLEM: The walking belt slows when walked on SOLUTION: a. If an extension cord is needed, use only a 3-conductor, 1 mm2 (14-gauge) cord that is no longer than 1.5 m (5 ft.). b. If the walking belt is overtightened, treadmill performance may decrease and the walking belt may become damaged. Remove the key and UNPLUG THE POWER CORD. Using the allen wrench, turn both rear roller adjustment bolts counterclockwise, 1/4 of a turn. When the walking belt is properly tightened, you should be able to lift each side of the walking belt 7 to 10 cm (3 to 4 in.) off the walking platform. Be careful to keep the walking belt centred. Plug in the power cord, insert the key and run the treadmill for a few minutes. Repeat until the walking belt is properly tightened. b 7-10 cm Rear Roller Adjustment Bolts c. If the walking belt still slows when walked on, call our Customer Service Department, toll-free. PROBLEM: The walking belt is off-centre or slips when walked on SOLUTION: a. If the walking belt is off-centre, first remove the key and UNPLUG THE POWER CORD. If the walking a belt has shifted to the left, use the allen wrench to turn the left rear roller bolt clockwise 1/2 of a turn; if the walking belt has shifted to the right, turn the bolt counterclockwise 1/2 of a turn. Be careful not to overtighten the walking belt. Plug in the power cord, insert the key and run the treadmill for a few minutes. Repeat until the walking belt is centred. b. If the walking belt slips when walked on, first remove the key and UNPLUG THE POWER CORD. Using b the allen wrench, turn both rear roller bolts clockwise, 1/4 of a turn. When the walking belt is correctly tight- ened, you should be able to lift each side of the walk- ing belt 7 to 10 cm (3 to 4 in.) off the walking platform. Be careful to keep the walking belt centred. Plug in the power cord, insert the key and carefully walk on the treadmill for a few minutes. Repeat until the walk- ing belt is properly tightened. 21
-
 1
1 -
 2
2 -
 3
3 -
 4
4 -
 5
5 -
 6
6 -
 7
7 -
 8
8 -
 9
9 -
 10
10 -
11
-
12
-
13
-
14
 |
 |