ProForm 1500 Sel User Manual - Page 7
Assembly
 |
View all ProForm 1500 Sel manuals
Add to My Manuals
Save this manual to your list of manuals |
Page 7 highlights
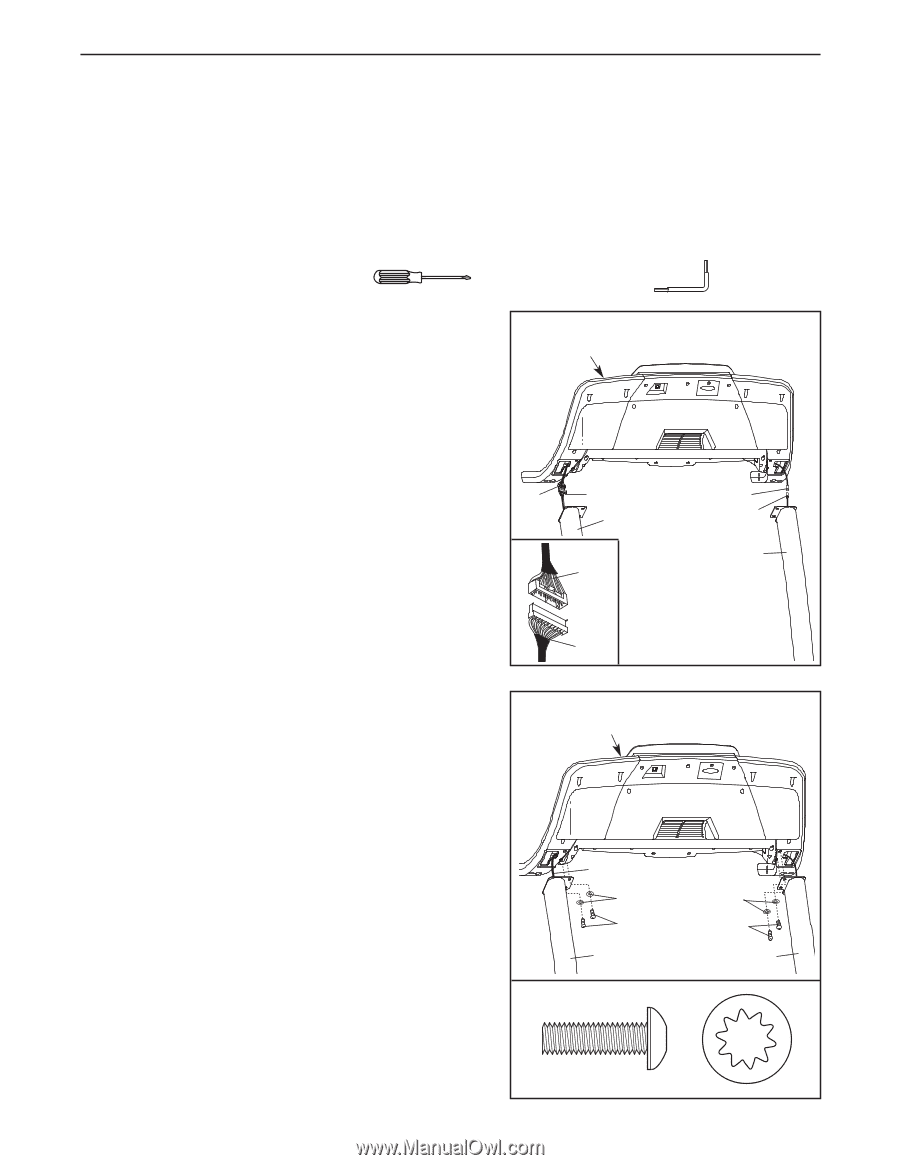
ASSEMBLY To hire an authorized service technician to assemble the treadmill, call toll-free 1-800-445-2480. Assembly requires two persons. Place the treadmill in a cleared area and remove all packing materials. Do not dispose of the packing materials until the treadmill is assembled. Note: The underside of the treadmill walking belt is coated with high-performance lubricant. During shipping, a small amount of lubricant may be transferred to the top of the walking belt, the sides of the walking platform, or the shipping carton. This does not affect treadmill performance. If there is lubricant on top of the walking belt or on the sides of the walking platform, wipe off the lubricant with a soft cloth and a mild, non-abrasive cleaner. Assembly requires a phillips screwdriver and the included allen wrench . 1. With the help of a second person, carefully raise the Uprights (65) to a vertical position. Have the second person hold the console assembly near the Uprights (65) as shown. Look under the console assembly and locate the Console Wire Harness (71) and the TV cable. Cut the plastic ties securing the Upright Wire Harness (85) and the Upright TV Cable (100) to the Uprights (65). Connect the Upright TV Cable to the TV cable in the console assembly. Connect the Upright Wire Harness to the Console Wire Harness (71). Make sure to connect the connectors properly (see the inset drawing). The connectors should slide together easily and snap into place. If the connectors do not slide together easily and snap into place, turn one connector and try again. IF THE CONNECTORS ARE NOT CONNECTED PROPERLY, THE CONSOLE MAY BE DAMAGED WHEN THE POWER IS TURNED ON. 1 Console Assembly 71 85 65 71 85 TV Cable 100 65 2. Insert the slack in the Wire Harnesses (71, 85) and the TV cable into the Uprights (65). Set the console assembly on the Uprights (65). While a second person holds the console assembly, attach the console assembly with four 1" Console Bolts (133) and four Console Washers (69) as shown. Firmly tighten the Console Bolts. 2 Console Assembly 71, 85 69 133 65 69 133 65 69 133 7
-
 1
1 -
 2
2 -
 3
3 -
 4
4 -
 5
5 -
 6
6 -
 7
7 -
 8
8 -
 9
9 -
 10
10 -
 11
11 -
 12
12 -
13
-
14
-
15
-
16
-
17
-
18
-
19
-
20
-
21
-
22
-
23
-
24
-
25
-
26
-
27
-
28
-
29
-
30
 |
 |