ProForm 345 Zlx Bike Uk Manual - Page 7
Attach the Rear Stabilizer 3 to the Frame 1
 |
View all ProForm 345 Zlx Bike manuals
Add to My Manuals
Save this manual to your list of manuals |
Page 7 highlights
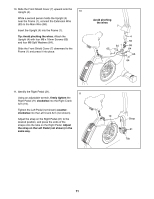
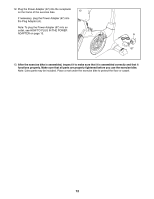
2. Set a sturdy piece of packing material under the rear of the Frame (1). Have a second person 2 hold the Frame to prevent it from tipping while you complete this step. Identify the Rear Stabilizer (3). Note: The Front Stabilizer (not shown) has wheels. Orient the Rear Stabilizer (3) so that the welded tubes are facing away from the Frame (1). Attach the Rear Stabilizer (3) to the Frame (1) with two M10 x 95mm Screws (53). Remove the packing material. 53 3 1 Welded Tubes 3. Set a sturdy piece of packing material under the front of the Frame (1). Have a second person 3 hold the Frame to prevent it from tipping while you complete this step. Orient the Front Stabilizer (2) so that the wheels are facing away from the Frame (1). Attach the Front Stabilizer (2) to the Frame (1) with two M10 x 95mm Screws (53). Remove the packing material. Wheel 2 53 1 7
-
 1
1 -
 2
2 -
 3
3 -
 4
4 -
 5
5 -
 6
6 -
 7
7 -
 8
8 -
 9
9 -
 10
10 -
 11
11 -
 12
12 -
13
-
14
-
15
-
16
-
17
-
18
-
19
-
20
-
21
-
22
-
23
-
24
-
25
-
26
-
27
-
28
 |
 |
