ProForm 360 P Instruction Manual - Page 7
How To Lower The Treadmill For Use
 |
View all ProForm 360 P manuals
Add to My Manuals
Save this manual to your list of manuals |
Page 7 highlights
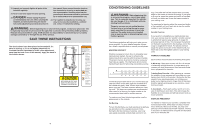
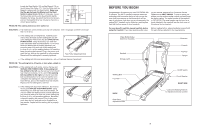
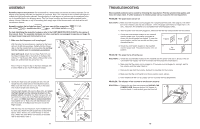
HOW TO LOWER THE TREADMILL FOR USE 1. Hold the upper end of the treadmill with your right hand as shown. Using your left hand, pull the latch knob to the left and hold it. Pivot the treadmill down until the frame is past the latch pin. Slowly release the latch knob. 2. Hold the treadmill firmly with both hands, and lower the treadmill to the floor. Do not drop the treadmill frame to the floor. To decrease the possibility of injury, bend your legs and keep your back straight. Latch Knob 14 3. With the help of a second person, raise the Uprights (25, 3 29) to the vertical position. Open part bag B. Set the Crossbar (40) on the brackets on the Uprights (25, 29). Attach the Crossbar with two Crossbar Screws (39). Do not tighten the Crossbar Screws yet. 40 39 25 39 29 4. Identify the Right Handrail (72), which has a large hole in 4 the left side. Feed the Wire Harness (42) up into the bracket on the Right Handrail and out of the large hole in the left side. (Note: It may be helpful to use needlenose pliers to pull the Wire Harness out of the hole.) Press a Handrail Cap (76) onto the lower end of the Right Handrail as shown. Remove any nylon ties from the bracket. Insert the bracket on the Right Handrail (72) into the top of the Right Upright (29) so the Handrail Cap (76) is resting against the Upright as shown. Attach the Right Handrail and the Handrail Cap with three 1" Bolts (37) and two Washers (38) as shown. Do not tighten the Bolts yet. Attach the left Handrail (not shown) in the same way. 42 Large Hole Bracket 72 37 37 38 38 37 29 76 5. Open part bag C. Attach the end of the ground wire to 5 the small hole in the side of the Right Handrail (72) with a Silver Ground Screw (75). Attach the Storage Latch (36) to the Left Upright (25) with two 3/4" Screws (2). Remove the Latch Knob (30) from the Latch Pin (35). Make sure that the Latch Pin Collar (33) and the Spring (32) are on the Latch Pin. Insert the Latch Pin into the Storage Latch (36), and then tighten the Latch Knob 30 back onto the Latch Pin. 2 25 Large Hole 33 32 35 Ground Wire 75 72 7
-
 1
1 -
 2
2 -
 3
3 -
 4
4 -
 5
5 -
 6
6 -
 7
7 -
 8
8 -
 9
9 -
 10
10 -
 11
11 -
 12
12
 |
 |
