ProForm 405s Instruction Manual - Page 7
How To Fold And Move The Treadmill, Operation And Adjustment, Danger
 |
View all ProForm 405s manuals
Add to My Manuals
Save this manual to your list of manuals |
Page 7 highlights
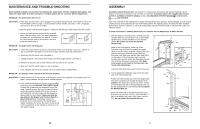
HOW TO SELECT KILOMETRES AND MILES The console can display distance and speed in either kilometres or miles. To change the unit of measurement, first UNPLUG THE POWER CORD. Next, remove the six screws attaching the console to the console base. Lift the console a few inches, being careful not to pull on the wires, and turn the console over. Locate the small switch on the back of the console. Move the switch upward or downward to select kilometres or miles. Re-attach the console to the console base. After changing the unit of measurement, remove one of the batteries from the console for about five seconds and then reinsert it. This will reset the console. Console Screws Screws Console Base Switch HOW TO FOLD AND MOVE THE TREADMILL HOW TO FOLD THE TREADMILL FOR STORAGE Before folding the treadmill, unplug the power cord. CAUTION: You must be able to safely lift 20 kg (45 lbs.) in order to raise, lower, or move the treadmill. 1. Hold the treadmill with your hands in the locations shown at the right. To decrease the possibility of injury, bend your legs and keep your back straight. As you raise the treadmill, make sure to lift with your legs rather than your back. Raise the treadmill about halfway to the vertical position. 2. Move your right hand to the position shown at the right, and hold the treadmill firmly. Raise the treadmill until the storage latch locks over the frame guide. Make sure that the storage latch closes fully over the frame guide. To protect the floor or carpet from damage, place a mat under the treadmill. Keep the treadmill out of direct sunlight. Do not leave the treadmill in the storage position in temperatures above 30° C (85° F). 10 Storage Latch Frame Guide Closed OPERATION AND ADJUSTMENT THE PERFORMANT LUBETM WALKING BELT Your treadmill features a walking belt coated with PERFORMANT LUBETM, a high-performance lubricant. IMPORTANT: Never apply silicone spray or other substances to the walking belt or the walking platform. Such substances will deteriorate the walking belt and cause excessive wear. HOW TO PLUG IN THE POWER CORD 1 This product must be earthed. If it should malfunction or break down, earthing provides a path of least resistance for electric current to reduce the risk of electric shock. This product is equipped with a cord having an equipment-earthing conductor and an earthing plug. Socket on treadmill Two power cords are included. Select the one that will fit your outlet. Refer to drawing 1, and plug the indicated end of the power cord into the socket on the treadmill. Refer to drawing 2. Plug the power cord 2 into an appropriate outlet that is properly installed and earthed in accordance with all local codes and ordinances. Note: In Italy, an adap- tor (not included) must be used between the power cord and the outlet. Important: The treadmill is not compatible with GFCI-equipped outlets. Outlet DANGER: Improper connection of the equipment-earthing conductor can result in an increased risk of electric shock. Check with a qualified electrician or serviceman if you are in doubt as to whether the product is properly earthed. Do not modify the plug provided with the product-if it will not fit the outlet, have a proper outlet installed by a qualified electrician. 7
-
 1
1 -
 2
2 -
 3
3 -
 4
4 -
 5
5 -
 6
6 -
 7
7 -
 8
8 -
 9
9 -
 10
10
 |
 |
