ProForm 480pi English Manual - Page 9
Note: Any time
 |
View all ProForm 480pi manuals
Add to My Manuals
Save this manual to your list of manuals |
Page 9 highlights
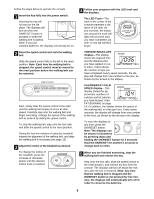
Follow the steps below to operate the console. 1 Insert the key fully into the power switch. Inserting the key will not turn on the displays. The displays will turn on when the ON/RESET button is pressed or when the walking belt is started. Note: If you just installed batteries, the displays will already be on. 2 Reset the speed control and start the walking belt. Slide the speed control fully to the left to the reset position. Note: Each time the walking belt is stopped, the speed control must be moved to the reset position before the walking belt can be restarted. Next, slowly slide the speed control to the right until the walking belt begins to move at slow speed. Carefully step onto the walking belt and begin exercising. Change the speed of the walking belt as desired by sliding the speed control. To stop the walking belt, step onto the foot rails and slide the speed control to the reset position. During the first few minutes of using the treadmill, inspect the alignment of the walking belt, and align the walking belt if necessary (see page 13). 3 Adjust the incline of the treadmill as desired. To change the incline of the treadmill, press the increase or decrease button until the desired incline level is reached. 4 Follow your progress with the LED track and the displays. The LED Track-The track in the center of the console represent a distance of 1/4 mile. As you exercise, the indicators around the track will light one at a time until you have completed 1/4 mile. A new lap will then begin. TIME/DISTANCE/LAPS display-This display Arrow shows the elapsed time and the distance that you have walked or run, in miles. It also shows the number of laps you have completed. Every seven seconds, the dis- play will change from one number to the next, as shown by the arrows in the display. CALORIES/FAT CALS/ SPEED display-This Arrow display shows the ap- proximate numbers of calories and fat calories you have burned. (See FAT BURNING on page 14.) In addition, the display shows the speed of the walking belt, in miles per hour. Every seven seconds, the display will change from one number to the next, as shown by the arrows in the display. To reset the displays at any time, press the ON/RESET button. Note: The displays can be shown in kilometers by pressing down and holding the ON/RESET button for 5 seconds. Hold the ON/RESET for another 5 seconds to change back to miles. 5 When you are finished exercising, stop the walking belt and remove the key. Step onto the foot rails, slide the speed control to the reset position, and remove the key from the console. The displays will turn off about five minutes after the key is removed. Note: Any time that the walking belt is stopped and the ON/RESET button is not pressed for five minutes, the displays will automatically turn off in order to conserve the batteries. 9
-
 1
1 -
2
-
3
-
 4
4 -
 5
5 -
 6
6 -
 7
7 -
 8
8 -
 9
9 -
 10
10 -
 11
11 -
 12
12 -
 13
13 -
 14
14 -
15
-
16
-
17
-
18
-
19
 |
 |
