ProForm 525xt English Manual - Page 8
olltowtn, speed
 |
View all ProForm 525xt manuals
Add to My Manuals
Save this manual to your list of manuals |
Page 8 highlights
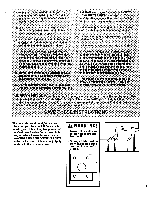
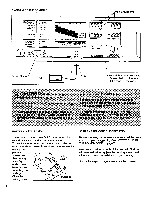
DIAGRAM OF THE CONSOLE Monitor Displays Performance FAST 20 30 40 50 60 70 80 AGE Warm-up Cool-down TRAINING ZONES STEP 1 IN Y RESET SPEED SLOW SPEED rt I I 110 AEROBIC MAX. FAT 00 FAT BURN HEART RATE TRAINING ZONES A WARNING: •it"kyft.. • Do oat *rod oo osJlong siortig Imola. • RoodLW,Avoid end 610.uszonilos end insormlicro. • Keep Bud. offMoronic conooio. SET SPEED POWER 0 ON OFF A V u'nLoe.ou TI. B MPH jry LI.-I SPEED C LI DI • TANCE 0 0 Ll CALS./ FAT CALS. / PULSE ON / RESET nrooFrrxr: ROI mow • g 7::°:117 For bon mull.. bold OM. Speed Control Clip Key Note: If there is a thin sheet of clear plastic on the face of the console, remove it. r Dpa a olltowtn teeautto US speed tISMalt lirnclramerts tr nirt t mat ed best ta n inateinfanna pfed U 0" *stint!' 00 $ Yettt 0 nniV. ealet w BATTERY INSTALLATION STEP BY STEP CONSOLE OPERATION The console requires three "AA" batteries (not in- cluded). Alkaline batteries are recommended. To install batteries, open the battery cover under the console as shown below. Press three batteries into the battery com- partment. Make sure that the neg- Battery Cover ative (-) ends of the batteries are touching the springs. Close the Batteries battery cover. Before operating the console, make sure that the power cord is properly plugged in. (See HOW TO PLUG IN THE POWER CORD on page 7.) Next, step onto the foot rails of the treadmill. Find the clip attached to the key (see the drawing above), and slide the clip onto the waistband of your clothing. Follow the steps on page 9 to operate the console. 8
-
 1
1 -
2
-
 3
3 -
 4
4 -
 5
5 -
 6
6 -
 7
7 -
 8
8 -
 9
9 -
 10
10 -
 11
11 -
 12
12 -
 13
13 -
14
-
15
-
16
-
17
-
18
-
19
 |
 |
