ProForm 570 Crosswalk Treadmill English Manual - Page 24
Unplug The Power Cord. If
 |
View all ProForm 570 Crosswalk Treadmill manuals
Add to My Manuals
Save this manual to your list of manuals |
Page 24 highlights
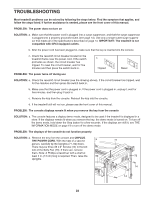
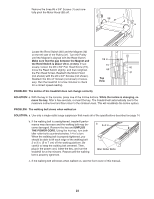
PROBLEM: The walking belt is off-center or slips when walked on SOLUTION: a. If the walking belt is off-center, first remove the key and UNPLUG THE POWER CORD. If the a walking belt has shifted to the left, use the hex key to turn the left idler roller bolt clockwise 1/2 of a turn; if the walking belt has shifted to the right, turn the idler roller bolt counterclockwise 1/2 of a turn. Be careful not to overtighten the walking belt. Then, plug in the power cord, insert the key, and run the treadmill for a few minutes. Repeat until the walking belt is centered. b. If the walking belt slips when walked on, first re- move the key and UNPLUG THE POWER CORD. b Using the hex key, turn both idler roller bolts clock- wise, 1/4 of a turn. When the walking belt is cor- rectly tightened, you should be able to lift each edge of the walking belt 2 to 3 in. (5 to 7 cm) off the walking platform. Be careful to keep the walk- ing belt centered. Then, plug in the power cord, in- sert the key, and carefully walk on the treadmill for a few minutes. Repeat until the walking belt is properly tightened. PROBLEM: The crosswalk arms squeak during use SOLUTION: a. (Note: Correcting this problem requires a small amount of white ma- a rine grease, available at hardware stores.) Remove the Resistance Knob (88) from the resistance as- sembly. Remove the resistance as- sembly from the Left Upright (77) or 88 the Right Upright (92). Apply a small amount of grease around the Resistance Cone (85). Insert the resistance assembly into the Left Upright (77) or the Right Upright (92). Then, tighten the Resistance Knob (88) onto resistance assembly. 77 92 85 Resistance Assembly 24
-
 1
1 -
2
-
3
-
4
-
5
-
6
-
7
-
8
-
9
-
10
-
11
-
12
-
13
-
14
-
15
-
16
-
17
-
18
-
 19
19 -
 20
20 -
 21
21 -
 22
22 -
 23
23 -
 24
24 -
 25
25 -
 26
26 -
 27
27 -
 28
28 -
 29
29 -
30
-
31
-
32
 |
 |
