ProForm 785 Space Saver Instruction Manual - Page 9
Operation And Adjustment, Danger
 |
View all ProForm 785 Space Saver manuals
Add to My Manuals
Save this manual to your list of manuals |
Page 9 highlights
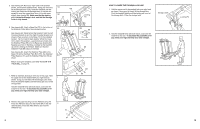
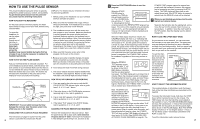
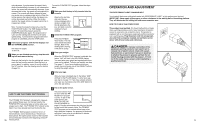
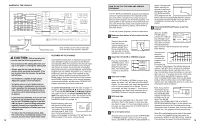
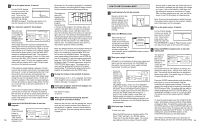
cally decrease; if you decrease the speed, the incline will automatically increase. If you increase the incline, the speed will automatically decrease; if you decrease the incline, the speed will automatically increase. The console will always attempt to keep your pulse near a predetermined setting. When the incline reaches the highest setting, the speed cannot be decreased any further. When the incline reaches the lowest setting, the speed cannot be increased any further. Note: To stop the program temporarily, press the START/PAUSE button. The TIME display will begin to flash. To restart the program, press the START/PAUSE button again. The program will resume and the walking belt will return to the latest speed setting. To terminate the program before the program is completed, press the STOP button. 7 Follow your progress with the five displays and the TRAINING ZONE monitor. See step 8 on pages 12 and 13. 8 When you are finished exercising, stop the walking belt and remove the key. Step onto the foot rails, stop the walking belt, and remove the key from the console. Store the key in a secure place. In addition, move the on/off switch to the ÒoffÓ position. (See the drawing near the bottom of page 10.) To use the FITNESS TEST program, follow the steps below. 1 Make sure that the key is fully inserted into the console. Stand on the foot rails and insert the key. Various displays and indicators will light. Find the clip attached to the key, and slide it onto the waistband of your clothing. 2 Select the FITNESS TEST program. Press the FITNESS TEST button. The indicator beside the button will light. Note: If the walking belt is moving, it will slow to a stop. C FITNESS TEST D W 3 Enter your weight. When the FITNESS TEST program is selected, the letters ÒLbSÓ will flash in the CALORIES display. You must enter your weight and age before this program can be started. To enter your weight, see step 3 on page 11. If you have already entered your weight, you must press one of the WEIGHT buttons to verify the weight setting. 4 Enter your age. After you have completed step 3, the letters ÒAGEÓ will flash in the PULSE display. To enter your age, see step 4 on page 11. If you have already entered your age, you must press one of the AGE buttons to verify the age setting. 5 Put on the pulse sensor. HOW TO USE THE FITNESS TEST PROGRAM The FITNESS TEST program is designed to measure your relative fitness level. For the best results, the FITNESS TEST should be taken at a time when your energy level is high. The FITNESS TEST should not be taken if you have already exercised during the day. The FITNESS TEST program consists of seven 4minute periods, and is followed by a 2-minute cooldown period. The speed and/or incline of the treadmill will automatically increase at the beginning of each 416 minute period. The pulse sensor must be worn when the FITNESS TEST program is used. To put on the pulse sensor, see HOW TO USE THE PULSE SENSOR on page 8. Plug the pulse sensor wire fully into the jack on the front of the console. Note: The FITNESS TEST program can be started without your pulse being detected; however, the program will automatically stop if your pulse is not detected 4 minutes after the program is started. OPERATION AND ADJUSTMENT THE PERFORMANT LUBETM WALKING BELT Your treadmill features a walking belt coated with PERFORMANT LUBETM, a high-performance lubricant. IMPORTANT: Never apply silicone spray or other substances to the walking belt or the walking platform. They will deteriorate the walking belt and cause excessive wear. HOW TO PLUG IN THE POWER CORD This product must earthed. If it should malfunction or break down, earthing provides a path of least resistance for electric current to reduce the risk of electric shock. This product is equipped with a cord having an equipment-earthing conductor and a earthing plug. Plug the power cord into an appropriate outlet that is properly installed and earthed in accordance with all local codes and ordinances. DANGER: Improper connection of the equipment-earthing conductor can result in an increased risk of electric shock. Check with a qualified electrician or serviceman if you are in doubt as to whether the product is properly earthed. Do not modify the plug provided with the productÑif it will not fit the outlet, have a proper outlet installed by a qualified electrician. FUSED 9
-
 1
1 -
2
-
3
-
 4
4 -
 5
5 -
 6
6 -
 7
7 -
 8
8 -
 9
9 -
 10
10 -
 11
11 -
 12
12 -
 13
13 -
 14
14
 |
 |