ProForm Crosswalk Caliber11 Treadmill English Manual - Page 7
Attach the Latch Assembly 110 to the Left Upright
 |
View all ProForm Crosswalk Caliber11 Treadmill manuals
Add to My Manuals
Save this manual to your list of manuals |
Page 7 highlights
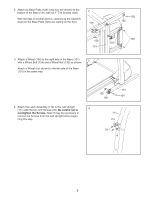
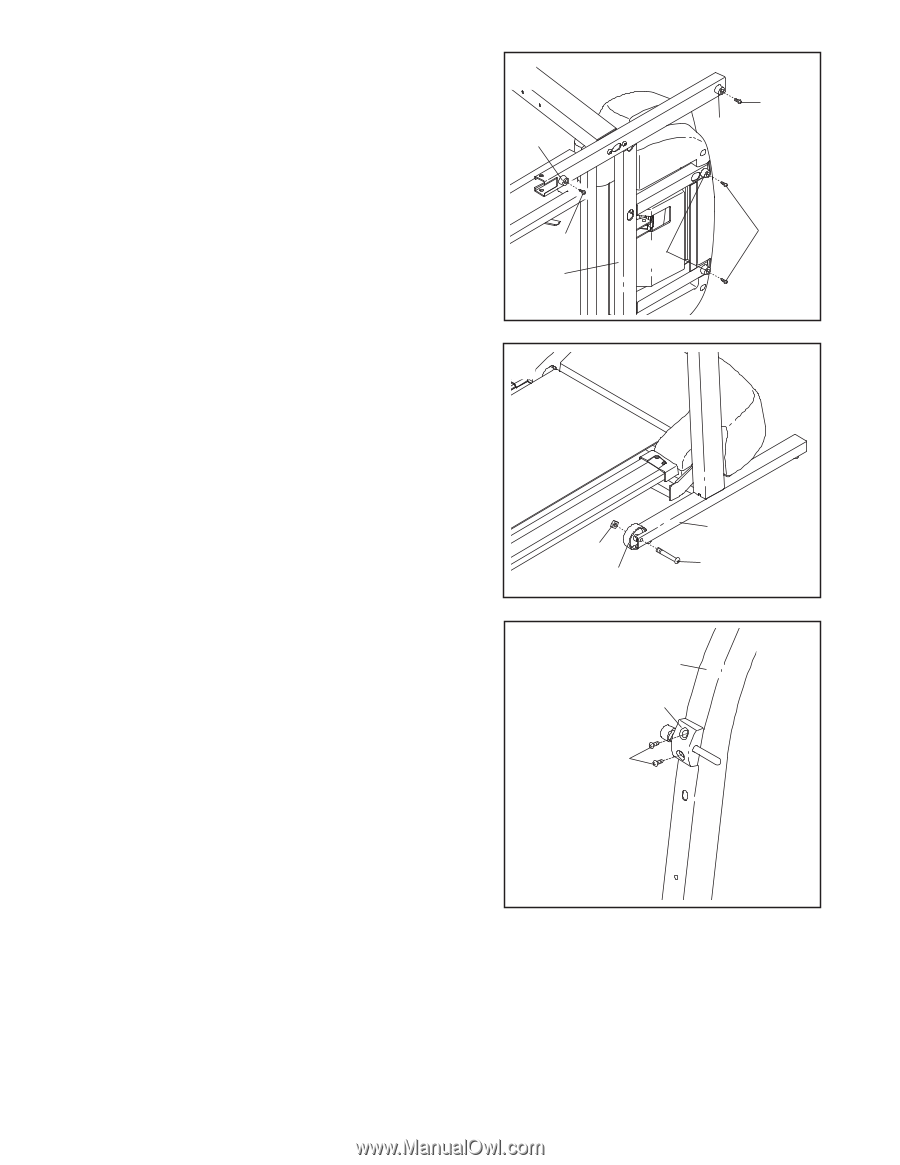
2. Attach six Base Pads (125) (only four are shown) to the bottom of the Base (131) with six 1" Tek Screws (126). With the help of another person, carefully tip the treadmill down so the Base Pads (125) are resting on the floor. 2 125 126 125 126 126 125 131 3. Attach a Wheel (136) to the right side of the Base (131) 3 with a Wheel Bolt (134) and a Wheel Nut (135) as shown. Attach a Wheel (not shown) to the left side of the Base (131) in the same way. 135 136 131 134 4. Attach the Latch Assembly (110) to the Left Upright (111) with the two 3/4" Screws (33). Be careful not to 4 overtighten the Screws. Note: It may be necessary to remove the Screws from the Left Upright before begin- ning this step. 111 110 33 7
-
 1
1 -
 2
2 -
 3
3 -
 4
4 -
 5
5 -
 6
6 -
 7
7 -
 8
8 -
 9
9 -
 10
10 -
 11
11 -
 12
12 -
13
-
14
-
15
-
16
-
17
-
18
-
19
-
20
-
21
-
22
-
23
-
24
-
25
-
26
-
27
-
28
-
29
-
30
-
31
-
32
-
33
-
34
 |
 |
7
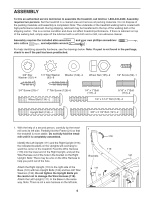
2.
Attach six Base Pads (125) (only four are shown) to the
bottom of the Base (131) with six 1” Tek Screws (126).
With the help of another person, carefully tip the treadmill
down so the Base Pads (125) are resting on the floor.
131
125
125
125
126
126
126
2
3.
Attach a Wheel (136) to the right side of the Base (131)
with a Wheel Bolt (134) and a Wheel Nut (135) as shown.
Attach a Wheel (not shown) to the left side of the Base
(131) in the same way.
136
135
134
131
4.
Attach the Latch Assembly (110) to the Left Upright
(111) with the two 3/4” Screws (33).
Be careful not to
overtighten the Screws.
Note: It may be necessary to
remove the Screws from the Left Upright before begin-
ning this step.
110
111
33
3
4