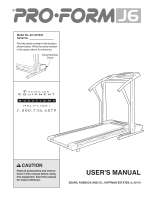
ProForm J6 Treadmill English Manual - Page 6
Attach the Console Base 87 to the Left and Right
 |
View all ProForm J6 Treadmill manuals
Add to My Manuals
Save this manual to your list of manuals |
Page 6 highlights
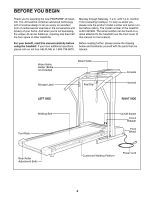
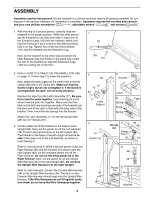
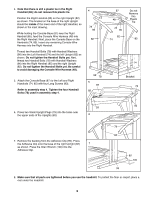
4. Note that there is still a plastic tie in the Right Handrail (85); do not remove this plastic tie. Position the Right Handrail (85) on the right Upright (82) as shown. The bracket on the base of the right Upright should be inside of the lower end of the right Handrail, as shown in the inset drawing. While holding the Console Base (87) near the Right Handrail (85), feed the Console Wire Harness (48) into the Right Handrail. Next, place the Console Base on the Handrails (74, 85). Insert any remaining Console Wire Harness into the Right Handrail. Thread two Handrail Bolts (78) with Handrail Washers (96) into the Left Handrail (74) and the left Upright (82) as shown. Do not tighten the Handrail Bolts yet. Next, thread two Handrail Bolts (78) with Handrail Washers (96) into the Right Handrail (85) and the right Upright (82). Do not tighten the Handrail Bolts yet. Be careful to avoid damaging the Console Wire Harness (48). 5. Attach the Console Base (87) to the Left and Right Handrails (74, 85) with four Long Screws (93). Refer to assembly step 4. Tighten the four Handrail Bolts (78) used in assembly step 4. 4 78 96 82 96 78 5 87 85 87 48 78 96 82 74 Do not Remove this Plastic Tie 85 74 Bracket 74 93 93 6. Press two Small Upright Plugs (79) into the holes near the upper ends of the Uprights (82). 6 7. Remove the backing from the Adhesive Clip (99). Press the Adhesive Clip onto the base of the right Upright (82) 7 as shown. Press the Allen Wrench (100) into the Adhesive Clip. 79 82 82 100 99 8. Make sure that all parts are tightened before you use the treadmill. To protect the floor or carpet, place a mat under the treadmill. 6
-
 1
1 -
 2
2 -
 3
3 -
 4
4 -
 5
5 -
 6
6 -
 7
7 -
 8
8 -
 9
9 -
 10
10 -
 11
11 -
 12
12 -
13
-
14
-
15
-
16
-
17
-
18
 |
 |
