ProForm Style 8500 Treadmill Uk Manual - Page 7
Extension Leg Bolts 64 with two Star Washers
 |
View all ProForm Style 8500 Treadmill manuals
Add to My Manuals
Save this manual to your list of manuals |
Page 7 highlights
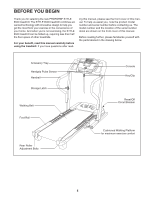
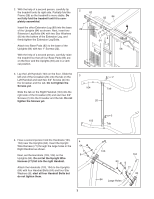
2. With the help of a second person, carefully tip 2 the treadmill onto its right side. Partially fold the 82 Frame (58) so the treadmill is more stable. Do not fully fold the treadmill until it is com- pletely assembled. 82 84 Insert the other Extension Leg (89) into the base of the Uprights (84) as shown. Next, insert two 22 Extension Leg Bolts (64) with two Star Washers (8) into the bottom of the Extension Leg, and firmly tighten the Extension Leg Bolts. . Attach two Base Pads (82) to the base of the Uprights (84) with two 1" Screws (22). 8 64 89 58 With the help of a second person, carefully raise the treadmill so that all four Base Pads (82) are on the floor and the Uprights (84) are in a vertical position. 3. Lay the Left Handrail (103) on the floor. Slide the left end of the Crossbar (20) onto the tab on the Left Handrail and start two 3/4" Screws (2) into the Crossbar and the tab. Do not tighten the Screws yet. Slide the tab on the Right Handrail (104) into the right side of the Crossbar (20) and start two 3/4" Screws (2) into the Crossbar and the tab. Do not tighten the Screws yet. 3 104 20 2 Tab 2 103 Tab 4. Have a second person hold the Handrails (103, 4 104) near the Uprights (84). Insert the Upright Wire Harness (77) through the large holes in the 64 Right Handrail as shown. Next, set the Handrails (103, 104) on the 8 Uprights (84). Do not let the Upright Wire Harness (77) fall into the right Handrail. Attach the Handrails (103, 104) to the Uprights (84) with four Handrail Bolts (64) and four Star Washers (8); start all four Handrail Bolts but do not tighten them. 7 103 104 64 8 77 84 84 Large Holes
-
 1
1 -
 2
2 -
 3
3 -
 4
4 -
 5
5 -
 6
6 -
 7
7 -
 8
8 -
 9
9 -
 10
10 -
 11
11 -
 12
12 -
13
-
14
-
15
-
16
-
17
-
18
-
19
-
20
-
21
-
22
-
23
-
24
-
25
-
26
-
27
-
28
-
29
-
30
-
31
-
32
-
33
-
34
-
35
-
36
 |
 |
