ProForm Xp 130 Elliptical English Manual - Page 9
Next, slide an M8 Washer 88 and a Pedal Leg Cover
 |
View all ProForm Xp 130 Elliptical manuals
Add to My Manuals
Save this manual to your list of manuals |
Page 9 highlights
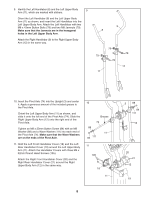
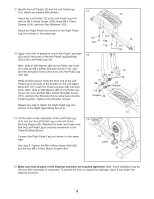
12. Identify the Left Pedal (13) and the Left Pedal Leg (14), which are marked with stickers. 12 13 Attach the Left Pedal (13) to the Left Pedal Leg (14) with an M4 x 45mm Screw (108), three M4 x 14mm Screws (104), and four Star Washers (112). Attach the Right Pedal (not shown) to the Right Pedal Leg (not shown) in the same way. 112 104 13. Apply a thin film of grease to one of the Pedal Leg Axles 13 (32) and to the faces of the two Pedal Leg Bushings (33) in the Left Pedal Leg (14). 112 108 112 14 112 104 Next, slide an M8 Washer (88) and a Pedal Leg Cover (31) onto an M8 x 23mm Shoulder Screw (115), and turn the Shoulder Screw a few turns into the Pedal Leg Axle (32). While another person holds the front end of the Left Pedal Leg (14) inside of the bracket on the Left Upper Body Arm (11), insert the Pedal Leg Axle (32) into both parts. Next, slide an M8 Washer (88) and a Pedal Leg Cover (31) onto another M8 x 23mm Shoulder Screw (115), and turn the Shoulder Screw a few turns into the Pedal Leg Axle. Tighten both Shoulder Screws. 11 31 88 88 31 12 115 33 Grease 115 Grease 32 Repeat this step to attach the Right Pedal Leg (not shown) to the Right Upper Body Arm (12). 14 14. Lift the latch on the underside of the Left Pedal Leg (14), and set the Left Pedal Leg on the left Crank 14 Bushing Sleeve (43). Release the lever, and make sure that the Left Pedal Leg is securely connected to the Crank Bushing Sleeve. Connect the Right Pedal Leg (not shown) in the same way. See step 5. Tighten the M8 x 69mm Button Bolt (80) and the two M8 x 23mm Button Screws (84). 14 Latch 43 15. Make sure that all parts of the elliptical exerciser are properly tightened. Note: Some hardware may be left over after assembly is completed. To protect the floor or carpet from damage, place a mat under the elliptical exerciser. 9
-
 1
1 -
2
-
3
-
 4
4 -
 5
5 -
 6
6 -
 7
7 -
 8
8 -
 9
9 -
 10
10 -
 11
11 -
 12
12 -
 13
13 -
 14
14 -
15
-
16
-
17
-
18
-
19
-
20
-
21
-
22
-
23
-
24
-
25
-
26
-
27
-
28
 |
 |
