Pyle HURVBTR36RD Instruction Manual - Page 6
Workout Reccomendations, Setup
 |
View all Pyle HURVBTR36RD manuals
Add to My Manuals
Save this manual to your list of manuals |
Page 6 highlights
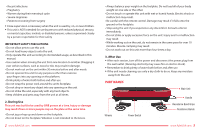
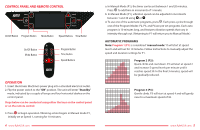
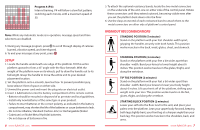
Progmm 4 (P4): Interval training. P4 will follow a slow/fast pattern, switching each minute, with a maximum speed of 30. Note: While any Automatic mode is in operation, massage speed and time selections are disabled. 5. During any massage program, press to scroll through display of calories burned, vibration speed, and time elapsed. 6. To end your massage at any point, press SETUP 1. Locate the handle underneath one edge of the platform. Tilt this entire platform upward to form a 45° angle with the floor beneath. With the weight of the platform now on its wheels, pull to draw the handle out to its full length. Grasp the handle to move the entire unit to your desired placement location. 2. Set the platform onto a smooth, level surface. To prevent possible injury, leave atleast 3 feet of space on either side. 3. Unwind the power cord and insert the plug into an electrical outlet. 4. Insert 2 AAA batteries into the battery compartment of the remote control. • Batteries should be recycled or disposed of as per state and local guidelines. • Install only new batteries of the same type in your product. • Failure to insert batteries in the correct polarity, as indicated in the battery compartment, may shorten the life of the batteries or cause batteries to leak. • Do not mix Alkaline, Standard (Carbon-Zinc) or Rechargeable (Nickel • Cadmium) or (Nickel Metal Hydride) batteries. • Do not dispose of batteries in fire. 6 www.PyleUSA.com 5. To attach the optional resistance bands, locate the two metal connectors on the underside of the unit, one on either side of the control panel. Rotate these connectors until they extend outward, becoming visible even after you set the platform back down onto the floor. 6. Use the clasp at one end of each resistance band to attach them to the metal connectors on either side of platform's control panel. WORKOUT RECCOMENDATIONS STANDING POSITION (5 minutes) Stand on the platform with your feet shoulder-width apart, gripping the handles securely with both hands. This position works muscles in the back, waist, glutes, chest, and stomach. STANDING POSITION (2 minutes) Stand on the platform with your feet a bit wider apart than shoulder -width. Bend your knees to lower height about 6 inches. This position works muscles in the glules, thighs, and along the vertebrae. TIP TOE POSITION (2 minutes) Stand on the platform with your feet a bit wider apart than shoulder -width. Bend your knees to lower your body height about 6 inches. Lift your heels off of the platform, shifting your weight onto your toes. This position works muscles in the feel, glutes, thighs, and along the vertebrae. STARTING BLOCK POSITION (2 minutes) Lower your self onto the floor next to the unit, and place your palms onto the platform. Lean your upper body forward, keeping both legs slightly bent, your front leg at a sharper angle than your back leg. This position works muscles in the shoulders, back, and arms. www.PyleUSA.com 7
-
 1
1 -
 2
2 -
 3
3 -
 4
4 -
 5
5 -
 6
6 -
 7
7 -
 8
8 -
 9
9 -
 10
10
 |
 |
