Pyle PAD20MXU PAD20MXU Manual 1 - Page 3
Applications, Important Notes, Audio Connections, Setting the Mixer into Operation - manual
 |
View all Pyle PAD20MXU manuals
Add to My Manuals
Save this manual to your list of manuals |
Page 3 highlights
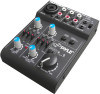
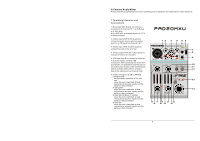
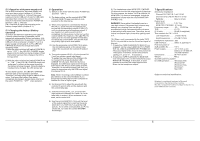
6 Power / Charge L ED ON / CHA RGE not lighting up: du ring battery operation of the unit An d wh en the unit is switched of f and connec ted to a power supply and the batter y is fully char ged shows green: wh en the unit is switched of f and connec ted to a power supply and the batter y is being charged shows red and green (= yellow): when the unit is switched on a nd connected to a powe r supply and the battery is being charg ed shows red: When the unit is s witched on a nd connecte d to a powe r supply and the battery is fully charged 7 Stere o output MA IN OUT (3.5 mm jack) to connect the input of an amplifier or another u nit, e. g. a sec ond mixer 8 POW ER switch 9 Outp ut MONITOR / PHONES ( 3.5 mm jack ) to connec t stereo headphones (minimum impeda nce 16Ω) 10 Volume control MONITOR / PHONES for the headphone output M ONITOR / P HONES (9) 11 Butt on TAPE IN A SSIGN TO M AIN to assi gn the input signal of th e jacks TAPE IN (3) to the outputs MAIN O UT (7), TAPE OUT (4) an d USB (5) 12 Button TAPE IN ASSIGN TO MONITOR to assign the input signal of the jac ks TAPE IN ( 3) instead of the mixed signal to the headphone output MONITOR / P HONES (9) 13 Overload LEDs CLIP for the stereo output signal a djusted with the control MASTER (14) 14 MASTER contro l to set the le vel of the ou tput signal s ent via the outputs MAIN OUT (7), TA PE OUT (4 ) and the USB port (5) 15 Control GAIN for channel CH 1 to set the input amplification 16 High frequency control HI an d low frequency control LO for channel CH 1 17 Control LEVEL for channel C H 1 18 Panorama contr ol PAN for channel CH 1 to place the mono sign al on the ste reo base 19 Level peak LED PK for ch annel CH 1; if at all, should only brief ly light up with level peaks 20 H igh frequency control HI and low frequency control LO for ch annel CH 2 21 C ontrol LEVEL for channel CH 2 22 Stereo balan ce control BAL for channel CH 2 23 Button USB A SSIGN TO CH 2 to assig n the input signal of th e USB port ( 5) to channel CH 2 2 Ap plic atio ns This compact 5-channel audi o mixer with USB interface is suite d for univers al applications, e. g. For audio record ing on the computer. The mono input channel all ows to connect a (phantompow ered) microp hone; the stereo input ch annel allows to connec t an audio so urce with lin e signal leve l. In addition , the mixer is provided with connections for a recorder an d headphones. The mixed signal is s ent to the output via a 3.5 mm jack and the USB port. It is also possible to use the USB port as an input to transfer audio data from the computer to the mixe r. When con necting the mixer to a computer, power is supplied via the USB connection. When operating the mixer with out a computer, either us e a suitable p ower supply unit with USB connect ion or operate the mixer via the inte grated rechargeable lithi umion batt ery. The battery is charge d when the mixer is connected to the power supply via the USB port. 3 Important Notes This unit corresponds to all re levant direc tives of the EU and is the refore marked with . * Th e unit is suit able for indo or use only. P rotect it against dripping water and sp lash water, h igh air hum idity and hea t (admissible ambient temperAtur e range 0 -40° ). * For cleaning only use a dry, soft cloth; n ever use water or chemica lsC. * N o guarantee claims for the unit and no liability for a ny resulting personal damage or material dam age will be a ccepted if th e unit is used for othe r purposes than originally intended, if it is not correctly connected or operated, or if it is not repaired in an ex pert way. If the unit is to be put out of op eration defi nitively, take it to a local recycling plant for a dispo sal whic h is not harmful to the en vironment. If the unit is to be put out of operatio n definiitively ,ta ke it to a loc al recycling p lant for a dispo sal which is not harmful to the environme nt 2 4 Audio Connections Prio r to connection, always turn back the output controls MONITOR / PHONES (10) and M ASTER (14) to "0". 1) The input MIC IN (1) of the mono channel CH 1 allows to conn ect a microphone via XLR plug or 6.3 mm plug. B oth the XLR jack and the 6.3 mm ja ck of the com bined jack are balanced. The XLR jack always supplies a 18 V p hantom pow er and it thus suitable for a condenser microphone oper ated with this phantom p ower. C aution! Do n ot connect a microphone with unbalanced output via XLR plug; it my b e D amaged by the phantom power 2) The input LINE IN (2) of the stereo chan nel CH 2 allows to con nect an audio source with line signal level (e. g. CD playe r) via RCA plugs: L = le ft channel, R = right chan nel. 3) It is possible to use the RCA jacks TAPE IN (3) and OUT (4) to connect a s tereo recorder: --Co nnect the recording outp ut of the reco rder to the input TAPE IN. --Co nnect the recording input of the recor der to the output TAP E OUT;the o utput signal a dju- sted with the MASTER contro l (14) is sent to this outp ut. How ever, it is als o possible to use the jack s for othe r units with line signal lev el, e. g. to co nnect a CD player or MP3 player to TAPE IN or to connect an a mplifier to TA PE OUT. 4) The 3.5 mm ja ck MONITOR / PHONES (9) a llows to conn ect stereo h eadphones ( impedance ≥16Ω). T hus, you will be able to m onitor the ou tput signal adjuste d with the co ntrol MASTER (14) o r the input signal of the ja cks TAPE IN (3) via h eadphones. 5) At the stereo o utput MAIN OUT (7), the output si gnal adjusted with the MA STER contr ol (14) is present. This output allows to connec t e. G. an amplifier or a second mixer via 3.5 mm plug. 6) W hen operating the mixer with a compu ter, it is possible to use the USB po rt (5) for digi tal output of the m ixed signal to the compu ter and fo r feeding dig ital audio da ta to the mixer. To C onnect the port see chapter 5.1. 5 Setting the Mixer into Operation 5.1 Oper ation with a computer When op erating the m ixer with a c omputer, either use the audio softwar e supplied w ith the operating system or a n audio software installe d additiona lly. Various p rograms for audio reprod uction / recording are availab le on the Inte rnet free of charge. 1) Start t he computer. Connect the USB port (5 ) to a USB connection on the computer via the USB cable provided. Sw itch on the m ixer with the switch POWER (8) [position "ON"]. The L ED ON/CHARGE (6) lights up acco rding to the battery charge sta tus (chapter 5.3). The computer recognizes the USB interface of the mixer as an external devi ce for audio input and audio output, e. g. as "USB EarMicrophone", depending on th e operating system. Therequir ed drivers (s tandard drivers of the operating sy stem) are av ailable on th e Comp uter. Note: If not all drivers required are available on the computer, install them, e. g. via the origin al CD of the operating system. Restar t the co mputer after installation, if necessary. 2) Open the reproduction / recording program and make the required settings for audio reprod uction via the mixer o r audio recording from the mixer ( user manual of the prog ram). Then opera te the mixer according to chapter 6. If it is no t possible to record or reproduce any sound, m ake sure to a ctivate the U SB interfac e for audio input or aud io output in thesystem settings of the operat ing system of thecompute r. Hint: If th e mixer is co nnected to a computer a nd to any units earthed v ia their mains cables (e. g. amplifiers), there may be hum noise due to ground lo ops. To eliminate this no ise, connect the mixer to the correspo nding unit via a ground isolator 3
-
 1
1 -
 2
2 -
 3
3 -
 4
4
 |
 |
