Pyle PAD30MXUBT User Manual - Page 3
POWER7[position
 |
View all Pyle PAD30MXUBT manuals
Add to My Manuals
Save this manual to your list of manuals |
Page 3 highlights
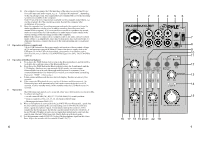
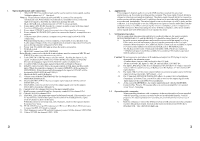
2) The computer recognizes the USB interface of the mixer as an external device for audio input and audio output, e.g. as "USB Ear-Microphone" , depending on the operating system. The required drivers (standard drivers of the operating system) are available on the computer. Note: If not all drivers required are available on the computer, install them, e.g. via the original CD of the operating system. Restart the computer after installation, if necessary. 3) Open the reproduction/ recording program and make the required settings for audio reproduction via the mixer or audio recording from the mixer (user manual of the program). If it is not possible to record or reproduce any sound, make sure to activate the USB interface for audio input or audio output in the System settings of the operating system of the computer. Hint: If the mixer is connected to a computer and to any units earthed via their mains cables (e.g. amplifiers), there may be hum noise due to ground loops. To eliminate this noise, connect the mixer to the corresponding unit via a ground isolator. 3.2 Operation with power supply unit Via its USB connection, the power supply unit must provide an output voltage of 5V and an output current of 500mA. Connect the power supply unit to the USB port (5) via the USB cable provided, then connect it to a mains socket. Switch on the mixer with the switch POWER(7)[position ON]. The LED ON(6) lights up. 3.3 Operation with Bluetooth player a. Press down the PAIR button (12) to turn on the Bluetooth player, and the LED is to display the working status of the Bluetooth player: b. Press down the PAIR button the Bluetooth player into the Search mode and the LED display: flashes every one seconds. In this mode, you can connect Bluetooth devices with your Bluetooth mobile phone or computer ( Note: connect Bluetooth devices below BT3.0 version, you need to enter a matching Password "0000" if Necessity.) c. When connected Bluetooth device, the LED display: flashes twice every five seconds.. d. If the connected Bluetooth devices too far of distance and disconnected, the Bluetooth player will automatically find it and connected the devices in 30 seconds, or enter standby mode. In the standby mode the LED flash every five seconds. 4 Operation The following steps merely serve as an aid, other ways of procedure are also possible. 1) As a basic setting first -set all control GAIN (16), EQ (17, 21), PAN /BAL(19) to mid-position. -Turn all control LEVEL (13, 15, 18, 22) back to the left stop. -Disengage the button PAIR (12) 2) When a microphone is connected to the jack MIC IN (1)or Headset(8), speak into the microphone and turn up the corresponding control LEVEL(I 8) until you obtain a good microphone signal. If you need to turn up the control LEVEL completely for this purpose, further turn up the control GAIN(16). However, if the led PEAK (20)lights up and is not extinguished immediately, turn back the control gain, The led PEAK must only briefly light up with level peaks. 3) Use the panorama control PAN(19) to place the microphone signal on the stereo Base. Adjust the sound with the controls HI and LO (17). 4 2 3 4 5 6 PADB ■ MX BT CH1 IN T YLE-© R sto O • MIC OFF 7 Toro HEADSET ON O 8 XLR=MIC 114"=LINE IN LINE IN 2-TK MAIN MIX MONITOR 9 10 11 GAIN D -60 HIGH LOW PAN +15 +15 L LINE/USB ( FROM •TO ALINE IN ♦MAIN MIX YUSB PLAY ♦PHONE HIGH LOW BAL +15 +15 2-T BT TO ♦MAIN MIX ♦PHONE Bluetooth PAIR MONITOR 12 13 R 15 PEAK MIN MAX 0 0 14 L -CLIP- R 15 MIN MAX CH 1 MIN MAX LINE USB MIN MAIN MIX MAX 16 17 18 19 20 21 22 19
-
 1
1 -
 2
2 -
 3
3 -
 4
4
 |
 |
