Pyle PDCDTP620M PDCDTP620M Manual 1 - Page 5
Cancelled.
 |
View all Pyle PDCDTP620M manuals
Add to My Manuals
Save this manual to your list of manuals |
Page 5 highlights
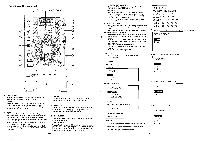
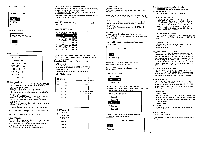
Item5. REMOTE CONTROL REMOTE CONTROL 1. Fader start 2. Tack 3. Lock Item6. PROG TRACK CLEAR PROG TRACK CLEAR 1. NO 2. YES Item7. VERSION VERSION SYS l'EN VER : 002 MCU VER : 001 DSP VER : 001 MP3 VER : 001 OTG VER : 001 HID VER 001 IDE VER : 001 14. Seamless Loop A => A point is able to recorded during PLAY and PAUSE mode. If B Point is recorded, and A point re-set behind Bpoint, B-point will be cleared B/EXIT (1) No function if A-CUE is recorded. (2) As A-CUE is recorded, press B button to complete Loop setting and start looping. Loop Circle and text will be completely show. Press B-Loop/EXIT button as looping, loop stops and A-LED, B-LED, RELOOP-LED stop flashing and remain light on. Press B-loop/EXIT again to reset B point and looping starts again.. (3) A-Point time must be in front the B Point. If A point time sets after B point, B point will be canceled. (4) "mark" shows on the time bar of LCD if B point is set. A, B, RELOOP-LED flashing (1.0Hz) when looping started. (5) Reloop: press the button to restart looping. 15. Edit: A/B point Edit During Looping mode, press Edit to start Edit mode and press NB point for choosing NB point for modification. NB LED flashes faster (4Hz) after Edit button pressed and press NB button to adjust the record point. Press Edit button again to confirm the modification. 16. Track Knob/ Menu selection knob a. In Play/Pause mode: Turn the knob to skip track immediately or press the knob to enter File Select mode. b. In Program/file select mode: Turn the knob to select the tracks and press down the knob to confirm. c. In Menu mode: Turn the knob to select the menu content and press down the knob to confirm. 17. Back Press Back button to back to upper layer or hold 2 seconds back to top layer. CDDA: CD TEXT LIST 1. TRACK1 / CD TEXT 2. TRACK2 / CD TEXT 3. TRACK3 / CD TEXT 4. TRACK4 / CD TEXT 5. TRACKS / CD TEXT 6. TRACK6 / CD TEXT 7. TRACK? / CD TEXT 8. TRACK8 / CD TEXT Turning the Track knob to select track and press down the track knob to confirm the selection. And Display back to, normal play mode. Press Back button to exit the Track select mode. MP3 Mode Turning the Track knob to select track and press down the track knob to confirm the selection. And Display back to normal play mode. Press Back button to exit the Track select mode. MP3 File Structure: ■ ROOT u FOLDER-1 u FOLDER-2 TRACK1 TRACK2 TRACK3 TRACK4 ir• Root Folder Name Folder MP3 files of the selected Folder E FOLDER-2 I I FOLDER-3 u FOLDER-4 u FOLDER-5 TRACK1 I TRACK2 I TRACK3 18. Next Track Preset Next playing track. Under NEXT TRACK mode, playing track will end with cross fade effect and connect with NEXT set track. Press the Next track button to enter the Next track mode, and press NEXT button to confirm the Next playing track selection. Note: i. Press Next or Back button again after Next track is set. Display will shows confirmation message to confirm the operation.. H. Turning the Track button to start play NEXT TRACK immediately 19. Program Program function is working under Pause mode only. Hold the TRACK button during pause mode to store the track into Program list. Press the PROG button during Program Pause mode: Display shows: EXIT PROG PLAY 1. OK! 2. Cancelled. @ Choose OK to confirm to EXIT program mode. @ Or press BACK button to cancel. Press the PROG button during Pause mode, Display shows: PROG Function : 1.PROG LIST 2.Delete PROG 3.Clear All PROG 1. PROG List: Choose to check the program list 2. Delete PROG: Turn the track button to select the track for deleting. Press Back button to cancel. PROG LIST Delete 02 Track 2 10 Track 10 05 Track 5 08 Track 8 16 Track 16 3. Clear All PROG: Choose to clear ALL Program List. Or Press Back button to cancel. Clear All PROG LIST Note: Maximum program number: 99 tracks PROG-FULL shows after 99 tracks are stored. 20. SEARCH BUTTON Press the buttons to Forward / Backward the track 21. KEY ON/OFF SWITCH Press the button to switch KEY mode on or off. • KEY OFF: The display shows the "KEY" in blinking, and the key changed according to the pitch change. The key parameter adjustment is not in effect • KEY ON: The "KEY" lights on the display, turning the SCOPE knob to adjust the key. Slide the pitch slider will also change the key. 22. ON/OFF BUTTON (PITCH) Press the button to be PITCH ON mode, press it again on the PITCH ON mode, and blinks with unit on the PITCH OFF mode. 23. PITCH BUTTON Select the pitch change range from +8%, +16%, +32%, +100%. The playback speed will change when you move the pitch control slider. 24. PITCH BEND + / - BUTTON When each of the two CD players is playing, the pitch bend function allows the position of the bass beat to be matched after the pitch has been adjusted. The pitch will automatically rise up to + 16% from the current setting while pressing the " +, "button. While pressing the " - " button, the pitch will automatically drop to - 16 % from current setting. By the way of changing the pitch the position of the beats can be matched. 25. PITCH CONTROL SLIDER To match the choices of playback speed (8%, 16%, 32%, 100% for CDDA, 8%, 16%, 32% for MP3), you can choose what range you want between minimum (up side) and maximum (bottom side) by moving the pitch control slider. 26. BPM BUTTON You can get the BPM number automatically or manually. Pressing the BPM BUTTON for 3 seconds to switch between auto and manual control. The BEAT will be shown on the display! Under the manual mode, tap this button to get the beat value. 27. JOG WHEEL *Speed Control Rotating the wheel, in play mode, will change the playback speed accordingly. While rotating clockwise, the player speed increase; rotating counterclockwise, the speed decrease. *Scratch Effect 28. SLEEP: Leave the unit unused for 30 minutes; the machine will shut off automatically. 29. Open/Close Press to eject the disc. Note: Disc can't be ejected unless the stop or pause button has been pushed first. 1 OK! 2. cancelled.
-
 1
1 -
 2
2 -
 3
3 -
 4
4 -
 5
5 -
 6
6
 |
 |
