Pyle PDMT02 PDMT02 Manual 1 - Page 2
Operation, Features, Maintenance
 |
View all Pyle PDMT02 manuals
Add to My Manuals
Save this manual to your list of manuals |
Page 2 highlights
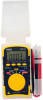
Operation AC or DC Voltage Measurement 1. Set the function switch to the "DCV" position for DC voltage measurements, or "ACV" position for AC voltage measurements. 2. Touch the test probe tips to the circuit under test. Be sure to observe the correct polarity (red lead to positive, black lead to negative). 3. Read the voltage on the display Resistance/Continuity Measurement WARNING: To avoid electric shock, disconnect power to the unit under test and discharge all capacitors before taking any resistance measurements. Remove the batteries and unplug the line cords. Never measure continuity on circuits or wires that have voltage on them. 1. Set the function switch to the position. 2. Connect the test leads to the circuit to be measured. 3. Read the value on the display. 4. For Continuity tests, press the SELECT button until the "•)))" symbol appears in the display. 5. If the resistance is less than 60 ohms, an audible tone will sound. Frequency/Duty Cycle Measurement 1. Set the function switch to the "HZ/DUTY" position. 2. Press the Hz/DUTY button once to display Duty Cycle %. Pressing the button again will toggle the display to frequency (Hz). 3. Touch the test probe tips to the circuit under test. Be sure to observe the correct polarity (red lead to positive, black lead to negative). 4. Read the value on the display. Features Relative Button The relative measurement feature allows you to make measurements relative to a stored reference value. A reference voltage can be stored and measurements made in comparison to that value. The displayed value is the difference between the reference value and the measured value. 1. Perform the measurement as described in the operating instructions. 2. Press the RELATIVE button to store the reading in the display and the "REL" indicator will appear on the display. 3. The display will now indicate the difference between the stored value and the measured value. 4. Press the RELATIVE button to exit the relative mode. Note: The Relative function does not operate in the Frequency function. Maintenance WARNING: Disconnect the test leads from any source of voltage before removing the back cover or the battery/fuse door. Do not operate your meter until the rear housing is in place and fastened securely. Replacing the Battery 1. Remove the rubber holster (if in place) 2. Remove Philips head screw and lift off the rear housing of the meter. 3. Replace old battery with fresh CR2032 type button battery. 4. Replace the rear cover and secure the screw. Capacitance Measurement WARNING: To avoid electric shock, disconnect power to the unit under test and discharge all capacitors before taking any capacitance measurements. Remove the batteries and unplug the line cords. Never measure continuity on circuits or wires that have voltage on them. 1. Set the function switch to the position. 2. Press the SELECT button until "nF" appears in the display. 3. Press the RELATIVE button to zero the display 4. Connect the test leads to the capacitor to be measured. 5. Read the value on the display. Diode Test WARNING: To avoid electric shock, do not test any diode that has voltage on it. 1. Set the function switch to position. 2. Press the SELECT button once to enter Diode Test. The " " symbol will appear in the display. 3. Touch the test probe tips to the diode or semiconductor junction you wish to test. Note the meter reading. 4. Reverse the test lead polarity by reversing the red and black leads. Note this reading. 5. The diode or junction can be evaluated as follows: A. If one reading shows a value and the other reading shows OL, the diode is good. B. If both readings show OL, the device is open. C. If both readings are very small, or 0, the device is shorted Data Hold Button The Data Hold function allows the meter to "freeze" a measurement for later reference 1. Press the "DATA HOLD" button to "freeze" the display, the "HOLD" indicator will appear. 2. Press the "DATA HOLD" button to return to normal operation. Auto Power Off 1. To save power, the display automatically turns off in 30 minutes. 2. Press the SELECT button to turn display back on. 3. To cancel Auto Power Off, set the function switch to the off position. Hold down the SELECT button and turn the function switch to the desired position and release the SELECT button after 3 seconds.
-
 1
1 -
 2
2
 |
 |
