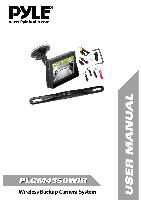
Pyle PLCM4350WIR User Manual - Page 3
System Installation and Wiring, Notes, Quick Installation
 |
View all Pyle PLCM4350WIR manuals
Add to My Manuals
Save this manual to your list of manuals |
Page 3 highlights
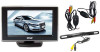
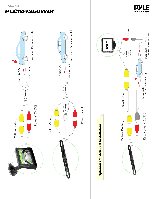
System Installation and Wiring Notes: Camera System installation on different types of vehicles may require slightly different wiring installs. These installation instructions do not apply to all types of vehicles. They are meant only as a general guide due to the large number of vehicle makes and models. Consult your local motor vehicle laws, and installation professional, on the use of this product to be sure it is permitted, and for optimum performance operation. Through installation of this backup camera system, you should be sure as to not degrade, damage or compromise the safety of any system or device on your vehicle. Improper installation and wiring of the vehicle back-up camera system may damage the vehicle's electrical system, including vital vehicle computer and operating systems. That could lead to an accident or fire, causing property damage and /or serious personal injury. It is highly recommended to seek professional installation advice from a qualified auto electrician or, in the alternative, to have the installation performed by a qualified auto electrician. Please ensure that monitor is secured and mounted where it would NOT obstruct any OEM vehicle safety features. In an event of an accident, manufacturer is not responsible for bodily injury caused by the monitor being a projectile. Select location for mounting the monitor in desired location. Ensure monitor location will not obstruct your vision while driving. The manufacturer assumes no liability for damage caused to your vehicle due to improper installation or use. Caution: This unit is designed to operate on a 12V/24V DC NEGATIVE GROUND electrical system. Connecting to other types of electrical systems will cause damage to your vehicle. Please contact the manufacturer if you are unaware of the system type in your vehicle. Quick Installation: The 2.4 G wireless modules come in two parts, labeled as the "Transmitter" and the "Receiver". The transmitter and receiver come equipped with built-in power wiring cables. When installing the transmitter, it should be connected to the camera (the camera is preferably mounted in the rear of the vehicle, just above the license plate). The receiver connects to the included display monitor. This receives the signal from the camera connected to the transmitter. Connect the transmitter's red power wire, of the DC 12V input cable, to the positive 12V reverse tail light in the rear of your car. Then connect the black wire, of the DC 12V input cable, and ground properly. The transmitter then plugs into the camera, and will supply power to the camera directly. Next, connect the yellow RCA Video connector cable to the RCA Video output of the transmitter. Try to run this yellow video cable through the least obtrusive and non-interfering route in your vehicle. The transmitter will automatically broadcast the video signal to the receiver wirelessly once activated (once your vehicle is placed in reverse). Then, grab the other wireless module (receiver) and use the red wire, of its DC 12V input cable, to connect this to your vehicle's fuse panel (preferably to the positive 12V ignition switch voltage) - which will only be powered when your vehicle is on, or activated by key. Then connect the black wire, of the DC 12V input, and ground properly. The receiver should be connected to the monitor, and will supply power to the monitor directly.
-
 1
1 -
 2
2 -
 3
3 -
 4
4 -
 5
5
 |
 |