Pyle PLCM4350WIR User Manual - Page 4
Installation Transcript, Camera Connection, Monitor Connection, Notes
 |
View all Pyle PLCM4350WIR manuals
Add to My Manuals
Save this manual to your list of manuals |
Page 4 highlights
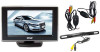
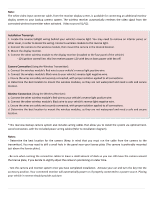
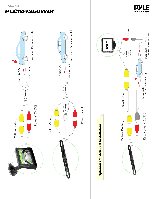
Note: The white video input connector cable, from the monitor display screen, is available for connecting an additional monitor display screen to your backup camera system. The wireless receiver automatically retrieves the video signal from the connected wireless transmitter when activated. Video sources (V1/V2). Installation Transcript: 1. Locate the reverse taillight wiring behind your vehicle's reverse light. You may need to remove an interior panel, or other cover, in order to locate the wiring. Connect a wireless module to the reverse light. 2. Connect the camera to the wireless module, then mount the camera in the desired location. 3. Mount the display monitor. 4. Connect the other wireless module to the display monitor (installed to the fuse panel of the vehicle) - 12V ignition control line, this line receives power 12V with key on loses power with key off. Camera Connection (Using the Wireless Transmitter): a. Connect the wireless module's Red wire to your vehicle's reverse light positive wire. b. Connect the wireless module's Black wire to your vehicle's reverse light negative wire. c. Ensure the wires are safely and securely connected, with proper isolation applied to all connections. d. Determine the best location to mount the wireless modules, as they are not waterproof and need a safe and secure location. Monitor Connection (Using the Wireless Receiver): a. Connect the other wireless module's Red wire to your vehicle's reverse light positive wire. b. Connect the other wireless module's Black wire to your vehicle's reverse light negative wire. c. Ensure the wires are safely and securely connected, with proper isolation applied to all connections. d. Determine the best location to mount the wireless modules, as they are not waterproof and need a safe and secure location. *This rearview backup camera system also includes wiring cables that allow you to install the system via optional hardwired connection, with the included power wiring cables (Refer to installation diagram). Notes: - Determine the best location for the camera (Keep in mind that you must run the cable from the camera to the transmitter). You may need to drill a small hole in the panel near your license plate (The camera is preferably mounted just above the license plate). - Be sure when running the connection cables to leave a small amount of slack so you can still move the camera around the license plate, if you decide to slightly adjust the camera's positioning at a later time. - Test the camera and monitor system once you have completed installation. Activate your car and turn the key into the accessory position. Your connected monitor will automatically power on if properly connected to a power source. Placing your vehicle in reverse should provide a picture.
-
 1
1 -
 2
2 -
 3
3 -
 4
4 -
 5
5
 |
 |