Pyle PLMR90UW User Manual - Page 2
Warning, Care and Maintenance, Mounting - manual
 |
View all Pyle PLMR90UW manuals
Add to My Manuals
Save this manual to your list of manuals |
Page 2 highlights
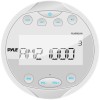
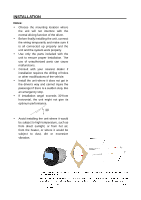
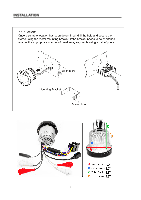
The round-style headunit receiver radio features Bluetooth technology allowing music to wirelessly stream from your compatible Bluetooth-enabled device. Control the audio from a distance -- all from your handheld device. Marine grade waterproof construction makes this unit perfect for upgrading your marine audio system. The input and output connectors allow you to connect external devices and speaker systems for a more convenient and selective listening experience. Warning: It is recommended you seek the assistance of a professional upon installation. Be sure to provide adequate clearance behind the receiver where mounting. Be sure as to avoid obstruction of any existing wires, fuel lines, electronic circuitry or vehicle safety features prior to installation. Make sure to safely and securely prepare the area of installation as to avoid any disruption of your vehicle's mechanical, electrical or safety systems. Choose a mounting location with a flat surface to ensure a flush and water-tight fit. To prevent any interference, distortion or accidental operation -- due to radio frequency waves or extreme temperature, choose a mounting and installation location farthest from the engine compartment. Disconnect the battery to ensure there will be no shorted wires during the installation procedure. Do not submerge the unit in water. Installation of Marine audio components requires experience and expertise with a variety of mechanical and electrical knowledges and practices. This user manual provides basic and general installation and operation instructions for your new marine receiver, it may not show the exact installation methods which may be required for your particular installation. Always consult a professional prior to installation and mounting. Care and Maintenance: Clean the player with a slightly damp, soft cloth using a mild household cleaner. Do not use solvents such as benzene, thinner, or other commercially hazardous chemical cleaners. Be sure to regularly inspect the connections on the rear of the unit for corrosion and correct as needed. Mounting: Choose a mounting location on the dash / instrument panel that will allow room for proper connecting to the power source. Take into consideration how you will use the input connectors, output connectors, USB connector and the antenna jack if necessary. Prepare the area for installation by carefully removing any interior trim panels and obtrusive materials as necessary. Route wire harnesses away from sharp edges, and ensure that no harnesses wire/connector will be pinched or pierced during reassembly. Once a suitable location has been determined, drill the hole and secure the stereo using the included screws and metal mounting U-shape bracket. Cut a hole in the designated area with a diameter of 3.0'' and depth of at least 3.9'' (to accommodate for the bracket mounting hardware and cables/wiring.) Make sure the receiver fits snug into the drilled opening. Insert the screw bolts into the back of the receiver. The "U" bracket then slides over the screw bolts and secures the receiver to the dash opening, using hex nuts to tighten the fit. The hex nuts can continue to be tightened against the bracket for secure and stable fitting against your dash / console panel. Before cutting any panel, ALWAYS ensure that there is sufficient clearance behind the panel, and that no wire harnesses, fuel lines, moving linkages, or any other critical components are exposed to damage by your choice of location. NEVER risk damage to the hull while cutting your opening.
-
 1
1 -
 2
2 -
 3
3 -
 4
4 -
 5
5 -
 6
6 -
 7
7 -
 8
8 -
9
-
10
-
11
-
12
 |
 |