Pyle PLPTS3 PLPTS3 Manual 2 - Page 3
a and raising the stand. Make sure to use
 |
View all Pyle PLPTS3 manuals
Add to My Manuals
Save this manual to your list of manuals |
Page 3 highlights
5. From underneath the tripod, add a washer and wing nut to each screw to hold in place. They should look like this once installed. 8. Congratulations - your stand is now complete! 6. Tighten the screws from above using a screwdriver to secure everything into place. 7. You can raise the stand by loosening knob (a) and raising the stand. Make sure to use bar (c) to secure the t-bar.
-
 1
1 -
 2
2 -
 3
3
 |
 |

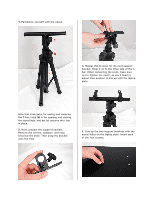
5.
From underneath the tripod, add a washer
and wing nut to each screw to hold in place.
They should look like this once installed.
6. Tighten the screws from above using a
screwdriver to secure everything into place.
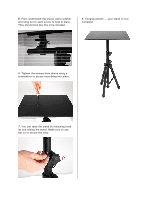
7. You can raise the stand by loosening knob
(a) and raising the stand. Make sure to use
bar (c) to secure the t-bar.
8. Congratulations — your stand is now
complete!