Pyle PMX466 Instruction Manual - Page 3
Channel Mixer, Channel Input And Output
 |
View all Pyle PMX466 manuals
Add to My Manuals
Save this manual to your list of manuals |
Page 3 highlights
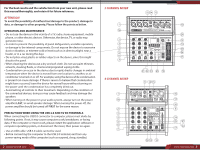
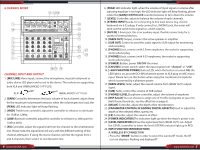
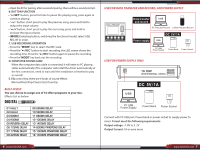
6 CHANNEL MIXER CHANNEL INPUT AND OUTPUT 1. [MIC/LINE] Mono input, connect the microphone, musical instrument or audio device (CD player and so on) to the device. The sockets are supporting both XLR and UNBALANCED 1/4" PLUG. 2. [GAlN] Controller, determines the basic volume of each channel, adjust them for the maximum volume performance, when the volume gets too loud, the [PEAK] LED indicator light will keep flashing. 3. [HIGH] Treble tone controller, adjust the controller to enhance or attenuate for 15dB at 12KHz. 4. [LOW] Bass tone controller, adjust the controller to enhance or attenuate for 15dB at 80Hz. 5. [FX] Controller, adjust the signal level from the channel to the reverberation line. Please note, the signal level will vary with the different setting of the channel attenuator. lf using the stereo channel, will mix the signals from L and A channels, then send it to reverberation line. 4 www.PyleUSA.com 6. [PEAK] LED indicator light, when the volume of input signal or volume after adjusting equalizer is too high, the LED indicator light will keep flashing, please rotate the [GAIN] CONTROLLER counterclockwise to turn down the volume. 7. [LEVEL] Controller, adjust to balance the volume of each channels. 8. [STEREO INPUT] Jacks, for connecting to line level device (e.g. electric keyboard) via 6.35 plugs, if only connect to L (MONO) jack, the mixer will send out the same mono signal to L and R outputs. 9. [AUX IN] 3.5mm jack, this is an auxiliary input, flexible connectivity for a variety of external devices. 10. [MAIN OUT] Output, connect the active speaker or amplifier. 11. [SUB OUT] Control to send the audio signal to SUB output for monitoring and recording. 12. [PHONES] Jack, connect with 3.5mm earphones, the socket is supporting stereo phone plug. 13. [PHONES] Jack, connect with 6.35 earphones, the socket is supporting stereo phone plug. 14. [POWER] Button, power ON/OFF the mixer. 15. [CH/USB] Convert switch, select the input signal from "channel" or "USB". 16. [+48V PHANTOM POWER] Button/LED, when the button is turned ON, the LED light is on, provide DC+48V phantom power to XLR plug on MIC mono input. Please turn on this button when using the condenser microphone which is powered by a phantom power. 17. [MAIN LEVEL] Fader, adjust the overall volume from [MAIN OUT] output signal. 18. [SUB] Fader, control the volume of SUB output. 19. [PHONES LEVEL] Earphone controller, adjust the volume of earphone. 20. [DSP Select] You can choose to assign one of 16 effect programs to your mix. (Hall, Room, Reverb etc. see the effect list on page 6). 21. [DELAY] Controller, adjust the depth ofthe reverberation. 22. [PARAMETER CONTROL IN ADDING DIGITAL EFFECTS] Used to adjust the depth of the selected effect, speed, etc. 23. [FX] Controller, adjust the volume of effect. 24. [POWER INDICATOR] The indicators light up when the mixer's power is on. 25. [LEVEL INDICATORS] Show the signal level from [MAIN OUT] out. Adjust the [LEVEL] controller to lower the level if [PEAK] indicator light up in RED. 26. [MP3 FUNCTION INTRODUCTION] A. WIRELESS BT CONNECTION • Press the "MODE" button in order to select the wireles BT mode, the BT icon on display is flashing and displays BT. www.PyleUSA.com 5
-
 1
1 -
 2
2 -
 3
3 -
 4
4 -
 5
5 -
 6
6
 |
 |
