Pyle PPHP210AMX Instruction Manual - Page 4
Mic / Line Input Selector Channel
 |
View all Pyle PPHP210AMX manuals
Add to My Manuals
Save this manual to your list of manuals |
Page 4 highlights
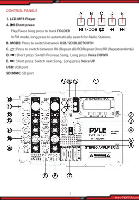
2. Line/MP3 Selector: Push down to use the USB/SD Bluetooth signal. Push the selector up to use the Mic/Line input signal . 3. Signal Input Volume Knob: Adjusts the volume for MP3 or MIC/Line signal input. 4. Master Volume Knob: Adjusts all the output signal for the powered mixer. 5. Indicator: Displays the signal volume for output. 6. Phantom Power: Press this button to activate the 15V phantom power necessary for a condenser (capacitance) Microphone which might require 15V power supply from the mixer Channel 1-4 input. 7. 5 Band Graphic Equalizer: Adjusts the frequency of output signal. 8. Depth Knob: Adjusts the depth e ects level of 1-4 Channel for Microphone input. 9. ECHO Volume knob: Adjusts the ECHO Level for MIC input. 10. Peak Indicator: Signal display indicator for Channel 1-4, when input signal is too high, the red light will be on. 11. Channel 1-4 XLR Connector: Connect Microphone and Line input, use the XLR cables. 12. Mic / Line Input Selector Channel: When connecting a microphone set the selector to MIC. When connecting a Line input set this selector to Line. 13. Treble Knob Channel: 1-4 have individual treble controls per channel. Use this knob to adjust the treble levels for the selected channel. 14. Bass Knob: Channels 1-4 have individual bass controls per channel. Use this knob to adjust the bass levels for the selected channel. 15. E ects Knob: Channels 1-4 have individual e ects controls per channel. Use this knob to adjust the reverb e ect levels for the selected channel. 16. Volume Knob: Channels 1-4 have individual volume controls per channel. Use this knob to adjust the volume levels for the selected channel. 17. 1/4" Line Input: Connect your sound source to this 1/4" input. The line volume will be controlled channel 5/6 volume control and master volume Knob. Only passive signals should be the connected input. 18. RCA Line Input: Connect your sound source to this RCA input(6/7 Channel). Only passive signals should be the connected input. 19. RCA Line Output: Use this connector to connect other ampli er. DO NOT connect directly to a passive speaker. 4 www.PyleUSA.com
-
 1
1 -
 2
2 -
 3
3 -
 4
4 -
 5
5 -
 6
6
 |
 |