Pyle PRJELMT76 Instruction Manual - Page 2
Motorized Projector Screen
 |
View all Pyle PRJELMT76 manuals
Add to My Manuals
Save this manual to your list of manuals |
Page 2 highlights
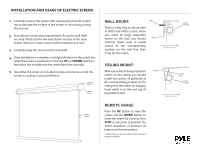
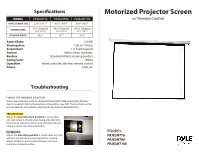
Specifications MODEL TOTAL SCREEN SIZE VIEWING AREA HOUSING WIDTH PRJELMT76 52.8'' x 59.1'' 72 in. Diagonal (42.9'' x 57.0'') 69.3'' PRJELMT86 60.2'' x 68.9'' 84 in. Diagonal (50.4'' x 67.0'') 79.1'' PRJELMT106 68.9'' x 80.7'' 100 in. Diagonal (59.1'' x 78.7'') 91.0'' Aspect Ratio: Viewing Area: Screen Gain: Surface: Borders: Casing Color: Operation: Power: 4:3/HD 128cm *170cm 1.3, Triple layered Matte white, washable Standard 4 black masking borders White Wired controller, Wireless remote control 120V, AC Motorized Projector Screen w/ Remote Control Troubleshooting FIXING THE MIN/MAX POSITION Every screen is factory set to an adequate fixed position before packaging, however due to movement during transportation, this position may shift. This is entirely normal and can easily be remiedied by adjusting the two holes as detailed below: YELLOW HOLE: Adjust the max retraction position if screen does not stop where it should when being retracted into the housing. Adjust clockwise and counterclockwise until you reach your desired position. GREY HOLE: Adjust the max drop position if screen does not stop where it should when being lowered for viewing. Adjust clockwise and counterclockwise until you reach your desired position. Models: PRJELMT76 PRJELMT86 PRJELMT106
-
 1
1 -
 2
2
 |
 |
