Pyle PSHTCM88 Instruction Manual - Page 3
Operating Instructions
 |
View all Pyle PSHTCM88 manuals
Add to My Manuals
Save this manual to your list of manuals |
Page 3 highlights
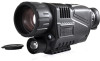
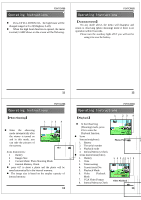
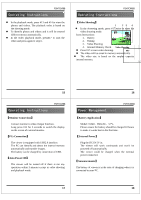
Operating Instructions PSHTCM88 【Battery Installation】 ● Turn the battery cover down ; insert one battery correctly (note the negative electrodes face down) insert and turn the cover back into position. Turn the viewer on, the screen will light up if the battery is installed correctly. Otherwise, please reinstall the battery again or tighten the cover again. 【Announcements】 Ensure the model of battery is correct; Ensure the electric Volts and Amps match; Pay attention to the anode and the cathode of the battery. 7 Operating Instructions PSHTCM88 【Power On】 1 23 4 ● Take the objective cover down. ● Long press #19 for 3 seconds to light screen up,observing 0 3 7 2 7 SD from Eyecup #11,if the screen is lit up and icons have been shown normally, the viewer could be used then ● Icons Instructions: 1 Battery 2 Images Size 3 Current Mode: Photo Shooting Mode 4 Internal Memory Check ● The Observing (Photo Shooting) Mode is available to use after the startup. 【Power Off】 ● In any mode, long press #17 for 3 seconds to turn it off. 8 Operating Instructions PSHTCM88 【Scenery Observation】 ● Take the objective cover down, observing the screen from eyecup #11. 1. Adjust the diopter ring #10 until to get the sharp images 2. Adjust the objective focusing wheel #2 to make the images to be sharpest and easy to observe then. ● Automatic fine-tuning control of display brightness could be operated by Viewer. ● Digital zoom could be realized by pressing #13 and #14 ranged at 1x to 8x. ● If the environment is light enough, turn the auxiliary light off to save the power. On the contrary, please turn the auxiliary light on to get the sharpest image to observe ● Otherwise, please turn the auxiliary light on. 【Announcements】 Don't block the light resource. 9 Operating Instructions PSHTCM88 【Brightness Adjustment】 In the observing mode, press #16. Enter the menu of *Br i ght : 7 LAMP 0 brightness adjustment. Just as the screen showed, the number after SD "Bright" means the current brightness index. Brightness Adjustment Press #15 to heighten the index and #16 to lower it. 9 means the highest brightness of display. The index ranged at 1 to 9, 9 means the brightest index. 【High Beam Adjustment】 In the observing mode, press #16 twice to enter the high beam adjustment menu. The screen will be just as the picture showed. The index of LAMP shows the intensity of auxiliary light. Br i ght : 7 *POWLED 0 LED: OFF 0 3 7 2 7 SD High Beam Adjustment 10
-
 1
1 -
 2
2 -
 3
3 -
 4
4 -
 5
5 -
 6
6 -
 7
7
 |
 |
