Pyle PSTMH22 User Guide - Page 4
Assembly your steamer, Using Your Steamer
 |
View all Pyle PSTMH22 manuals
Add to My Manuals
Save this manual to your list of manuals |
Page 4 highlights
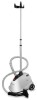
Assembly your steamer 1: Pick the unit out of the package, then check and be sure all the parts are available. 2: Fully extend the telescopic pole, To do so first open the clips and loosen the poles, then fully extend the pole, at last close the clips on the pole and to lock the poles. As( figure 2) show. Make sure that the pole is securely locked into place and cannot be pushed down. NOTE: The Telescopic Pole must be fully extending during steamer operation to insure a free flow of steam through the Hose. 3: To attach the hanger attachment, align tabs in plastic hanger with grooves on pole and push down,(Figure 3) 4: Insert the bottom of the Telescopic Pole into the Pole Base (see Figure 4) in such a way so that the Steam Nozzle Holder faces the rear of the steamer (see Figure 1). Pointing the Steam Nozzle Holder towards the rear will ensure the stability of the steamer when garments are hanging from the Clothes Hanger Hook. 5: To attach the steam hose: Align the hose nut with the hose base of top unit, and then turning the hose nut clockwise to tighten the hose with unit. As( figure 5) show, after that then place the steam nozzle to the hanger. CAUTION: To prevent steam from causing bodily injury or damage to surfaces, always hang the Steam Nozzle on the Steam Nozzle Holder when not in use. Do not lay the Hose on the floor as condensation may occur, causing unwanted water droplets in the steam. CAUTION: Pulling on the Hose with excessive force will damage the hose, resulting in a steam leak. Using Your Steamer 1:Unplug the Power Cord, and turn the Lighted On/Off Switch to the "Off" position. 2:Remove the Water Fill Tank; turn it upside down, and unscrew the Valve Cap 3: Fill the Water Tank with cool water, and replace the Valve Cap. NOTE: To prolong the lifetime of your steamer, we recommend using distilled or demineralized water. NOTE: Do not substitute another water tank for the one designed for this unit. 4: Place the Water Tank on the Water Reservoir. You should hear water flowing into the Water Reservoir for a short time CAUTION: Do not let the steamer operate with a dry Water Tank, or damage to the unit could occur 5: Plug the unit into a properly grounded three-pronged outlet. 6: Turn the Lighted On/Off Switch to "On." Verify that the light on the
-
 1
1 -
 2
2 -
 3
3 -
 4
4 -
 5
5 -
 6
6 -
 7
7 -
 8
8
 |
 |
