RCA 25110RE3-A User Guide - Page 15
Ear Clip Attachment - headset
 |
UPC - 940356373734
View all RCA 25110RE3-A manuals
Add to My Manuals
Save this manual to your list of manuals |
Page 15 highlights
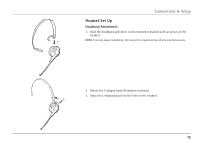
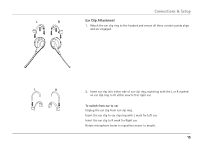
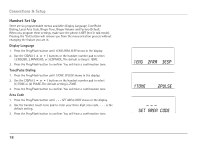
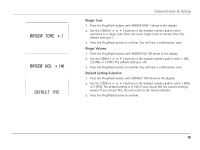
Connections & Setup Ear Clip Attachment 1. Attach the ear clip ring to the headset and ensure all three contact points align and are engaged. 2. Insert ear clip into either side of ear clip ring, matching with the L or R marked on ear clip ring to fit either your left or right ear. To switch from ear to ear Unplug the ear clip from ear clip ring. Insert the ear clip to ear clip ring with L mark for Left ear. Insert the ear clip to R mark for Right ear. Rotate microphone boom to reposition nearer to mouth. 15
-
 1
1 -
2
-
3
-
4
-
5
-
6
-
7
-
8
-
9
-
 10
10 -
 11
11 -
 12
12 -
 13
13 -
 14
14 -
 15
15 -
 16
16 -
 17
17 -
 18
18 -
 19
19 -
 20
20 -
21
-
22
-
23
-
24
-
25
-
26
-
27
-
28
-
29
-
30
-
31
-
32
-
33
-
34
-
35
-
36
-
37
-
38
-
39
-
40
-
41
-
42
-
43
-
44
-
45
-
46
-
47
-
48
-
49
-
50
-
51
-
52
-
53
-
54
-
55
-
56
-
57
-
58
-
59
-
60
-
61
-
62
-
63
-
64
-
65
-
66
-
67
-
68
-
69
-
70
-
71
-
72
-
73
-
74
-
75
-
76
-
77
-
78
-
79
-
80
-
81
-
82
-
83
-
84
-
85
-
86
-
87
-
88
-
89
-
90
-
91
-
92
 |
 |

1²
Ear Clip Attachment
1. Attach the ear clip ring to the headset and ensure all three contact points align
and are engaged.
Connections & Setup
2. Insert ear clip into either side of ear clip ring, matching with the L or R marked
on ear clip ring to fit either your left or right ear.
To switch from ear to ear
Unplug the ear clip from ear clip ring.
Insert the ear clip to ear clip ring with L mark for Left ear.
Insert the ear clip to R mark for Right ear.
Rotate microphone boom to reposition nearer to mouth.