RCA DRC8030N User Manual - Page 6
General controls - dvd recorder
 |
View all RCA DRC8030N manuals
Add to My Manuals
Save this manual to your list of manuals |
Page 6 highlights
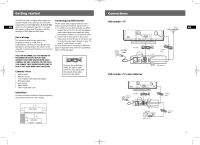
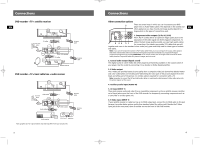
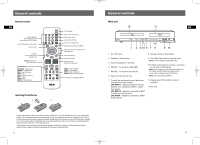
DRC8030_EN 8/15/06 10:30 AM Page 12 General controls Remote control EN Channel selection, Numerical value inputs, Device selection (INPUT button) Selects PS (progressive scan) output Hides the menu Live view, View a channel while playing a title GO BACK = Returns to the previous menu Playback Keys ADVANCE = Skip Forward, AGAIN = Skip Backward, REV= Slow, Fast Rewind, PLAY = Play, FWD = Slow, Fast Forward, REC = Record, STOP = Stop, PAUSE = Temporary stop On / Off button Opens / closes the disc tray Accesses play mode Accesses the edit menu Accesses the settings menu E Displays the recorder or disc MENU Menu and info banner activation and navigation keys INFO Information display Accesses the library / Change channel / Skip forward / backward AUDIO = Audio language ANGLE = Camera angle ZOOM = Image enlargement SUBTITLE = DVD subtitle language TV functions for compatible devices Inserting the batteries • Respect the polarities. Do not mix different types of batteries or new and old batteries. Do not use rechargeable batteries. Do not expose batteries to excessive heat, do not incinerate them and do not recharge them. Do not try to open them as they may leak or explode. Remove the batteries from the remote control unit if you are not going to use it for several weeks. Immediately remove any leaking batteries. Take care in doing this, as leaking batteries may cause burns to the skin or other physical injury. • Please respect the environment and prevailing regulations! Before you dispose of batteries ask your dealer whether they are subject to special recycling and if he accepts to take them back. 5 General controls Main unit EN 1. On / Off button 8. Change channel or skip chapter. 2. Playback or freeze frame. 3. Stops the playback or recording. 4. DVD REC - To record to a DVD R/RW. 5. HDD REC - To record to the hard disc. 6. Open and close the disc tray. 9. The Audio-Video jacks for external input Note: View the images using the INPUT key. 10. S-Video socket (input) to connect a camcorder or any other S-Video device. Note: do not forget to connect the audio cables since the S-Video socket handles only images and not sound. View the images using the INPUT key. Note: 9 & 10 are labeled as INPUT 2 7. To select the audiovisual sources (appliances connected to the AV sockets): LIVE INPUT 1 - Appliance (satellite received, decoder, etc.) connected to INPUT 1 sockets (rear panel). LIVE INPUT 2 - Appliance connected to INPUT 2 sockets on the front panel. LIVE AUDIO - Appliance connected to AUDIO IN (rear panel) 11. Displays your DVD recorder's modes of operation. 12. Disc tray. 6
-
 1
1 -
 2
2 -
 3
3 -
 4
4 -
 5
5 -
 6
6 -
 7
7 -
 8
8 -
 9
9 -
 10
10 -
 11
11 -
 12
12 -
13
-
14
-
15
-
16
-
17
-
18
-
19
 |
 |
