RCA DRC8030N User Manual - Page 7
Initial setup - user manual
 |
View all RCA DRC8030N manuals
Add to My Manuals
Save this manual to your list of manuals |
Page 7 highlights
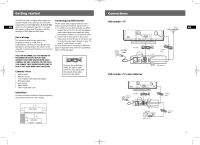
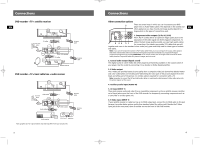
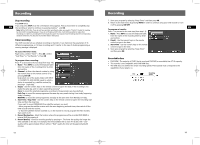
DRC8030_EN 8/15/06 10:30 AM Page 14 Initial setup Turn on the TV and DVD recorder 1. Turn on the DVD recorder by pressing ON/STANDBY. 2. Turn on the TV and select the input mode connected with the DVD recorder output signal. To do so, EN you usually press the AV button on the TV remote control until you get to the video input channel that matches how the DVD recorder is connected to the TV. When you are on the right channel, you can see the DVD recorder menu for language selection (see below). Note: since access to a TV's video input channel varies from one manufacturer to the next, it is difficult to provide specific instructions for your particular brand. Please consult the user manual of your TV. Interactive setup • Use the remote control to follow the on-screen instructions. Use navigation keys ( ) to move the on-screen highlight in the corresponding directions on the screen. • Press OK to select a highlighted item. Note: You can access the setup screen from the player menu. If you move, get a different program provider for TV shows, or change your connections, you will need to complete the interactive setup again. 1) Select on-screen menu language 2) Select the signal that is connected to the CABLE/ANTENNA input jack Press (right key) to access the choices (CableAntenna or Antenna only) and then press to highlight "Done" and press OK. Note: turn on the cable box or satellite receiver before completing this step. 3) Channel search Automatic channel search starts. When the search reaches 100%, press OK (the channel list appears). If the channel list does not appear, check the ANTENNA/CABLE input jack to make sure the cable is connected properly. 7 Initial setup 4) Channel list The channel list contains the channels you tune to when you press CH+ or CH- on the remote control. From the channel list screen, you can delete channels you rarely watch. You will still be able to tune to the "deleted" channels directly by using the number buttons, but the DVD recorder will not tune to a channel when you press CH+ or CH-. Use the navigation keys ( ) to scroll through the channels. A checkmark in the box next to the channel means it has been stored in the channel list. Highlight the channel and press OK to check or uncheck the box. You can also label channels by pressing INFO. To skip editing the channel list, press STOP. 5) Select your time zone 6) Daylight saving time If you select "Yes", the recorder's internal clock will automatically advance the time by 1 hour in the spring and set the clock back by 1 hour in the fall. EN 8
-
 1
1 -
 2
2 -
 3
3 -
 4
4 -
 5
5 -
 6
6 -
 7
7 -
 8
8 -
 9
9 -
 10
10 -
 11
11 -
 12
12 -
13
-
14
-
15
-
16
-
17
-
18
-
19
 |
 |
