RCA EZ219BK User Manual - EZ219BK - Page 10
Video mode
 |
View all RCA EZ219BK manuals
Add to My Manuals
Save this manual to your list of manuals |
Page 10 highlights
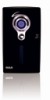
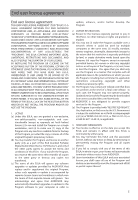
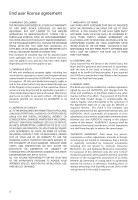
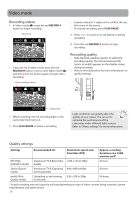
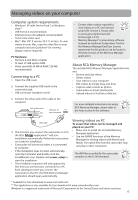
Video mode Recording videos 1. In Video mode ( ), press the red RECORD button to begin recording. Video mode • A pause indicator II replaces the red at the top left corner of the screen. • To resume recording, press PLAY/PAUSE. 3. Press + or - to zoom in or out before or during recording. 4. Press the red RECORD button to stop recording. • If you are not in Video mode, press the red RECORD button once to enter Video mode ( ) and then press the button again to begin video recording. Recording quality • Slide the Video Quality selector to select the recording quality. The selected setting (HD, Sports or webQ) appears on the display screen during recording. • Refer to the table below for more information on quality settings. Video recording indicator Elapsed time • While recording, the red recording light on the camcorder front turns on. 2. Press PLAY/PAUSE to pause a recording. Light conditions can greatly affect the quality of your videos. You can set to optimize the performance of the camcorder under different light sources. Refer to "Menu settings" for more information. Quality settings Settings Recommended for: Resolutions (pixel) and Fram Rate (FPS) Approx. recording durations on a 16GB memory card* HD (High Definition mode) Sports (Sports mode) webQ (Web Quality mode) Viewing on TV & Best video quality Viewing on TV & Capturing fast movements Uploading to and viewing on the web 1280 x 720 @ 30fps 848 x 480 @ 60fps 320 x 240 @ 30fps 8 hours 8 hours 40 hours * Actual recording time and capacity will vary depending on type of video content being recorded, system requirements, and other factors. 10
-
 1
1 -
2
-
3
-
4
-
 5
5 -
 6
6 -
 7
7 -
 8
8 -
 9
9 -
 10
10 -
 11
11 -
 12
12 -
 13
13 -
 14
14 -
 15
15 -
16
-
17
-
18
-
19
 |
 |