RCA L32HD32D User Guide & Warranty - Page 38
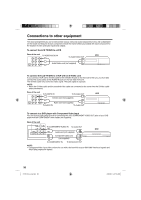
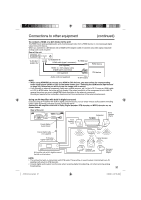
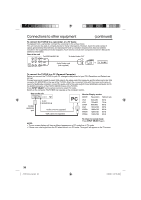
To connect the TV/DVD to a camcorder, or a TV Game, To connect the TV/DVD to a PC Personal Computer
 |
UPC - 846042700641
View all RCA L32HD32D manuals
Add to My Manuals
Save this manual to your list of manuals |
Page 38 highlights
Connections to other equipment (continued) To connect the TV/DVD to a camcorder, or a TV Game To playback from a camcorder, connect the camcorder to the unit as shown. This unit can also be used as a display device for many video games. However, due to the wide variety of signals generated by these devices and subsequent hook-up variations required, they have not all been included in the suggested connection diagrams. You'll need to consult each component's Owner's Manual for additional information. Rear of the unit To VIDEO/AUDIO IN To Audio/Video OUT Audio/Video cord or (not supplied) To connect the TV/DVD to a PC (Personal Computer) Before you connect this TV/DVD to your PC, change the adjustment of your PC's Resolution and Refresh rate (60 Hz). Connect one end of a (male to male) VGA cable to the video card of the computer and the other end to the VGA connector PC MONITOR on the rear of the TV/DVD. Attach the connectors firmly with the screws on the plug. In case of a Multimedia computer, connect the audio cord to the audio output of your Multimedia computer and to the AUDIO connector of the PC/DVI AUDIO IN jack of the TV/DVD. Press INPUT SELECT on the remote control to select PC mode. Switch on the computer. The TV/DVD can operate as the computer monitor. Rear of the unit PC/DVI AUDIO IN jack To PC MONITOR IN Audio cord (not supplied) VGA cable (not supplied) Monitor Display modes MODE Resolution Refresh rate VGA VGA SVGA XGA WXGA WXGA WXGA 640x480 720x400 800x600 1024x768 1280x768 1280x720 1360x768 60Hz 70Hz 60Hz 60Hz 60Hz 60Hz 60Hz To return to normal mode Press INPUT SELECT again. NOTE: • The on-screen displays will have a different appearance in PC mode than in TV mode. • If there is no video signal from the PC when the unit is in PC mode, "No signal" will appear on the TV-screen. 38 51H0101A_eng.indd 38 2/26/08 9:47:55 AM
-
 1
1 -
2
-
3
-
4
-
5
-
6
-
7
-
8
-
9
-
10
-
11
-
12
-
13
-
14
-
15
-
16
-
17
-
18
-
19
-
20
-
21
-
22
-
23
-
24
-
25
-
26
-
27
-
28
-
29
-
30
-
31
-
32
-
 33
33 -
 34
34 -
 35
35 -
 36
36 -
 37
37 -
 38
38 -
 39
39 -
 40
40 -
 41
41 -
 42
42 -
 43
43 -
44
 |
 |
