RCA MAF40BKR Owner/User Manual - Page 3
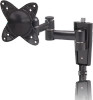
Attaching wall mount plate, Attaching the TV mount plate
 |
View all RCA MAF40BKR manuals
Add to My Manuals
Save this manual to your list of manuals |
Page 3 highlights
olutions - 40 lbs. (18 kg) hoosing a Universal all Mount from RCA. be used for all major 27" flat panel TVs, under. This wall a 0-15-degree tilt, and swivel, and m extension for easy attempting to mount et, please remove s package and read nstructions carefully. 40 lbs. or with a ausing property ximum weight of eights indicated may installation and ng of your flat panel TV. your TV. Recheck the You will need a #3 bit (integrated level on te installations). wall studs. hardware has been , if needed. TV to the audio and ave any concerns and for proof of Attaching wall mount plate Drywall Installation 1. Use a stud finder to locate a wood stud where you want to install the mount. NOTE: It is required that the wall mount plate be attached to wall studs. 2. Locate center of stud. 3. Place the wall mount plate against the wall, with the cord management channel towards the bottom. Level it using the bubble guide. Mark the locations on the wall where the mount is to be installed. 4. Drill holes at each marked location using the enclosed wood drill bit. 5. Secure the wall mount plate to the wall, using one drywall screw, but do not completely tighten it yet. 6. Using the integrated bubble level, carefully adjust the wall mount plate until it is level. 7. Insert the remaining screws and tighten all three screws completely. Concrete/Brick Installation 1. Place the wall mount plate against the wall with the cord management channel towards the bottom. 2. Using the integrated bubble level, mark off the position of the holes that will be used for securing the mount. 3. Place the wall mount plate aside. 4. Using an electric drill and a 5/16" (8mm) masonry bit, drill holes in the marked locations. 5. Remove any excess dust from the holes. 6. Insert a concrete anchor into each hole. If necessary, use a hammer to lightly tap each anchor into place so they are flush with the wall. 7. Once both anchors are in place, place the wall mount plate back into position. Using the integrated bubble level, carefully adjust the wall mount plate until it is level. 8. Attach the wall mount plate, using the drywall screws provided. 9. Make sure all screws are tightened and secure. Attaching the TV mount plate 1. Unplug your flat panel TV before starting this step of the installation. IMPORTANT: NEVER lay the TV face down as this may cause damage to the viewing surface. 2. Before attaching the TV mount plate to the TV, determine which hardware to use. Examine the back of your TV. If the back is flat, use the M4x12mm bolts. If your TV has a recessed back, use the longer M4x30mm bolts and 1/2" spacers. 3. After you have determined which bolts to use, attach the TV mount plate to the back of your TV. NOTE: Be careful not to over-tighten the bolts. MAF40BK de tenter de fixer le té l'emballage et lisez at AVERTISSEMENT : To poids supérieur à 40 lb 27 po, peut provoquer dommages matériels e MISE EN GAR Ce support mural est 18 kg/40 lb. Son utilis indiqué pourrait caus soigneusement les in Mesures de Suivez ces précautions pou 1. Assurez-vous que la de nouveau les limite 2. Rassemblez les outi aurez besoin d'un to d'une mèche (inclus montants et d'un ma 3. Vous devez absolum un localisateur de m 4. Utilisez le matériel fo sûre et sécuritaire. 5. Demandez à un élec au besoin. 6. N'oubliez pas d'ache aux appareils audio 7. Nous recommandon si vous craignez de n Conservez votre coupon garantie et comme preuv No de modèle _________
-
 1
1 -
 2
2 -
 3
3 -
 4
4
 |
 |
