RCA RP2502 User Guide - Page 7
Before you begin - remote control
 |
View all RCA RP2502 manuals
Add to My Manuals
Save this manual to your list of manuals |
Page 7 highlights
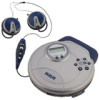
RP2500 EN 12/4/03 5:14 PM Page 7 Before you begin Unpacking Your Unit 2. Slide the ear hook behind the ear with EN You should have the following: the ear pad on the front of the ear. • one main unit Rotate the clip phone so the ear pad fits • one remote control (RP2501 / RP2502 closely with the ear. / RP2507 / LAD950U) • AC/DC power adaptor (LAD940U / LAD950U) • Car kit (RP2505 / RP2507) • one set of clip phones • one user's guide How to Use Your Clip Phones (The e.clipz) The right ear clip phone is labeled R while the left ear clip phone is labeled L. 3. Lock the clip phone in place by pushing down on the top of the ear hook until it locks. L R 1. Pull the ear hook away from the ear pad slightly. You will hear a click sound. 4. For best sound quality, make sure the earpad fits closely with your ear. CLICK 2
-
 1
1 -
 2
2 -
 3
3 -
 4
4 -
 5
5 -
 6
6 -
 7
7 -
 8
8 -
 9
9 -
 10
10 -
 11
11 -
 12
12 -
13
-
14
-
15
-
16
-
17
 |
 |
