Rane MP26 MP26 Mixer Owners Manual - Page 28
Rane master level controls and master meter levels, Calibrating your Rane mixer with a sound system
 |
View all Rane MP26 manuals
Add to My Manuals
Save this manual to your list of manuals |
Page 28 highlights
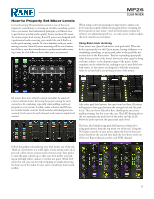
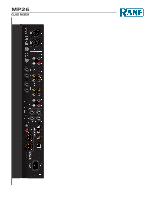
MP26 CLUB MIXER Rane master level controls and master meter levels The main difference DJs may notice about the master output level meter is that the master level control has no affect on the meter levels (see above picture). This may seem a bit weird when compared to other DJ mixers, but there's a very good reason behind this design. With Rane professional DJ mixers, the master output level meter is the summed total of all PGM channel levels. In other words, the master output meter is a true representation of your combined output mix level. As long as the output level meters stay out of the red, you won't be in danger of clipping or distorting audio, not that you can clip or distort a Rane mixer anyway, but that's beside the point. You can still blow the sound system speakers (and your chances of getting booked to play that venue again). Wrapping up Optimum sound quality requires correctly setting software level and DJ mixer level controls. The correct procedure begins by properly setting software level controls and then mixer gain level controls. Once your mixer levels are properly set, calibrating the master output level control with the sound system is the last step. Following these simple steps ensures you'LL get the best possible audio quality from your Rane DJ mixer. LEARN SOMETHING? MORE ARTICLES LIKE THIS ARE IN THE KNOWLEDGE BASE AND BLOG AT DJ.RANE.COM. Calibrating your Rane mixer with a sound system It was mentioned earlier that the main level control has no affect on the master level meter, and this is by design. The design intent is to use the master level control to calibrate the mixer with a sound system. Ideally, during sound check, the sound tech running the sound system will calibrate the system to the output level of the Rane mixer, so that red meters on the mixer indicate red (or almost red) on the main sound board and/or near clipping of the amplifiers. 1.Start with the master level control knob all the way down. 2.Make sure the audio levels meters within the software you're using are not peaking red. 3.Start with the PGM channel 1 fader all the way up and adjust the upper rotary gain/level control so that your meters barely hit the red and then back the level down until out of the red, giving yourself a little room for sudden level peaks. Repeat the same process for PGM channel 2, if using more than two channels, PGM channel 3 and PGM channel 4. 4.While playing audio, using each PGM channel, check the master output level meters. If the master output level meters are in the red make small adjustments to each PGM channel gain control until the master level meter is peaking into the yellow. Now that your mixer level controls are properly set, you're ready to turn up the master level control. 5.Here's where you grab the sound tech running the sound system. The tech may have you do one of the following: Increase the mixer's master level control until you're told to stop. If you stop at 8, this is your maximum level output for the mixer and you do not want to exceed this level setting. Increasing the master level control past 8 may cause the sound tech to give you dirty looks, or worse, damage the sound system. Turn the mixer's master level control all the way up. Once your master level control is at max, the sound tech will slowly increase the level on the main sound board until the sound system is at the peak level. When it comes to preventing damage to the sound system this is the sound techs safest way to calibrate a mixer to the system. 28
-
 1
1 -
2
-
3
-
4
-
5
-
6
-
7
-
8
-
9
-
10
-
11
-
12
-
13
-
14
-
15
-
16
-
17
-
18
-
19
-
20
-
21
-
22
-
 23
23 -
 24
24 -
 25
25 -
 26
26 -
 27
27 -
 28
28 -
 29
29 -
 30
30 -
 31
31 -
 32
32
 |
 |
