RedMax HEZ2460F Owners Manual - Page 13
Adjusting Idling Speed Op7, How To Use
 |
View all RedMax HEZ2460F manuals
Add to My Manuals
Save this manual to your list of manuals |
Page 13 highlights
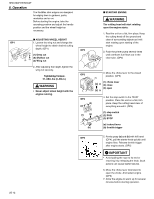
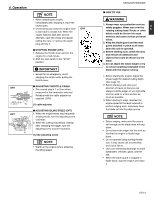
8. Operation OP6 .04 in (1~2mm) (1) OP7 (1) NOTE 1. When restarting the engine immediately after stopping it, leave the choke open. 2. Overchoking can make the engine hard to start due to excess fuel. When the engine failed to start after several attempts, open the choke and repeat pulling the rope, or remove the spark plug and dry it. ■ STOPPING ENGINE (OP4) 1. Release the throttle lever and run the engine for a half minute. 2. Shift the stop switch to the "STOP" position. OP8 IMPORTANT • Except for an emergency, avoid stopping the engine while pulling the throttle lever. ■ ADJUSTING THROTTLE CABLE • The normal play is 1 or 2mm when measured at the carburetor side end. Readjust with the cable adjuster as required. (OP6) (1) cable adjuster ■ ADJUSTING IDLING SPEED (OP7) 1. When the engine tends stop frequently at idling mode, turn the adjusting screw clockwise. 2. When the cutting head keeps rotating after releasing the trigger, turn the adjusting screw counter-clockwise. (1) idle adjusting screw NOTE • Warm up the engine before adjusting the idling speed. HEZ2460F/HEZ2650F ■ HOW TO USE WARNING 1. Always wear eye protection such as safety goggles. Never lean over the U S rotating cutting head. Rocks or other debris could be thrown into eyes and face and cause serious personal injury. 2. Keep the blade guard and the mad guard attached in place at all times when the unit is operated. 3. Before starting a job, check the area and remove all obstacles and objects that could be thrown by the blade. 4. Do not adjust the wheel height or try to remove anything entangled to the blade with the engine running. 1. Before starting the engine, adjust the wheel height for desired cutting depth (See page 12). 2. Before starting a job, plan your direction of travel so that you can always hold the edger on you right side and can walk on a hard surface as much as possible. 3. When starting to edge, maintain the engine speed at the level required to perform edging work, and slowly have the blade cut into the edge groove. NOTE • Before edging, make sure the area is soft enough so the blade does not bog down. • Do not move the edger into the work so fast that the engine or blade bogs down. • Do not operate using starting throttle lock. It may cause unit uncontrolled, and clutch failure. • Use care indirecting discharge to avoid bystanders, vehicles, glass, and the like. • When the blade guard is clogged or blade stuck, stop the engine and clean it. US-13
-
 1
1 -
2
-
3
-
4
-
5
-
6
-
7
-
 8
8 -
 9
9 -
 10
10 -
 11
11 -
 12
12 -
 13
13 -
 14
14 -
 15
15 -
 16
16 -
 17
17 -
 18
18 -
19
-
20
 |
 |
