Reebok 9700 Vista Treadmill Canadian English Manual - Page 25
The Information Mode
 |
View all Reebok 9700 Vista Treadmill manuals
Add to My Manuals
Save this manual to your list of manuals |
Page 25 highlights
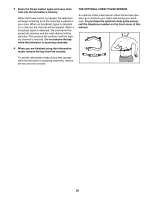
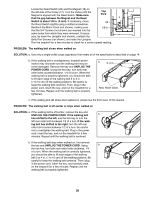
THE INFORMATION MODE The console features an information mode that allows you to view treadmill usage information, select a system of measurement for the console, and turn on and turn off the demo mode. The information mode also allows you to adjust the settings of the television and to save channels into the television's memory. 2. Press the Power button and adjust the brightness, contrast, color, sharpness, and/or hue of the television. When the Power button is pressed, the brightness level indicator will appear on the television screen. Press the Volume buttons to adjust the brightness setting if desired. Follow the steps below to use the information mode. 1. Hold down the Stop button while inserting the key into the console. Next, press the Channel buttons until the contrast, color, sharpness, or hue level indicator appears. Adjust the settings, if desired, by pressing the Volume buttons. When the information mode is selected, the lower part of the screen will show the total number of miles or kilometers that the walking belt has moved (DISTANCE) and the total number of hours that the treadmill has been used (TIME). In addition, the center of the screen will show the word ENGLISH, for miles, or the word METRIC, for kilometers. Press the Speed increase button to change the unit of measurement if desired. The words AUDIO TRAINER: ALL, AUDIO TRAINER: ON, or AUDIO TRAINER: OFF will also appear in the center of the screen. When you use an iFIT card, the voice of a personal trainer will guide you through your workouts. When the AUDIO TRAINER: ALL setting is selected, the personal trainer will guide you through your workouts and instruct you how to purchase more iFIT cards. When the AUDIO TRAINER: ON setting is selected, the personal trainer will simply guide you through your workouts. When the AUDIO TRAINER: OFF setting is selected, the voice of the personal trainer will not be heard. Press the Incline decrease button repeatedly to select the desired audio setting. Note: The console features a display demo mode, designed to be used if the treadmill is displayed in a store. While the demo mode is turned on, the console will function normally when you plug in the power cord, switch the reset/off circuit breaker to the reset position, and insert the key into the console. However, when you remove the key, the displays will remain lit, although the buttons will not function. If the demo mode is turned on, the words "DEMO ON" will appear in display while the information mode is selected. To turn on or turn off the demo mode, press the Speed decrease button. 3. Press the Power button again and add or remove channels. After all valid channels available in your area have been saved into the television's memory (see step 5 on page 26), you can manually add channels or remove unwanted channels. To add or remove a channel, first press the Channel buttons until the desired channel number appears on the screen. Then, press the Volume increase button to add the channel, or the Volume decrease button to remove the channel. Continue this process until you have added all desired channels and removed all unwanted channels. 4. Press the Power button again and select an antenna connection or a cable connection. After the Power button is pressed, press the Volume decrease button to select the ANTENNA setting, the Volume increase button to select the STANDARD CABLE setting, the Channel decrease button to select the CABLE IRC setting, or the Channel increase button to select the CABLE HRC setting. If you have connected an antenna to the treadmill, select the ANTENNA setting. If you have connected a CATV cable, select one of the three cable settings; try all three cable settings, if necessary, to find the optimal setting. 25
-
 1
1 -
2
-
3
-
4
-
5
-
6
-
7
-
8
-
9
-
10
-
11
-
12
-
13
-
14
-
15
-
16
-
17
-
18
-
19
-
 20
20 -
 21
21 -
 22
22 -
 23
23 -
 24
24 -
 25
25 -
 26
26 -
 27
27 -
 28
28 -
 29
29 -
 30
30 -
31
-
32
-
33
-
34
-
35
-
36
-
37
-
38
-
39
-
40
 |
 |