| Section |
Page |
| Manuals for This Machine |
5 |
| Manuals for This Machine |
5 |
| Manuals for This Machine |
5 |
| The following manuals describe the operational procedures of this machine. For particular functio... |
5 |
| The following manuals describe the operational procedures of this machine. For particular functio... |
5 |
| Manuals provided are specific to machine type. |
5 |
| Manuals provided are specific to machine type. |
5 |
| Adobe Acrobat Reader is necessary to view the manuals as a PDF file. |
5 |
| Two CD-ROMs are provided: |
5 |
| General Settings Guide (this manual) |
5 |
| General Settings Guide (this manual) |
5 |
| General Settings Guide (this manual) |
5 |
| Provides an overview of the machine and describes |
5 |
| Provides an overview of the machine and describes |
5 |
| Refer to this manual for Address Book procedures such as registering fax numbers, e-mail addresse... |
5 |
| Network Guide (PDF file - CD-ROM1) |
5 |
| Network Guide (PDF file - CD-ROM1) |
5 |
| Describes procedures for configuring the machine and computers in a network environment. |
5 |
| Describes procedures for configuring the machine and computers in a network environment. |
5 |
| Copy Reference |
5 |
| Copy Reference |
5 |
| Describes operations, functions, and troubleshooting for the machine's copier function. |
5 |
| Describes operations, functions, and troubleshooting for the machine's copier function. |
5 |
| Facsimile Reference <Basic Features> |
5 |
| Facsimile Reference <Basic Features> |
5 |
| Describes operations, functions, and troubleshooting for the machine's facsimile function. |
5 |
| Describes operations, functions, and troubleshooting for the machine's facsimile function. |
5 |
| Facsimile Reference <Advanced Features> |
5 |
| Facsimile Reference <Advanced Features> |
5 |
| Describes advanced functions and settings for key operators. |
5 |
| Describes advanced functions and settings for key operators. |
5 |
| Printer Reference 1 |
5 |
| Printer Reference 1 |
5 |
| Describes system settings and operations for the machine's printer function. |
5 |
| Describes system settings and operations for the machine's printer function. |
5 |
| Printer Reference 2 (PDF file - CD-ROM1) |
5 |
| Printer Reference 2 (PDF file - CD-ROM1) |
5 |
| Describes operations, functions, and troubleshooting for the machine's printer function. |
5 |
| Describes operations, functions, and troubleshooting for the machine's printer function. |
5 |
| Scanner Reference (PDF file - CD-ROM1) |
5 |
| Scanner Reference (PDF file - CD-ROM1) |
5 |
| Describes operations, functions, and troubleshooting for the machine's scanner function. |
5 |
| Describes operations, functions, and troubleshooting for the machine's scanner function. |
5 |
| Manuals for DeskTopBinder V2 Lite |
6 |
| Manuals for DeskTopBinder V2 Lite |
6 |
| DeskTopBinder V2 Lite is a utility included on the CD-ROM labeled “Scanner Driver & Document Mana... |
6 |
| DeskTopBinder V2 Lite is a utility included on the CD-ROM labeled “Scanner Driver & Document Mana... |
6 |
| • DeskTopBinder V2 Lite Setup Guide (PDF file - CD-ROM2) |
6 |
| • DeskTopBinder V2 Lite Setup Guide (PDF file - CD-ROM2) |
6 |
| • DeskTopBinder V2 Lite Setup Guide (PDF file - CD-ROM2) |
6 |
| Describes the installation of, and the operating environment for DeskTopBinder V2 Lite in detail.... |
6 |
| • DeskTopBinder V2 Introduction Guide (PDF file - CD-ROM2) |
6 |
| • DeskTopBinder V2 Introduction Guide (PDF file - CD-ROM2) |
6 |
| Describes operations of DeskTopBinder V2 Lite and provides an overview of its functions. This gui... |
6 |
| • Auto Document Link Guide (PDF file - CD-ROM2) |
6 |
| • Auto Document Link Guide (PDF file - CD-ROM2) |
6 |
| Describes operations and functions of Auto Document Link installed with DeskTopBinder V2 Lite. Th... |
6 |
| Manuals for ScanRouter V2 Lite |
6 |
| Manuals for ScanRouter V2 Lite |
6 |
| ScanRouter V2 Lite is a utility included on the CD-ROM labeled “Scanner Driver & Document Managem... |
6 |
| ScanRouter V2 Lite is a utility included on the CD-ROM labeled “Scanner Driver & Document Managem... |
6 |
| • ScanRouter V2 Lite Setup Guide (PDF file - CD-ROM2) |
6 |
| • ScanRouter V2 Lite Setup Guide (PDF file - CD-ROM2) |
6 |
| • ScanRouter V2 Lite Setup Guide (PDF file - CD-ROM2) |
6 |
| Describes the installation of, settings, and the operating environment for ScanRouter V2 Lite in ... |
6 |
| • ScanRouter V2 Lite Management Guide (PDF file - CD-ROM2) |
6 |
| • ScanRouter V2 Lite Management Guide (PDF file - CD-ROM2) |
6 |
| Describes delivery server management and operations, and provides an overview of ScanRouter V2 Li... |
6 |
| Other manuals |
6 |
| Other manuals |
6 |
| • PostScript3 Supplement (PDF file - CD-ROM1) |
6 |
| • PostScript3 Supplement (PDF file - CD-ROM1) |
6 |
| • PostScript3 Supplement (PDF file - CD-ROM1) |
6 |
| • PostScript3 Supplement (PDF file - CD-ROM1) |
6 |
| • Unix Supplement (available from an authorized dealer, or as a PDF file on our Web site) |
6 |
| • Unix Supplement (available from an authorized dealer, or as a PDF file on our Web site) |
6 |
| What You Can Do with This Machine |
7 |
| What You Can Do with This Machine |
7 |
| The following introduces the functions of this machine, and the relevant manuals containing detai... |
7 |
| The following introduces the functions of this machine, and the relevant manuals containing detai... |
7 |
| Some functions many not be available depending on your machine type. |
7 |
| Some functions many not be available depending on your machine type. |
7 |
| Copier, Facsimile, Printer, and Scanner Functions |
7 |
| Copier, Facsimile, Printer, and Scanner Functions |
7 |
| <GRAPHIC> |
7 |
| <GRAPHIC> |
7 |
| This machine provides copier, facsimile, printer, and scanner functions. |
7 |
| • You can make copies of originals. See |
7 |
| • You can make copies of originals. See |
7 |
| • You can make copies of originals. See |
7 |
| • You can send originals by fax or e- mail, and receive faxes from other parties. See |
7 |
| • You can send originals by fax or e- mail, and receive faxes from other parties. See |
7 |
| • You can print documents created in computer applications. See |
7 |
| • You can print documents created in computer applications. See |
7 |
| • You can scan originals and send scan files to a computer. See |
7 |
| • You can scan originals and send scan files to a computer. See |
7 |
| Paperless Fax Transmission |
7 |
| Paperless Fax Transmission |
7 |
| <GRAPHIC> |
7 |
| <GRAPHIC> |
7 |
| • You can send documents created in computer applications to another party's fax machine directly... |
7 |
| • You can send documents created in computer applications to another party's fax machine directly... |
7 |
| • You can send documents created in computer applications to another party's fax machine directly... |
7 |
| Fax Transmission and Reception through the Internet |
8 |
| Fax Transmission and Reception through the Internet |
8 |
| <GRAPHIC> |
8 |
| <GRAPHIC> |
8 |
| • You can send fax documents through e-mail by specifying the recipient's e-mail address (Transmi... |
8 |
| • You can send fax documents through e-mail by specifying the recipient's e-mail address (Transmi... |
8 |
| • You can send fax documents through e-mail by specifying the recipient's e-mail address (Transmi... |
8 |
| You can receive sent documents via Internet Fax, or from computers (Receiving Internet Fax ). |
8 |
| See |
8 |
| Using the Scanner in a Network Environment |
8 |
| Using the Scanner in a Network Environment |
8 |
| <GRAPHIC> |
8 |
| <GRAPHIC> |
8 |
| • You can send scan files to a specified destination using e-mail (Sending scan file by e-mail). See |
8 |
| • You can send scan files to a specified destination using e-mail (Sending scan file by e-mail). See |
8 |
| • You can send scan files to a specified destination using e-mail (Sending scan file by e-mail). See |
8 |
| • With ScanRouter V2 Professional/Lite, you can save scan files in specified destinations on netw... |
8 |
| • With ScanRouter V2 Professional/Lite, you can save scan files in specified destinations on netw... |
8 |
| Administrating the Machine (Security Functions) |
9 |
| Administrating the Machine (Security Functions) |
9 |
| <GRAPHIC> |
9 |
| <GRAPHIC> |
9 |
| The security functions protect documents from being copied without permission or unauthorized acc... |
9 |
| This function is only available when the printer/scanner and fax units are installed. |
9 |
| This function is only available when the printer/scanner and fax units are installed. |
9 |
| Security Functions |
9 |
| Security Functions |
9 |
| Security Functions |
9 |
| • Protecting against unauthorized access via phone lines |
9 |
| • Protecting against unauthorized access via phone lines |
9 |
| • Protecting against unauthorized access via phone lines |
9 |
| • Protecting against unauthorized access via phone lines |
9 |
| • Authenticating administrator (setting the key operator code) See |
9 |
| • Authenticating administrator (setting the key operator code) See |
9 |
| Monitoring the Machine Using a Computer |
9 |
| Monitoring the Machine Using a Computer |
9 |
| <GRAPHIC> |
9 |
| <GRAPHIC> |
9 |
| You can monitor machine status and change settings using a computer. |
9 |
| • Using SmartDeviceMonitor for Admin, SmartDeviceMonitor for Client, or a Web browser, you can us... |
9 |
| • Using SmartDeviceMonitor for Admin, SmartDeviceMonitor for Client, or a Web browser, you can us... |
9 |
| • Using SmartDeviceMonitor for Admin, SmartDeviceMonitor for Client, or a Web browser, you can us... |
9 |
| • You can use a Web browser to make network settings. See |
9 |
| • You can use a Web browser to make network settings. See |
9 |
| • You can also use a Web browser to register and manage items such as user codes, fax numbers, an... |
9 |
| • You can also use a Web browser to register and manage items such as user codes, fax numbers, an... |
9 |
| Monitoring and management using a Web browser are only available when the expansion board is inst... |
9 |
| Monitoring and management using a Web browser are only available when the expansion board is inst... |
9 |
| TABLE OF CONTENTS |
10 |
| TABLE OF CONTENTS |
10 |
| Manuals for This Machine i |
10 |
| Copyrights and Trademarks |
13 |
| Copyrights and Trademarks |
13 |
| Copyrights and Trademarks |
13 |
| Trademarks |
13 |
| Trademarks |
13 |
| Microsoft |
13 |
| Microsoft |
13 |
| PostScript |
13 |
| Bluetooth™ is a trademark of the Bluetooth SIG, Inc. (Special Interest Group) and is used by RICO... |
13 |
| Copyright ©2001 Bluetooth SIG, Inc. |
13 |
| The Bluetooth Trademarks are owned by Bluetooth SIG, Inc. USA. |
13 |
| Other product names used herein are for identification purposes only and might be trademarks of t... |
13 |
| The proper names of the Windows operating systems are as follows: |
13 |
| The proper names of the Windows operating systems are as follows: |
13 |
| The proper names of the Windows operating systems are as follows: |
13 |
| Information about Installed Software |
14 |
| Information about Installed Software |
14 |
| expat |
14 |
| expat |
14 |
| • The software including controller, etc. (hereinafter “software”) installed on this product uses... |
14 |
| • The software including controller, etc. (hereinafter “software”) installed on this product uses... |
14 |
| • The software including controller, etc. (hereinafter “software”) installed on this product uses... |
14 |
| • The software including controller, etc. (hereinafter “software”) installed on this product uses... |
14 |
| • The product manufacturer provides warranty and support to the software of the product including... |
14 |
| • The product manufacturer provides warranty and support to the software of the product including... |
14 |
| • Information relating to the expat is available at: |
14 |
| • Information relating to the expat is available at: |
14 |
| http://expat.sourceforge.net/ |
14 |
| Copyright (c) 1998, 1999, 2000 Thai Open Source Software Centre, Ltd. and Clark Cooper. |
14 |
| Permission is hereby granted, free of charge, to any person obtaining a copy of this software and... |
14 |
| The above copyright notice and this permission notice shall be included in all copies or substant... |
14 |
| THE SOFTWARE IS PROVIDED “AS IS”, WITHOUT WARRANTY OF ANY KIND, EXPRESS OR IMPLIED, INCLUDING BUT... |
14 |
| NetBSD |
15 |
| NetBSD |
15 |
| 1. Copyright Notice of NetBSD |
15 |
| 1. Copyright Notice of NetBSD |
15 |
| For all users to use this product: |
15 |
| This product contains NetBSD operating system: |
15 |
| For the most part, the software constituting the NetBSD operating system is not in the public dom... |
15 |
| The following text shows the copyright notice used for many of the NetBSD source code. For exact ... |
15 |
| A full source code can be found at http://www.netbsd.org/. |
15 |
| Copyright © 1999, 2000 The NetBSD Foundation, Inc. |
15 |
| All rights reserved. |
15 |
| Redistribution and use in source and binary forms, with or without modification, are permitted pr... |
15 |
| A Redistributions of source code must retain the above copyright notice, this list of conditions ... |
15 |
| A Redistributions of source code must retain the above copyright notice, this list of conditions ... |
15 |
| A Redistributions of source code must retain the above copyright notice, this list of conditions ... |
15 |
| B Redistributions in binary form must reproduce the above copyright notice, this list of conditio... |
15 |
| B Redistributions in binary form must reproduce the above copyright notice, this list of conditio... |
15 |
| C All advertising materials mentioning features or use of this software must display the followin... |
15 |
| C All advertising materials mentioning features or use of this software must display the followin... |
15 |
| This product includes software developed by The NetBSD Foundation, Inc. and its contributors. |
15 |
| D Neither the name of The NetBSD Foundation nor the names of its contributors may be used to endo... |
15 |
| D Neither the name of The NetBSD Foundation nor the names of its contributors may be used to endo... |
15 |
| THIS SOFTWARE IS PROVIDED BY THE NETBSD FOUNDATION, INC. AND CONTRIBUTORS ''AS IS'' AND ANY EXPRE... |
15 |
| 2. Authors Name List |
16 |
| All product names mentioned herein are trademarks of their respective owners. |
16 |
| The following notices are required to satisfy the license terms of the software that we have ment... |
16 |
| • This product includes software developed by the University of California, Berkeley and its cont... |
16 |
| • This product includes software developed by the University of California, Berkeley and its cont... |
16 |
| • This product includes software developed by the University of California, Berkeley and its cont... |
16 |
| • This product includes software developed by Jonathan R. Stone for the NetBSD Project. |
16 |
| • This product includes software developed by Jonathan R. Stone for the NetBSD Project. |
16 |
| • This product includes software developed by the NetBSD Foundation, Inc. and its contributors. |
16 |
| • This product includes software developed by the NetBSD Foundation, Inc. and its contributors. |
16 |
| • This product includes software developed by Manuel Bouyer. |
16 |
| • This product includes software developed by Manuel Bouyer. |
16 |
| • This product includes software developed by Charles Hannum. |
16 |
| • This product includes software developed by Charles Hannum. |
16 |
| • This product includes software developed by Charles M. Hannum. |
16 |
| • This product includes software developed by Charles M. Hannum. |
16 |
| • This product includes software developed by Christopher G. Demetriou. |
16 |
| • This product includes software developed by Christopher G. Demetriou. |
16 |
| • This product includes software developed by TooLs GmbH. |
16 |
| • This product includes software developed by TooLs GmbH. |
16 |
| • This product includes software developed by Terrence R. Lambert. |
16 |
| • This product includes software developed by Terrence R. Lambert. |
16 |
| • This product includes software developed by Adam Glass and Charles Hannum. |
16 |
| • This product includes software developed by Adam Glass and Charles Hannum. |
16 |
| • This product includes software developed by Theo de Raadt. |
16 |
| • This product includes software developed by Theo de Raadt. |
16 |
| • This product includes software developed by Jonathan Stone and Jason R. Thorpe for the NetBSD P... |
16 |
| • This product includes software developed by Jonathan Stone and Jason R. Thorpe for the NetBSD P... |
16 |
| • This product includes software developed by the University of California, Lawrence Berkeley Lab... |
16 |
| • This product includes software developed by the University of California, Lawrence Berkeley Lab... |
16 |
| • This product includes software developed by Christos Zoulas. |
16 |
| • This product includes software developed by Christos Zoulas. |
16 |
| • This product includes software developed by Christopher G. Demetriou for the NetBSD Project. |
16 |
| • This product includes software developed by Christopher G. Demetriou for the NetBSD Project. |
16 |
| • This product includes software developed by Paul Kranenburg. |
16 |
| • This product includes software developed by Paul Kranenburg. |
16 |
| • This product includes software developed by Adam Glass. |
16 |
| • This product includes software developed by Adam Glass. |
16 |
| • This product includes software developed by Jonathan Stone. |
16 |
| • This product includes software developed by Jonathan Stone. |
16 |
| • This product includes software developed by Jonathan Stone for the NetBSD Project. |
16 |
| • This product includes software developed by Jonathan Stone for the NetBSD Project. |
16 |
| • This product includes software developed by Winning Strategies, Inc. |
16 |
| • This product includes software developed by Winning Strategies, Inc. |
16 |
| • This product includes software developed by Frank van der Linden for the NetBSD Project. |
16 |
| • This product includes software developed by Frank van der Linden for the NetBSD Project. |
16 |
| • This product includes software developed for the NetBSD Project by Frank van der Linden. |
16 |
| • This product includes software developed for the NetBSD Project by Frank van der Linden. |
16 |
| • This product includes software developed for the NetBSD Project by Jason R. Thorpe. |
16 |
| • This product includes software developed for the NetBSD Project by Jason R. Thorpe. |
16 |
| • The software was developed by the University of California, Berkeley. |
16 |
| • The software was developed by the University of California, Berkeley. |
16 |
| • This product includes software developed by Chris Provenzano, the University of California, Ber... |
16 |
| • This product includes software developed by Chris Provenzano, the University of California, Ber... |
16 |
| Sablotron |
17 |
| Sablotron |
17 |
| Sablotron (Version 0.82) Copyright (c) 2000 Ginger Alliance Ltd. All Rights Reserve |
17 |
| Sablotron (Version 0.82) Copyright (c) 2000 Ginger Alliance Ltd. All Rights Reserve |
17 |
| a) The application software installed on this product includes the Sablotron software Version 0.8... |
17 |
| b) The product manufacturer provides warranty and support to the application software of this pro... |
17 |
| c) The Sablotron 0.82 and the modifications thereof are made available under the terms of Mozilla... |
17 |
| d) The source code of the modified code of the Sablotron 0.82 is available at: http://support-dow... |
17 |
| e) The source code of the Sablotron software is available at: http://www.gingerall.com. |
17 |
| f) MPL 1.1 is available at: http://www.mozilla.org/MPL/MPL-1.1.html. |
17 |
| JPEG LIBRARY |
17 |
| JPEG LIBRARY |
17 |
| • The software installed on this product is based in part on the work of the Independent JPEG Group. |
17 |
| • The software installed on this product is based in part on the work of the Independent JPEG Group. |
17 |
| • The software installed on this product is based in part on the work of the Independent JPEG Group. |
17 |
| • The software installed on this product is based in part on the work of the Independent JPEG Group. |
17 |
| SASL |
18 |
| SASL |
18 |
| CMU libsasl |
18 |
| CMU libsasl |
18 |
| Tim Martin |
18 |
| Rob Earhart |
18 |
| Rob Siemborski |
18 |
| Copyright (c) 2001 Carnegie Mellon University. All rights reserved. |
18 |
| Redistribution and use in source and binary forms, with or without modification, are permitted pr... |
18 |
| CARNEGIE MELLON UNIVERSITY DISCLAIMS ALL WARRANTIES WITH REGARD TO THIS SOFTWARE, INCLUDING ALL I... |
18 |
| MD4 |
19 |
| MD4 |
19 |
| Copyright (C) 1990-2, RSA Data Security, Inc. All rights reserved. |
19 |
| Copyright (C) 1990-2, RSA Data Security, Inc. All rights reserved. |
19 |
| License to copy and use this software is granted provided that it is identified as the “RSA Data ... |
19 |
| License is also granted to make and use derivative works provided that such works are identified ... |
19 |
| RSA Data Security, Inc. makes no representations concerning either the merchantability of this so... |
19 |
| These notices must be retained in any copies of any part of this documentation and/or software. |
19 |
| MD5 |
19 |
| MD5 |
19 |
| Copyright (C) 1991-2, RSA Data Security, Inc. Created 1991. All rights reserved. |
19 |
| Copyright (C) 1991-2, RSA Data Security, Inc. Created 1991. All rights reserved. |
19 |
| License to copy and use this software is granted provided that it is identified as the “RSA Data ... |
19 |
| License is also granted to make and use derivative works provided that such works are identified ... |
19 |
| RSA Data Security, Inc. makes no representations concerning either the merchantability of this so... |
19 |
| These notices must be retained in any copies of any part of this documentation and/or software. |
19 |
| How to Read This Manual |
20 |
| How to Read This Manual |
20 |
| Symbols |
20 |
| Symbols |
20 |
| The following set of symbols is used in this manual. |
20 |
| The following set of symbols is used in this manual. |
20 |
| This symbol indicates a potentially hazardous situation that might result in death or serious inj... |
20 |
| This symbol indicates a potentially hazardous situation that might result in minor or moderate in... |
20 |
| * The statements above are notes for your safety. |
20 |
| If this instruction is not followed, paper might be misfed, originals might be damaged, or data m... |
20 |
| This symbol indicates information or preparations required prior to operating. |
20 |
| This symbol indicates precautions for operation, or actions to take after abnormal operation. |
20 |
| This symbol indicates numerical limits, functions that cannot be used together, or conditions in ... |
20 |
| This symbol indicates a reference. |
20 |
| Keys that appear on the machine's display panel. |
20 |
| Keys that appear on the machine's display panel. |
20 |
| Keys that appear on the machine's display panel. |
20 |
| Keys built into the machine's control panel. |
20 |
| Keys built into the machine's control panel. |
20 |
| Keys built into the machine's control panel. |
20 |
| ENERGY STAR Program |
21 |
| ENERGY STAR Program |
21 |
| <TABLE> |
21 |
| <TABLE> |
21 |
| <TABLE> |
21 |
| <TABLE BODY> |
21 |
| <TABLE ROW> |
21 |
| <GRAPHIC> |
21 |
| As an ENERGY STAR Partner, we have determined that this machine model meets the ENERGY STAR Guide... |
21 |
| <TABLE> |
21 |
| <TABLE> |
21 |
| <TABLE BODY> |
21 |
| <TABLE ROW> |
21 |
| The ENERGY STAR Guidelines intend to establish an international energy-saving system for developi... |
21 |
| The ENERGY STAR Guidelines intend to establish an international energy-saving system for developi... |
21 |
| When a product meets the ENERGY STAR Guidelines for energy efficiency, the Partner shall place th... |
21 |
| This product was designed to reduce the environmental impact associated with office equipment by ... |
21 |
| • Low Power mode |
21 |
| • Low Power mode |
21 |
| • Low Power mode |
21 |
| This product automatically lowers its power consumption 1 minute after finishing the last copy or... |
21 |
| For details about how to change the interval between last job and Low Power mode, see |
21 |
| • Off mode (Copier only) |
21 |
| • Off mode (Copier only) |
21 |
| To conserve energy, this product automatically turns off 1 minute after finishing the last copy o... |
21 |
| For details about how to change the interval between last job and Auto Off mode, see |
21 |
| • Sleep mode (Fax, printer, or scanner installed) |
21 |
| • Sleep mode (Fax, printer, or scanner installed) |
21 |
| If there is a fax, printer, or scanner unit installed, this product automatically lowers its powe... |
21 |
| For details about how to change the interval between last job and Sleep mode, see |
21 |
| If you want to operate this product while it is in either of these modes, do one of the following: |
21 |
| If you want to operate this product while it is in either of these modes, do one of the following: |
21 |
| • Duplex Priority |
22 |
| • Duplex Priority |
22 |
| To conserve paper, the Duplex function (1-Sided Æ 2-Sided) can be selected preferentially when yo... |
22 |
| Specifications |
22 |
| Specifications |
22 |
| <TABLE> |
22 |
| <TABLE> |
22 |
| <TABLE> |
22 |
| <TABLE HEADING> |
22 |
| <TABLE ROW> |
22 |
| Copier only |
22 |
| Copier only |
22 |
| Fax, printer, or scanner installed |
22 |
| Fax, printer, or scanner installed |
22 |
| <TABLE BODY> |
22 |
| <TABLE ROW> |
22 |
| Low Power mode |
22 |
| Low Power mode |
22 |
| Power consumption |
22 |
| Power consumption |
22 |
| 50 Wh |
22 |
| 50 Wh |
22 |
| 60 Wh |
22 |
| 60 Wh |
22 |
| <TABLE ROW> |
22 |
| Default interval |
22 |
| Default interval |
22 |
| 1 minute |
22 |
| 1 minute |
22 |
| 1 minute |
22 |
| 1 minute |
22 |
| <TABLE ROW> |
22 |
| Recovery time |
22 |
| Recovery time |
22 |
| Less than 10 seconds |
22 |
| Less than 10 seconds |
22 |
| Less than 10 seconds |
22 |
| Less than 10 seconds |
22 |
| <TABLE ROW> |
22 |
| Sleep mode |
22 |
| Sleep mode |
22 |
| Power consumption |
22 |
| Power consumption |
22 |
| � |
22 |
| Less than 10 Wh |
22 |
| Less than 10 Wh |
22 |
| <TABLE ROW> |
22 |
| Default interval |
22 |
| Default interval |
22 |
| � |
22 |
| 1 minute |
22 |
| 1 minute |
22 |
| <TABLE ROW> |
22 |
| Recovery time |
22 |
| Recovery time |
22 |
| � |
22 |
| Less than 10 seconds |
22 |
| Less than 10 seconds |
22 |
| <TABLE ROW> |
22 |
| Off mode |
22 |
| Off mode |
22 |
| Power consumption |
22 |
| Power consumption |
22 |
| less than 2 Wh |
22 |
| less than 2 Wh |
22 |
| � |
22 |
| � |
22 |
| <TABLE ROW> |
22 |
| Default interval |
22 |
| Default interval |
22 |
| 1 minute |
22 |
| 1 minute |
22 |
| � |
22 |
| � |
22 |
| <TABLE ROW> |
22 |
| Recovery time |
22 |
| Recovery time |
22 |
| Less than 10 seconds |
22 |
| Less than 10 seconds |
22 |
| � |
22 |
| <TABLE> |
22 |
| <TABLE> |
22 |
| <TABLE BODY> |
22 |
| <TABLE ROW> |
22 |
| Duplex Priority |
22 |
| Duplex Priority |
22 |
| 1 Sided Æ 1 Sided |
22 |
| 1 Sided Æ 1 Sided |
22 |
| Recycled Paper |
22 |
| Recycled Paper |
22 |
| In accordance with the ENERGY STAR Program, we recommend use of recycled paper which is environme... |
22 |
| In accordance with the ENERGY STAR Program, we recommend use of recycled paper which is environme... |
22 |
| 1.� Getting Started |
23 |
| 1.� Getting Started |
23 |
| Guide to Components |
23 |
| Guide to Components |
23 |
| Guide to components |
23 |
| <GRAPHIC> |
23 |
| <GRAPHIC> |
23 |
| <GRAPHIC> |
23 |
| 1.� Auto Document Feeder |
23 |
| 1.� Auto Document Feeder |
23 |
| 1.� Auto Document Feeder |
23 |
| Feeds in originals automatically. |
23 |
| 2.� Exposure glass |
23 |
| 2.� Exposure glass |
23 |
| Place originals face down here. |
23 |
| 3.� Internal tray |
23 |
| 3.� Internal tray |
23 |
| Copied, printed paper, or fax messages are delivered here. |
23 |
| 4.� Ventilation holes |
23 |
| 4.� Ventilation holes |
23 |
| Prevent overheating. Do not obstruct these by placing objects near them or leaning things against... |
23 |
| 5.� Main power switch |
23 |
| 5.� Main power switch |
23 |
| If the machine does not operate after turning on the operation switch, check the main power switc... |
23 |
| 6.� Main power indicator |
23 |
| 6.� Main power indicator |
23 |
| Lights when the main power switch is turned on, and goes off when the switch is turned off. |
23 |
| 7.� On indicator |
23 |
| 7.� On indicator |
23 |
| Lights when the operation switch is turned on, and goes off when the switch is turned off. |
23 |
| 8.� Operation switch |
24 |
| 8.� Operation switch |
24 |
| Press to turn the power on (the On indicator lights). To turn the power off, press again (the On ... |
24 |
| 9.� Control panel |
24 |
| 9.� Control panel |
24 |
| See |
24 |
| 10.� Front cover |
24 |
| 10.� Front cover |
24 |
| Open to access the inside of the machine. |
24 |
| 11.� Paper tray (Tray 1) |
24 |
| 11.� Paper tray (Tray 1) |
24 |
| Load paper here. |
24 |
| 12.� Paper tray unit (Tray 2) |
24 |
| 12.� Paper tray unit (Tray 2) |
24 |
| See |
24 |
| 13.� Internal tray guide |
24 |
| 13.� Internal tray guide |
24 |
| Open out to support large paper and raise the end fence. |
24 |
| <GRAPHIC> |
24 |
| <GRAPHIC> |
24 |
| 1.� Bypass tray |
24 |
| 1.� Bypass tray |
24 |
| 1.� Bypass tray |
24 |
| Use to copy onto OHP transparencies, adhesive labels, translucent paper, envelopes, and custom si... |
24 |
| 2.� Right cover |
24 |
| 2.� Right cover |
24 |
| Right cover |
24 |
| Open this to remove jammed paper fed from the paper tray. |
24 |
| 3.� Lower right cover |
24 |
| 3.� Lower right cover |
24 |
| Open this to remove jammed paper from the paper tray unit. |
24 |
| Other Items |
25 |
| Other Items |
25 |
| Other items |
25 |
| • External |
25 |
| • External |
25 |
| • External |
25 |
| • External |
25 |
| <GRAPHIC> |
25 |
| <GRAPHIC> |
25 |
| 1.� Paper tray unit (Tray 2) |
25 |
| 1.� Paper tray unit (Tray 2) |
25 |
| 1.� Paper tray unit (Tray 2) |
25 |
| Holds 500 sheets. |
25 |
| • Internal |
25 |
| • Internal |
25 |
| A Fax unit |
25 |
| A Fax unit |
25 |
| A Fax unit |
25 |
| Allows you to use the facsimile function. |
25 |
| B Printer/Scanner unit |
25 |
| B Printer/Scanner unit |
25 |
| Allows you to use the printer and scanner functions. |
25 |
| C Parallel port IEEE 1284 interface board |
25 |
| C Parallel port IEEE 1284 interface board |
25 |
| Allows you to connect an IEEE 1284 cable. |
25 |
| D IEEE 1394 interface board |
25 |
| D IEEE 1394 interface board |
25 |
| Allows you to connect an IEEE 1394 cable. |
25 |
| E IEEE 802.11b wireless LAN board |
25 |
| E IEEE 802.11b wireless LAN board |
25 |
| Allows you to install a wireless LAN interface. |
25 |
| F Bluetooth Interface Board |
25 |
| F Bluetooth Interface Board |
25 |
| Allows you to expand the interface. |
25 |
| G PostScript3 module |
25 |
| G PostScript3 module |
25 |
| Allows you to use PostScript3. |
25 |
| You cannot install two or more of the options below: Parallel port IEEE 1284 interface board, IEE... |
25 |
| You cannot install two or more of the options below: Parallel port IEEE 1284 interface board, IEE... |
25 |
| Control Panel |
26 |
| Control Panel |
26 |
| Control panel |
26 |
| This illustration shows the control panel of the machine with fax, printer, and scanner installed. |
26 |
| This illustration shows the control panel of the machine with fax, printer, and scanner installed. |
26 |
| <GRAPHIC> |
26 |
| <GRAPHIC> |
26 |
| <GRAPHIC> |
26 |
| 1.� Fax function keys |
26 |
| 1.� Fax function keys |
26 |
| 1.� Fax function keys |
26 |
| Facsimile Reference <Basic Features> |
26 |
| Facsimile Reference <Basic Features> |
26 |
| Facsimile Reference <Basic Features> |
26 |
| Facsimile |
26 |
| Facsimile |
26 |
| Facsimile |
26 |
| Press to activate the facsimile function. |
26 |
| 3.� Scanner/Fax function keys |
26 |
| 3.� Scanner/Fax function keys |
26 |
| Scanner Reference |
26 |
| Scanner Reference |
26 |
| Scanner Reference |
26 |
| Scanner |
26 |
| Scanner |
26 |
| Scanner |
26 |
| Press to activate the scanner function. |
26 |
| Copy |
26 |
| Copy |
26 |
| Copy |
26 |
| Press to activate the copy function. |
26 |
| Printer |
26 |
| Printer |
26 |
| Printer |
26 |
| Press to activate the printer function. |
26 |
| 7.� Indicators |
26 |
| 7.� Indicators |
26 |
| Display errors and machine status. |
26 |
| h: Error indicator. See |
26 |
| B: Load Paper indicator. See |
26 |
| D: Add Toner indicator. See |
26 |
| 8.� Display |
26 |
| 8.� Display |
26 |
| Displays operation status and messages. |
26 |
| 9.� Selection keys |
26 |
| 9.� Selection keys |
26 |
| Correspond to items on the display. Press to select the corresponding item. |
26 |
| 10.� Scroll keys |
26 |
| 10.� Scroll keys |
26 |
| Press to select an item. |
26 |
| U |
26 |
| U |
26 |
| T |
26 |
| T |
26 |
| V |
26 |
| V |
26 |
| W |
26 |
| W |
26 |
| User Tools/Counter |
26 |
| User Tools/Counter |
26 |
| User Tools/Counter |
26 |
| • User Tools |
26 |
| • User Tools |
26 |
| • User Tools |
26 |
| Press to change default or conditions according to requirement. See |
26 |
| • Counter |
26 |
| • Counter |
26 |
| Press to check or print the counter value. See |
26 |
| Clear Modes |
26 |
| Clear Modes |
26 |
| Clear Modes |
26 |
| Press to clear the current settings. |
26 |
| Clear/Stop |
26 |
| Clear/Stop |
26 |
| Clear/Stop |
26 |
| • Clear: |
26 |
| • Clear: |
26 |
| • Clear: |
26 |
| Clears an entered numeric value. |
26 |
| • Stop: |
26 |
| • Stop: |
26 |
| Stops a job in progress, such as scanning, faxing, or printing. |
26 |
| 14.� Main power indicator and On indicator |
27 |
| 14.� Main power indicator and On indicator |
27 |
| The main power indicator lights when the main power switch is turned on. The On indicator lights ... |
27 |
| Do not turn off the main power switch while the On indicator is lit or blinking. Doing so may dam... |
27 |
| Do not turn off the main power switch while the On indicator is lit or blinking. Doing so may dam... |
27 |
| 15.� Operation switch |
27 |
| 15.� Operation switch |
27 |
| Press to turn the power on. The On indicator lights. To turn the power off, press again. |
27 |
| 16.� Quick Dial keys |
27 |
| 16.� Quick Dial keys |
27 |
| Press to select the registered destination at a single touch, or to enter letters and symbols. |
27 |
| On Line |
27 |
| On Line |
27 |
| On Line |
27 |
| Printer Reference 1 |
27 |
| Printer Reference 1 |
27 |
| Printer Reference 1 |
27 |
| 18.� Data In indicator |
27 |
| 18.� Data In indicator |
27 |
| Printer Reference 1 |
27 |
| Printer Reference 1 |
27 |
| Printer Reference 1 |
27 |
| 19.� Copier function keys |
27 |
| 19.� Copier function keys |
27 |
| Copy Reference |
27 |
| Copy Reference |
27 |
| Copy Reference |
27 |
| Lighter |
27 |
| Lighter |
27 |
| Lighter |
27 |
| Press to change the image density setting. Select the image density in five increments, lighter t... |
27 |
| Original Type |
27 |
| Original Type |
27 |
| Original Type |
27 |
| Press to select the original type registered in |
27 |
| Cancel |
27 |
| Cancel |
27 |
| Cancel |
27 |
| Press to cancel an operation or return to the previous display. |
27 |
| OK |
27 |
| OK |
27 |
| OK |
27 |
| Press to set a selected item or an entered numeric value. |
27 |
| 24.� Number keys |
27 |
| 24.� Number keys |
27 |
| Press to enter numeric values. |
27 |
| # |
27 |
| # |
27 |
| # |
27 |
| Press to set a selected item or an entered numeric value. |
27 |
| Start |
27 |
| Start |
27 |
| Start |
27 |
| Press to start copying, printing, scanning or sending. |
27 |
| Display |
28 |
| Display |
28 |
| The display panel shows machine status, error messages, and function menus. |
28 |
| The display panel shows machine status, error messages, and function menus. |
28 |
| A force or impact of more than 30 N (about 3 kgf) will damage the display. |
28 |
| A force or impact of more than 30 N (about 3 kgf) will damage the display. |
28 |
| A force or impact of more than 30 N (about 3 kgf) will damage the display. |
28 |
| The copy display is set as the default screen when the machine is turned on. |
28 |
| When you select or specify an item on the display, it is highlighted like |
28 |
| Reading the Display and Using Keys |
28 |
| Reading the Display and Using Keys |
28 |
| Reading the display and using keys |
28 |
| This section explains how to read the display and use the Selection keys. |
28 |
| This section explains how to read the display and use the Selection keys. |
28 |
| <GRAPHIC> |
28 |
| <GRAPHIC> |
28 |
| 1.� Selection keys |
28 |
| 1.� Selection keys |
28 |
| 1.� Selection keys |
28 |
| Correspond to items at the bottom line on the display. |
28 |
| Example: |
28 |
| • When the instruction “press |
28 |
| • When the instruction “press |
28 |
| • When the instruction “press |
28 |
| • When the instruction “press |
28 |
| • When the instruction “press |
28 |
| • When the instruction “press |
28 |
| • When the instruction “press |
28 |
| Cancel |
28 |
| Cancel |
28 |
| Cancel |
28 |
| Press to cancel an operation or return to the previous display. |
28 |
| OK |
28 |
| OK |
28 |
| OK |
28 |
| Press to set a selected item or an entered numeric value. |
28 |
| 4.� Scroll keys |
28 |
| 4.� Scroll keys |
28 |
| Press to move the cursor in each direction, step by step. |
28 |
| When the |
28 |
| Common key operations |
29 |
| Common key operations |
29 |
| Common key operations |
29 |
| The following keys are common to all screens: |
29 |
| The following keys are common to all screens: |
29 |
| Key list |
29 |
| Key list |
29 |
| <TABLE> |
29 |
| <TABLE> |
29 |
| <TABLE BODY> |
29 |
| <TABLE ROW> |
29 |
| [Cancel] |
29 |
| Cancel |
29 |
| Deletes a selected function or entered values, and then the previous display returns. |
29 |
| <TABLE ROW> |
29 |
| [Exit] |
29 |
| Exit |
29 |
| The previous display returns. |
29 |
| <TABLE ROW> |
29 |
| [Stop] |
29 |
| Stop |
29 |
| Stops a job in progress. |
29 |
| <TABLE ROW> |
29 |
| [Yes] |
29 |
| Yes |
29 |
| Yes |
29 |
| Acknowledges a selected function or an entered values. |
29 |
| Acknowledges a selected function or an entered values. |
29 |
| <TABLE ROW> |
29 |
| [Stop] |
29 |
| Stop |
29 |
| Stop |
29 |
| Cancels a selected function or entered values, and then the previous display returns. |
29 |
| Cancels a selected function or entered values, and then the previous display returns. |
29 |
| 2.� Combined Function Operations |
31 |
| 2.� Combined Function Operations |
31 |
| Changing Modes |
31 |
| Changing Modes |
31 |
| Changing modes |
31 |
| You cannot switch modes in any of the following situations: |
31 |
| You cannot switch modes in any of the following situations: |
31 |
| You cannot switch modes in any of the following situations: |
31 |
| The copying screen is displayed as default when the power is turned on. You can change this defau... |
31 |
| <GRAPHIC> |
32 |
| - System Reset |
32 |
| - System Reset |
32 |
| The machine returns automatically to its initial condition when the job is finished, after a cert... |
32 |
| You can change the System Reset time. See |
32 |
| You can change the System Reset time. See |
32 |
| Multi-Access |
33 |
| Multi-Access |
33 |
| You can carry out another job using a different function while the current job is being performed... |
33 |
| You can carry out another job using a different function while the current job is being performed... |
33 |
| This allows you to handle jobs efficiently, regardless of how the machine is being used. For exam... |
33 |
| See |
33 |
| See |
33 |
| - Function compatibility |
33 |
| - Function compatibility |
33 |
| The chart shows function compatibility when print priority is set to “ |
33 |
| <TABLE> |
33 |
| <TABLE> |
33 |
| <TABLE> |
33 |
| <TABLE HEADING> |
33 |
| <TABLE ROW> |
33 |
| Function you want to select |
33 |
| Copy |
33 |
| Facsimile |
33 |
| Printer |
33 |
| Scanner |
33 |
| <TABLE ROW> |
33 |
| Transmission Operation |
33 |
| Transmission |
33 |
| Reception |
33 |
| Receive Data |
33 |
| Print |
33 |
| <TABLE ROW> |
33 |
| Function in progress |
33 |
| Function in progress |
33 |
| Using the control panel |
33 |
| Copying |
33 |
| Scanning An Original for Memory Transmission |
33 |
| Memory Transmission |
33 |
| Immediate Transmission |
33 |
| Memory Reception |
33 |
| Printing Received Data |
33 |
| Printing |
33 |
| Using the control panel |
33 |
| Scanning |
33 |
| <TABLE BODY> |
33 |
| <TABLE ROW> |
33 |
| Copy |
33 |
| Using the control panel |
33 |
| ¥ |
33 |
| ¥ |
33 |
| $ |
33 |
| $ |
33 |
| b |
33 |
| $ |
33 |
| b |
33 |
| b |
33 |
| b |
33 |
| b |
33 |
| $ |
33 |
| $ |
33 |
| <TABLE ROW> |
33 |
| Copying |
33 |
| ¥ |
33 |
| ¥ |
33 |
| $ |
33 |
| $ *1 |
33 |
| b |
33 |
| $ *1 |
33 |
| b |
33 |
| b |
33 |
| b |
33 |
| b |
33 |
| $ |
33 |
| $ *1 |
33 |
| <TABLE ROW> |
33 |
| Facsimile |
33 |
| Transmission Operation |
33 |
| $ |
33 |
| $ |
33 |
| ¥ |
33 |
| ¥ |
33 |
| b |
33 |
| ¥ |
33 |
| b |
33 |
| b |
33 |
| b |
33 |
| b |
33 |
| $ |
33 |
| $ |
33 |
| <TABLE ROW> |
33 |
| Transmission |
33 |
| Scanning An Original for Memory Transmission |
33 |
| ¥ |
33 |
| ¥ |
33 |
| ¥ |
33 |
| ¥ |
33 |
| b |
33 |
| ¥ |
33 |
| b |
33 |
| b |
33 |
| b |
33 |
| b |
33 |
| ¥ |
33 |
| ¥ |
33 |
| <TABLE ROW> |
33 |
| Memory Transmission |
33 |
| b |
33 |
| b |
33 |
| b |
33 |
| b |
33 |
| ¥ |
33 |
| ¥ |
33 |
| ¥ |
33 |
| b |
33 |
| b |
33 |
| b |
33 |
| b |
33 |
| b |
33 |
| <TABLE ROW> |
33 |
| Immediate Transmission |
33 |
| ¥ |
33 |
| ¥ |
33 |
| ¥ |
33 |
| ¥ |
33 |
| ¥ |
33 |
| ¥ |
33 |
| ¥ |
33 |
| b |
33 |
| b |
33 |
| b |
33 |
| ¥ |
33 |
| ¥ |
33 |
| <TABLE ROW> |
34 |
| Facsimile |
34 |
| Reception |
34 |
| Memory Reception |
34 |
| b |
34 |
| b |
34 |
| b |
34 |
| b |
34 |
| ¥ |
34 |
| ¥ |
34 |
| ¥ |
34 |
| b |
34 |
| b |
34 |
| b |
34 |
| b |
34 |
| b |
34 |
| <TABLE ROW> |
34 |
| Printing Received Data |
34 |
| b |
34 |
| b |
34 |
| b |
34 |
| b |
34 |
| b *2 |
34 |
| b *2 |
34 |
| b *2 |
34 |
| ¥ |
34 |
| b |
34 |
| b |
34 |
| b |
34 |
| b |
34 |
| <TABLE ROW> |
34 |
| Printer |
34 |
| Receive Data |
34 |
| b |
34 |
| b |
34 |
| b |
34 |
| b |
34 |
| b |
34 |
| b |
34 |
| b |
34 |
| b |
34 |
| 1 |
34 |
| 1 |
34 |
| b |
34 |
| b |
34 |
| <TABLE ROW> |
34 |
| Print |
34 |
| Printing |
34 |
| b |
34 |
| b |
34 |
| b |
34 |
| b |
34 |
| b |
34 |
| b |
34 |
| b |
34 |
| b |
34 |
| b |
34 |
| 1 |
34 |
| b |
34 |
| b |
34 |
| <TABLE ROW> |
34 |
| Scanner |
34 |
| Using the control panel |
34 |
| $ |
34 |
| $ |
34 |
| $ |
34 |
| $ |
34 |
| b |
34 |
| $ |
34 |
| b |
34 |
| b |
34 |
| b |
34 |
| b |
34 |
| ¥ |
34 |
| ¥ |
34 |
| <TABLE ROW> |
34 |
| Scanning |
34 |
| $ |
34 |
| $ *1 |
34 |
| $ |
34 |
| $ *1 |
34 |
| b |
34 |
| $ *1 |
34 |
| b |
34 |
| b |
34 |
| b |
34 |
| b |
34 |
| ¥ |
34 |
| ¥ |
34 |
| b…means that these functions can be used together. |
34 |
| $…means that you can interrupt the current job with Function keys to proceed to a subsequent job. |
34 |
| 1…means that another job will automatically start after the current job is finished. |
34 |
| ¥…means that you must manually start another job after the current job is finished (i.e., these f... |
34 |
| *1 You can scan a document once the preceding job documents are all scanned. |
34 |
| *1 You can scan a document once the preceding job documents are all scanned. |
34 |
| *1 You can scan a document once the preceding job documents are all scanned. |
34 |
| *2 During parallel reception, any subsequent job is suspended until reception is completed. |
34 |
| *2 During parallel reception, any subsequent job is suspended until reception is completed. |
34 |
| 3.� User Tools ( |
35 |
| 3.� User Tools ( |
35 |
| User Tools Menu ( |
35 |
| User Tools Menu ( |
35 |
| User Tools Menu (System Settings<Default Para Font>) |
35 |
| For details about |
35 |
| For details about |
35 |
| For details about |
35 |
| For details about parallel interface, see “System Settings (Parallel Connection)”, |
35 |
| General Features |
35 |
| General Features |
35 |
| General Features |
35 |
| General Features |
35 |
| <TABLE> |
35 |
| <TABLE> |
35 |
| <TABLE> |
35 |
| <TABLE HEADING> |
35 |
| <TABLE ROW> |
35 |
| Default (MFP) |
35 |
| Default (MFP) |
35 |
| Default (Copier only) |
35 |
| Default (Copier only) |
35 |
| <TABLE BODY> |
35 |
| <TABLE ROW> |
35 |
| Panel Tone |
35 |
| Panel Tone |
35 |
| On |
35 |
| On |
35 |
| <TABLE ROW> |
35 |
| Copy Count Display |
35 |
| Copy Count Display |
35 |
| Up |
35 |
| Up |
35 |
| <TABLE ROW> |
35 |
| Function Priority |
35 |
| Function Priority |
35 |
| Copier |
35 |
| Copier |
35 |
| <TABLE ROW> |
35 |
| Print Priority |
35 |
| Print Priority |
35 |
| Display mode |
35 |
| Display mode |
35 |
| <TABLE ROW> |
35 |
| Display Contrast |
35 |
| Display Contrast |
35 |
| Display Contrast |
35 |
| Center |
35 |
| Center |
35 |
| <TABLE ROW> |
35 |
| Key Repeat |
35 |
| Key Repeat |
35 |
| Key Repeat |
35 |
| On |
35 |
| On |
35 |
| On |
35 |
| <TABLE ROW> |
35 |
| Measurement Unit |
35 |
| Measurement Unit |
35 |
| Measurement Unit |
35 |
| Metric version: mm |
35 |
| Metric version: |
35 |
| Inch version: |
35 |
| Tray Paper Settings |
35 |
| Tray Paper Settings |
35 |
| Tray Paper Settings |
35 |
| Tray Paper Settings |
35 |
| <TABLE> |
35 |
| <TABLE> |
35 |
| <TABLE> |
35 |
| <TABLE HEADING> |
35 |
| <TABLE ROW> |
35 |
| Default (MFP) |
35 |
| Default (Copier only) |
35 |
| <TABLE BODY> |
35 |
| <TABLE ROW> |
35 |
| Tray Paper Size:Tray 1 |
35 |
| Tray Paper Size: |
35 |
| Tray 1 |
35 |
| Metric version: A4L |
35 |
| Metric version: |
35 |
| <TABLE ROW> |
35 |
| Inch version: 81/2\ |
35 |
| Inch version: |
35 |
| <TABLE ROW> |
35 |
| Tray Paper Size:Tray 2 |
35 |
| Tray Paper Size: |
35 |
| Tray 2 |
35 |
| Metric version: A4L |
35 |
| Metric version: |
35 |
| <TABLE ROW> |
35 |
| Inch version: 81/2\ |
35 |
| Inch version: |
35 |
| <TABLE ROW> |
35 |
| Paper Type: |
35 |
| Paper Type: |
35 |
| Bypass tray |
35 |
| Thick Paper |
35 |
| Thick Paper |
35 |
| <TABLE ROW> |
35 |
| Paper Type:Tray 1 |
35 |
| Paper Type: |
35 |
| Tray 1 |
35 |
| No Display (Plain Paper)/APS On/Duplex On |
35 |
| No Display (Plain Paper)/APS On/Duplex On |
35 |
| <TABLE ROW> |
35 |
| Paper Type:Tray 2 |
35 |
| Paper Type: |
35 |
| Tray 2 |
35 |
| No Display (Plain Paper)/APS On/Duplex On |
35 |
| No Display (Plain Paper)/APS On/Duplex On |
35 |
| <TABLE ROW> |
35 |
| Ppr Tray Priority: Copier |
35 |
| Ppr Tray Priority: Copier |
35 |
| Tray 1 |
35 |
| Tray 1 |
35 |
| <TABLE ROW> |
35 |
| Ppr Tray Priority: Printer |
35 |
| Ppr Tray Priority: Printer |
35 |
| Tray 1 |
35 |
| Tray 1 |
35 |
| <TABLE ROW> |
35 |
| Ppr Tray Priority: Fax |
35 |
| Ppr Tray Priority: Fax |
35 |
| Tray 1 |
35 |
| Tray 1 |
35 |
| Timer Settings |
36 |
| Timer Settings |
36 |
| Timer Settings |
36 |
| Timer Settings |
36 |
| <TABLE> |
36 |
| <TABLE> |
36 |
| <TABLE> |
36 |
| <TABLE HEADING> |
36 |
| <TABLE ROW> |
36 |
| Default (MFP) |
36 |
| Default (Copier only) |
36 |
| <TABLE BODY> |
36 |
| <TABLE ROW> |
36 |
| Auto Off Timer |
36 |
| Auto Off Timer |
36 |
| 1 min. |
36 |
| 1 min. |
36 |
| <TABLE ROW> |
36 |
| Energy Saver Timer |
36 |
| Energy Saver Timer |
36 |
| Energy Saver Timer |
36 |
| 1 min. |
36 |
| 1 min. |
36 |
| 1 min. |
36 |
| <TABLE ROW> |
36 |
| System Auto Reset Timer |
36 |
| System Auto Reset Timer |
36 |
| 60 sec. |
36 |
| 60 sec. |
36 |
| <TABLE ROW> |
36 |
| Copier Auto Reset Timer |
36 |
| Copier Auto Reset Timer |
36 |
| 60 sec. |
36 |
| 60 sec. |
36 |
| <TABLE ROW> |
36 |
| Facsimile Auto Reset Timer |
36 |
| Facsimile Auto Reset Timer |
36 |
| 30 sec. |
36 |
| 30 sec. |
36 |
| <TABLE ROW> |
36 |
| Scanner Auto Reset Timer |
36 |
| Scanner Auto Reset Timer |
36 |
| 60 sec. |
36 |
| 60 sec. |
36 |
| <TABLE ROW> |
36 |
| Set Date |
36 |
| Set Date |
36 |
| — |
36 |
| <TABLE ROW> |
36 |
| Set Time |
36 |
| Set Time |
36 |
| — |
36 |
| Interface Settings |
36 |
| Interface Settings |
36 |
| Interface Settings |
36 |
| Interface Settings |
36 |
| • For details about network settings, see |
36 |
| • For details about network settings, see |
36 |
| • For details about network settings, see |
36 |
| • For details about network settings, see |
36 |
| • For details about parallel interface, see |
36 |
| • For details about parallel interface, see |
36 |
| File Transfer |
36 |
| File Transfer |
36 |
| File Transfer |
36 |
| File Transfer |
36 |
| See |
36 |
| See |
36 |
| Key Operator Tools |
36 |
| Key Operator Tools |
36 |
| Key Operator Tools |
36 |
| Key Operator Tools |
36 |
| <TABLE> |
36 |
| <TABLE> |
36 |
| <TABLE> |
36 |
| <TABLE HEADING> |
36 |
| <TABLE ROW> |
36 |
| Default (MFP) |
36 |
| Default (Copier only) |
36 |
| <TABLE BODY> |
36 |
| <TABLE ROW> |
36 |
| User Code Management |
36 |
| User Code Management |
36 |
| Copier |
36 |
| Copier |
36 |
| Off |
36 |
| Off |
36 |
| Off |
36 |
| Off |
36 |
| <TABLE ROW> |
36 |
| Facsimile |
36 |
| Facsimile |
36 |
| Off |
36 |
| Off |
36 |
| <TABLE ROW> |
36 |
| Scanner |
36 |
| Scanner |
36 |
| Off |
36 |
| Off |
36 |
| <TABLE ROW> |
36 |
| Printer |
36 |
| Printer |
36 |
| Auto Program |
36 |
| Auto Program |
36 |
| <TABLE ROW> |
36 |
| Key Counter Management |
36 |
| Key Counter Management |
36 |
| All Off |
36 |
| Off |
36 |
| Off |
36 |
| <TABLE ROW> |
36 |
| Key Operator Code |
36 |
| Key Operator Code |
36 |
| Off |
36 |
| Off |
36 |
| <TABLE ROW> |
36 |
| Extended Security |
36 |
| Extended Security |
36 |
| Off |
36 |
| Off |
36 |
| <TABLE ROW> |
36 |
| Display/Print Counter |
36 |
| Display/Print Counter |
36 |
| — |
36 |
| <TABLE ROW> |
36 |
| Counter per User Code |
36 |
| Counter per User Code |
36 |
| Counter per User Code |
36 |
| Display |
36 |
| Display |
36 |
| Display |
36 |
| Copier Counter |
36 |
| Copier Counter |
36 |
| Copier Counter |
36 |
| — |
36 |
| <TABLE ROW> |
36 |
| Print |
36 |
| Print |
36 |
| Print |
36 |
| All User Codes |
36 |
| All User Codes |
36 |
| All User Codes |
36 |
| — |
36 |
| <TABLE ROW> |
36 |
| Clear |
36 |
| Clear |
36 |
| Clear |
36 |
| All User Codes |
36 |
| All User Codes |
36 |
| All User Codes |
36 |
| — |
36 |
| <TABLE ROW> |
36 |
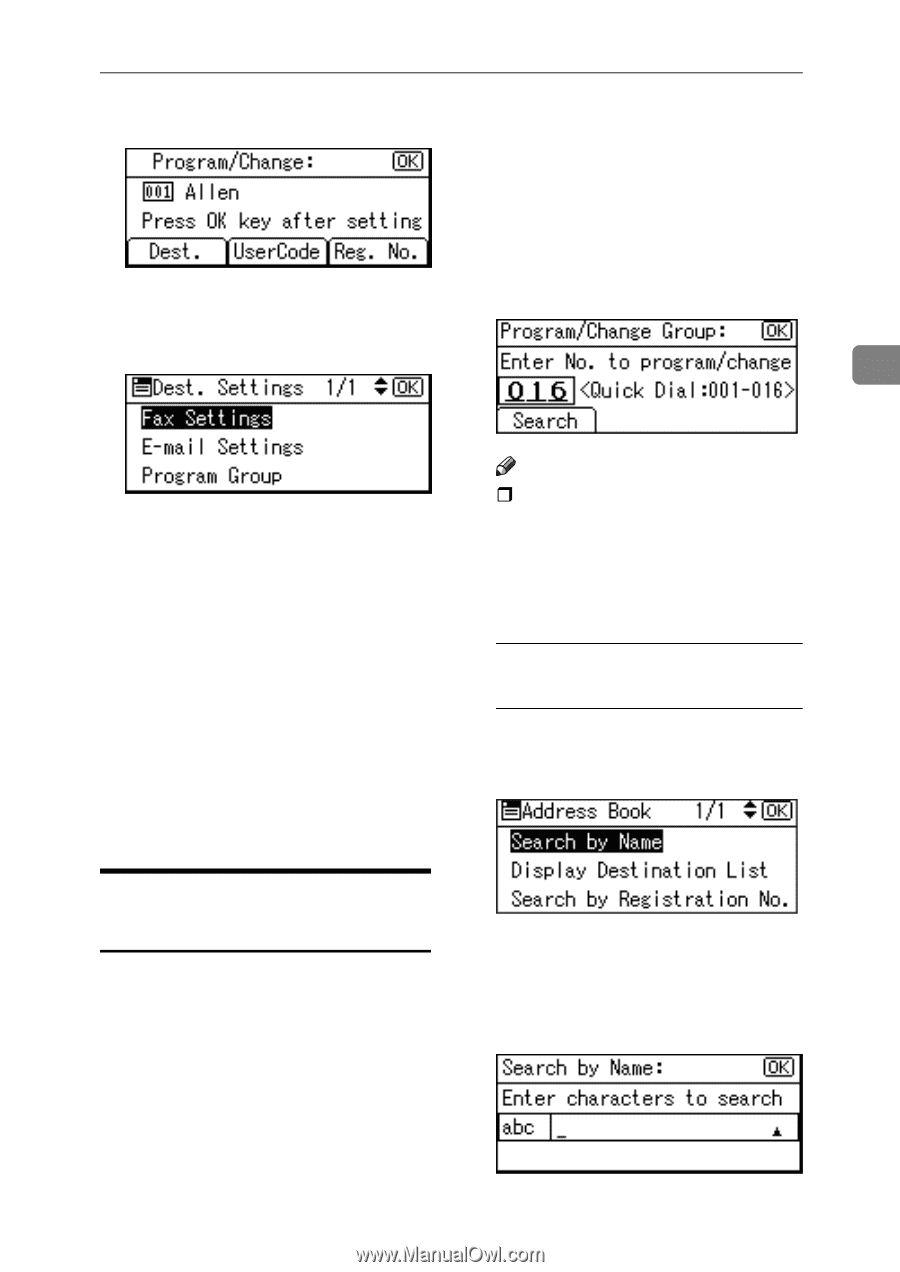
| Address Book Management |
36 |
| Address Book Management |
36 |
| Address Book Management |
36 |
| Program/Change |
36 |
| Program/Change |
36 |
| Program/Change |
36 |
| — |
36 |
| <TABLE ROW> |
36 |
| Delete |
36 |
| Delete |
36 |
| Delete |
36 |
| — |
36 |
| <TABLE ROW> |
36 |
| Prgrm./Change/Delete Group |
36 |
| Prgrm./Change/Delete Group |
36 |
| Prgrm./Change/Delete Group |
36 |
| Program/Change |
36 |
| Program/Change |
36 |
| Program/Change |
36 |
| — |
36 |
| — |
36 |
| <TABLE ROW> |
36 |
| Delete |
36 |
| Delete |
36 |
| Delete |
36 |
| — |
36 |
| <TABLE ROW> |
37 |
| Program/Change User Code |
37 |
| Program/Change User Code |
37 |
| Program |
37 |
| Program |
37 |
| Program |
37 |
| — |
37 |
| — |
37 |
| <TABLE ROW> |
37 |
| Change |
37 |
| Change |
37 |
| Change |
37 |
| — |
37 |
| — |
37 |
| <TABLE ROW> |
37 |
| Delete |
37 |
| Delete |
37 |
| Delete |
37 |
| — |
37 |
| — |
37 |
| <TABLE ROW> |
37 |
| Address Book:Print List |
37 |
| Address Book:Print List |
37 |
| Address Book:Print List |
37 |
| Destination List |
37 |
| Destination List |
37 |
| Destination List |
37 |
| — |
37 |
| <TABLE ROW> |
37 |
| Group Destination List |
37 |
| Group Destination List |
37 |
| Group Destination List |
37 |
| — |
37 |
| <TABLE ROW> |
37 |
| Quick Dial Label |
37 |
| Quick Dial Label |
37 |
| Quick Dial Label |
37 |
| — |
37 |
| <TABLE ROW> |
37 |
| AOF (Always On) |
37 |
| AOF (Always On) |
37 |
| AOF (Always On) |
37 |
| On |
37 |
| On |
37 |
| On |
37 |
| Accessing User Tools ( |
38 |
| Accessing User Tools ( |
38 |
| Accessing User Tools (System Settings<Default Para Font>) |
38 |
| This section is for key operators in charge of this machine. |
38 |
| This section is for key operators in charge of this machine. |
38 |
| User Tools allow you to change or set defaults. |
38 |
| Operations for system settings differ from normal operations. Always quit User Tools when you hav... |
38 |
| Operations for system settings differ from normal operations. Always quit User Tools when you hav... |
38 |
| Operations for system settings differ from normal operations. Always quit User Tools when you hav... |
38 |
| Any changes you make with User Tools remain in effect even if the main power switch or operation ... |
38 |
| Changing Default Settings |
38 |
| Changing Default Settings |
38 |
| Changing default settings |
38 |
| If a key operator code is already set, the key operator code entry display appears. Enter the key... |
38 |
| If a key operator code is already set, the key operator code entry display appears. Enter the key... |
38 |
| If a key operator code is already set, the key operator code entry display appears. Enter the key... |
38 |
| If a key operator code is already set, the key operator code entry display appears. Enter the key... |
38 |
| A Press the |
38 |
| A Press the |
38 |
| <GRAPHIC> |
38 |
| B Select |
38 |
| <GRAPHIC> |
38 |
| C Select the menu using |
38 |
| <GRAPHIC> |
38 |
| p.23 “User Tools Menu (System Settings)” |
38 |
| p.23 “User Tools Menu (System Settings)” |
38 |
| p.23 “User Tools Menu (System Settings)” |
38 |
| D Select the item using |
38 |
| D Select the item using |
38 |
| <GRAPHIC> |
38 |
| E Change settings by following instructions on the display, and then press the |
38 |
| To discontinue the operation and return to the initial display, press the |
38 |
| To discontinue the operation and return to the initial display, press the |
38 |
| Quitting User Tools |
39 |
| Quitting User Tools |
39 |
| Quitting User Tools |
39 |
| A Press the |
39 |
| A Press the |
39 |
| A Press the |
39 |
| A Press the |
39 |
| <GRAPHIC> |
40 |
| Settings You Can Change with User Tools |
40 |
| Settings you can change with User Tools |
40 |
| To access User Tools, see |
40 |
| To access User Tools, see |
40 |
| To access User Tools, see |
40 |
| General Features |
40 |
| General Features |
40 |
| General Features |
40 |
| General Features<Default Para Font> |
40 |
| Panel Tone |
40 |
| Panel Tone |
40 |
| Panel Tone |
40 |
| Panel Tone |
40 |
| Panel Tone |
40 |
| Panel Tone<Default Para Font> |
40 |
| The beeper (key tone) sounds when a key is pressed. |
40 |
| The beeper (key tone) sounds when a key is pressed. |
40 |
| Default: |
40 |
| Default: |
40 |
| Copy Count Display |
40 |
| Copy Count Display |
40 |
| Copy Count Display |
40 |
| Copy Count Display<Default Para Font> |
40 |
| The copy counter can be set to show the number of copies made (count up), or the number of copies... |
40 |
| The copy counter can be set to show the number of copies made (count up), or the number of copies... |
40 |
| Default: |
40 |
| Default: |
40 |
| Function Priority |
40 |
| Function Priority |
40 |
| Function Priority |
40 |
| Function Priority<Default Para Font> |
40 |
| You can specify the mode to be displayed immediately after the operation switch is turned on, or ... |
40 |
| You can specify the mode to be displayed immediately after the operation switch is turned on, or ... |
40 |
| Default: |
40 |
| Default: |
40 |
| Print Priority |
40 |
| Print Priority |
40 |
| Print Priority |
40 |
| Print Priority<Default Para Font> |
40 |
| Set the print priority for each mode. |
40 |
| Set the print priority for each mode. |
40 |
| p.21 “Multi-Access” |
40 |
| p.21 “Multi-Access” |
40 |
| p.21 “Multi-Access” |
40 |
| Default: |
40 |
| Default: |
40 |
| When |
40 |
| Display Contrast |
40 |
| Display Contrast |
40 |
| Display Contrast |
40 |
| Display Contrast<Default Para Font> |
40 |
| You can adjust the brightness of the display. |
40 |
| You can adjust the brightness of the display. |
40 |
| Key Repeat |
40 |
| Key Repeat |
40 |
| Key Repeat |
40 |
| Key Repeat<Default Para Font> |
40 |
| You can select whether or not to use the key repeat function. |
40 |
| You can select whether or not to use the key repeat function. |
40 |
| Default: |
40 |
| Default: |
40 |
| Measurement Unit |
41 |
| Measurement Unit |
41 |
| Measurement Unit |
41 |
| Measurement Unit<Default Para Font> |
41 |
| You can switch the measurement between “mm” and “inch”. |
41 |
| You can switch the measurement between “mm” and “inch”. |
41 |
| Default: Metric version: |
41 |
| Default: Metric version: |
41 |
| Inch version: |
41 |
| Tray Paper Settings |
41 |
| Tray Paper Settings |
41 |
| Tray Paper Settings |
41 |
| Tray paper settings |
41 |
| Tray Paper Size: |
41 |
| Tray Paper Size: |
41 |
| Tray Paper Size: |
41 |
| Tray Paper Size: |
41 |
| Tray Paper Size: |
41 |
| Select the size of the paper loaded in the paper tray. |
41 |
| Select the size of the paper loaded in the paper tray. |
41 |
| • The paper sizes you can set for Tray 1 are as follows: |
41 |
| • The paper sizes you can set for Tray 1 are as follows: |
41 |
| • The paper sizes you can set for Tray 1 are as follows: |
41 |
| A4L, B5 JISL, A5K, 8 |
41 |
| • The paper sizes you can set for Tray 2 are as follows: |
41 |
| • The paper sizes you can set for Tray 2 are as follows: |
41 |
| A4L , 8 |
41 |
| If the specified paper size differs from the actual size of the paper loaded in the paper tray, a... |
41 |
| If the specified paper size differs from the actual size of the paper loaded in the paper tray, a... |
41 |
| Default: |
41 |
| Default: |
41 |
| p.77 “Changing the Paper Size” |
41 |
| p.77 “Changing the Paper Size” |
41 |
| p.77 “Changing the Paper Size” |
41 |
| Paper Type: |
41 |
| Paper Type: |
41 |
| Paper Type: |
41 |
| Set the display so you can see what type of paper is loaded in the bypass tray. |
41 |
| Set the display so you can see what type of paper is loaded in the bypass tray. |
41 |
| • The paper types you can set for the bypass tray are as follows: |
41 |
| • The paper types you can set for the bypass tray are as follows: |
41 |
| • The paper types you can set for the bypass tray are as follows: |
41 |
| Default: |
41 |
| Default: |
41 |
| Paper types you can set in the bypass tray for machines with the copier function only are plain p... |
41 |
| Paper Type: |
42 |
| Paper Type: |
42 |
| Paper Type: |
42 |
| Set the display so you can see what type of paper is loaded in each paper tray. The print functio... |
42 |
| Set the display so you can see what type of paper is loaded in each paper tray. The print functio... |
42 |
| • The paper types you can set are as follows: |
42 |
| • The paper types you can set are as follows: |
42 |
| • The paper types you can set are as follows: |
42 |
| • recycled paper, special paper, color paper, letterhead, preprinted paper, prepunched paper, bon... |
42 |
| • recycled paper, special paper, color paper, letterhead, preprinted paper, prepunched paper, bon... |
42 |
| • recycled paper, special paper, color paper, letterhead, preprinted paper, prepunched paper, bon... |
42 |
| Default: |
42 |
| Default: |
42 |
| To enable the |
42 |
| Paper Tray Priority: Copier (copier) |
42 |
| Paper Tray Priority: Copier (copier) |
42 |
| You can specify the tray to supply paper for output. |
42 |
| You can specify the tray to supply paper for output. |
42 |
| Default: |
42 |
| Default: |
42 |
| Paper Tray Priority: Facsimile (facsimile) |
42 |
| Paper Tray Priority: Facsimile (facsimile) |
42 |
| You can specify the tray to supply paper for output. |
42 |
| You can specify the tray to supply paper for output. |
42 |
| Default: |
42 |
| Default: |
42 |
| Paper Tray Priority: Printer (printer) |
42 |
| Paper Tray Priority: Printer (printer) |
42 |
| You can specify the tray to supply paper for output. |
42 |
| You can specify the tray to supply paper for output. |
42 |
| Default: |
42 |
| Default: |
42 |
| Timer Settings |
43 |
| Timer Settings |
43 |
| Timer Settings |
43 |
| Timer settings |
43 |
| Auto Off Timer |
43 |
| Auto Off Timer |
43 |
| Auto Off Timer |
43 |
| Auto Off Timer |
43 |
| Auto Off Timer |
43 |
| Auto off timer |
43 |
| After a specified period has passed, following job completion, the machine automatically turns of... |
43 |
| The machine status after the Auto Off operation is referred to as “Off mode”, or “Sleep mode”. Fo... |
43 |
| Default: |
43 |
| Default: |
43 |
| The time can be set from 1 to 240 minutes using the number keys. |
43 |
| From “Off mode” or “Sleep mode”, the machine is ready to use within 10 seconds. |
43 |
| Auto Off may not work when error messages appear. |
43 |
| Energy Saver Timer |
43 |
| Energy Saver Timer |
43 |
| Energy Saver Timer |
43 |
| Energy Saver Timer<Default Para Font> |
43 |
| The machine automatically enters Low Power mode automatically after a job is finished, and the se... |
43 |
| The machine automatically enters Low Power mode automatically after a job is finished, and the se... |
43 |
| Default: |
43 |
| Default: |
43 |
| The time can be set from 1 to 240 minutes using the number keys. |
43 |
| Energy Saver may not work when error messages appear. |
43 |
| The machine automatically prints any fax or printer data received while in Energy Saver mode. |
43 |
| System Auto Reset Timer |
43 |
| System Auto Reset Timer |
43 |
| System Auto Reset Timer |
43 |
| System Auto Reset Timer |
43 |
| The System Reset setting automatically switches the screen to that of the function set in |
43 |
| Default: |
43 |
| Default: |
43 |
| The time can be set from 10 to 999 seconds in 1 second increments using the number keys. |
43 |
| Copier Auto Reset Timer |
44 |
| Copier Auto Reset Timer |
44 |
| Copier Auto Reset Timer |
44 |
| Auto reset timer:copier |
44 |
| Specify the time to elapse before copier mode resets. |
44 |
| If |
44 |
| If |
44 |
| Default: |
44 |
| The time can be set from 10 to 999 seconds using the number keys. |
44 |
| Facsimile Auto Reset Timer |
44 |
| Facsimile Auto Reset Timer |
44 |
| Facsimile Auto Reset Timer |
44 |
| Specify the time to elapse before the facsimile mode resets. |
44 |
| Specify the time to elapse before the facsimile mode resets. |
44 |
| Default: |
44 |
| Default: |
44 |
| The time can be set from 30 to 999 seconds using the number keys. |
44 |
| Scanner Auto Reset Timer |
44 |
| Scanner Auto Reset Timer |
44 |
| Scanner Auto Reset Timer |
44 |
| Specifies the time to elapse before the scanner mode resets. |
44 |
| Specifies the time to elapse before the scanner mode resets. |
44 |
| If |
44 |
| If |
44 |
| Default: |
44 |
| The time can be set from 10 to 999 seconds using the number keys. |
44 |
| Set Date |
44 |
| Set Date |
44 |
| Set Date |
44 |
| Set date |
44 |
| Set the date on the machine's internal clock using the number keys. |
44 |
| Set Time |
44 |
| Set Time |
44 |
| Set Time |
44 |
| Set time |
44 |
| Set the time on the machine's internal clock using the number keys. |
44 |
| Enter the time using the number keys. |
44 |
| Enter the time using the number keys. |
44 |
| When the summer time function is set, you cannot make the time setting if the current time falls ... |
44 |
| Key Operator Tools |
45 |
| Key Operator Tools |
45 |
| Key Operator Tools |
45 |
| Key Operator Tools<Default Para Font> |
45 |
| The key operator must set the following items (for settings or more information, contact the key ... |
45 |
| The key operator must set the following items (for settings or more information, contact the key ... |
45 |
| We recommend that the key operator program a key operator code when making settings. See |
45 |
| User Code Management |
45 |
| User Code Management |
45 |
| User Code Management |
45 |
| User Code Management |
45 |
| User Code Management<Default Para Font> |
45 |
| Allows you to control who uses the machine by setting codes for users. |
45 |
| Allows you to control who uses the machine by setting codes for users. |
45 |
| User codes must be registered for user code management. See |
45 |
| Default: |
45 |
| Default: |
45 |
| Use |
45 |
| Key Counter Management |
45 |
| Key Counter Management |
45 |
| Key Counter Management |
45 |
| Key Counter Management<Default Para Font> |
45 |
| Use the key counter to specify whether or not users are restricted. |
45 |
| Use the key counter to specify whether or not users are restricted. |
45 |
| Default: |
45 |
| Default: |
45 |
| Key Counter Management |
45 |
| Key Counter Management |
45 |
| Key Operator Code |
45 |
| Key Operator Code |
45 |
| Key Operator Code |
45 |
| Key Operator Code<Default Para Font> |
45 |
| Specify whether or not to use passwords (max. eight digits) to control |
45 |
| Specify whether or not to use passwords (max. eight digits) to control |
45 |
| Default: |
45 |
| Default: |
45 |
| If you select |
45 |
| • If you selected |
45 |
| • If you selected |
45 |
| • If you selected |
45 |
| A key operator code is only required for the |
45 |
| • If you selected |
45 |
| • If you selected |
45 |
| A key operator code is required to access all items in |
45 |
| If you select |
45 |
| Extended Security |
46 |
| Extended Security |
46 |
| Extended Security |
46 |
| Extended Security<Default Para Font> |
46 |
| Specify whether or not to use the security function. |
46 |
| Default : |
46 |
| Default : |
46 |
| You have to set a 6-digit key operator code to enable |
46 |
| For details about security, see |
46 |
| For details about security, see |
46 |
| Display/Print Counter |
46 |
| Display/Print Counter |
46 |
| Display/Print Counter |
46 |
| Display/Print Counter<Default Para Font> |
46 |
| Allows you to view and print the number of prints. |
46 |
| Allows you to view and print the number of prints. |
46 |
| • Display/Print Counter |
46 |
| • Display/Print Counter |
46 |
| • Display/Print Counter |
46 |
| • Display/Print Counter |
46 |
| Displays the number of prints for each function (Total, |
46 |
| • Print Counter List |
46 |
| • Print Counter List |
46 |
| Prints out a list of the number of prints made under each function. |
46 |
| • To print the counter list |
46 |
| • To print the counter list |
46 |
| A Press the |
46 |
| A Press the |
46 |
| A Press the |
46 |
| <GRAPHIC> |
46 |
| B Select |
46 |
| <GRAPHIC> |
46 |
| C Select |
46 |
| <GRAPHIC> |
47 |
| D Select |
47 |
| <GRAPHIC> |
47 |
| E Press |
47 |
| <GRAPHIC> |
47 |
| F Press the |
47 |
| <GRAPHIC> |
47 |
| G Press the |
47 |
| Counter per User Code |
47 |
| Counter per User Code |
47 |
| Counter per User Code |
47 |
| Counter per User Code<Default Para Font> |
47 |
| Allows you to view and print the numbers of prints accessed with user codes, and to set those val... |
47 |
| Allows you to view and print the numbers of prints accessed with user codes, and to set those val... |
47 |
| Press |
47 |
| Press |
47 |
| The number of prints may differ from the counter value shown in |
47 |
| • Print counter per user code |
47 |
| • Print counter per user code |
47 |
| • Print counter per user code |
47 |
| Prints the number of prints made under each user code. |
47 |
| • Clear counter per user code |
47 |
| • Clear counter per user code |
47 |
| Sets the number of prints made under each user code to 0. |
47 |
| To print list for each user code, see |
47 |
| Address Book Management |
48 |
| Address Book Management |
48 |
| Address Book Management |
48 |
| Address Book Management |
48 |
| You can add, change, or delete user information in the Address Book, and facsimile/scanner functi... |
48 |
| For details about these operations, see |
48 |
| Program/Change |
48 |
| Program/Change |
48 |
| Program/Change |
48 |
| Program/Change |
48 |
| This registers new user information, or registers and changes the items below: |
48 |
| • User (destination) name |
48 |
| • User (destination) name |
48 |
| • User (destination) name |
48 |
| • Destination |
48 |
| • Destination |
48 |
| Facsimile number, International TX mode, label insertion, e-mail address, sender's password, prog... |
48 |
| • User code |
48 |
| • User code |
48 |
| User code, available functions |
48 |
| • Registration number |
48 |
| • Registration number |
48 |
| Delete |
48 |
| Delete |
48 |
| Delete |
48 |
| Delete |
48 |
| Deletes a user information. |
48 |
| You can register up to 150 users. |
48 |
| You can register up to 150 users. |
48 |
| You can also register and manage data in the Address Book, using SmartDeviceMonitor for Admin (pr... |
48 |
| You can also register and manage data in the Address Book using a Web browser. See the Web browse... |
48 |
| Program/Change User Code |
48 |
| Program/Change User Code |
48 |
| Program/Change User Code |
48 |
| Program/Change User Code (for machines with copier function only) |
48 |
| You can register, change, and delete user codes. For details about these operations, see |
48 |
| You can register, change, and delete user codes. For details about these operations, see |
48 |
| You can register up to 50 user codes. |
48 |
| You can register up to 50 user codes. |
48 |
| Program/Change/Delete Group |
49 |
| Program/Change/Delete Group |
49 |
| You can register multiple users in a group. |
49 |
| You can register multiple users in a group. |
49 |
| This allows you to easily control registered users in each group. |
49 |
| For details about operations, see |
49 |
| Program/Change |
49 |
| Program/Change |
49 |
| Program/Change |
49 |
| Program/Change |
49 |
| This registers new groups, or changes the group name or registration number. |
49 |
| Delete |
49 |
| Delete |
49 |
| Delete |
49 |
| Deletes a group. |
49 |
| You can register up to 10 groups. |
49 |
| You can register up to 10 groups. |
49 |
| You can also register and manage data in the Address Book, using SmartDeviceMonitor for Admin (pr... |
49 |
| You can also group users (destinations) using a Web browser. See the Web browser's Help. |
49 |
| Address Book: Print List |
49 |
| Address Book: Print List |
49 |
| Address Book: Print List |
49 |
| You can print the destination list registered in the Address Book. |
49 |
| You can print the destination list registered in the Address Book. |
49 |
| • Destination List |
49 |
| • Destination List |
49 |
| • Destination List |
49 |
| • Destination List |
49 |
| Prints the destination list registered in the Address Book. |
49 |
| • Group Destination List |
49 |
| • Group Destination List |
49 |
| • Group Destination List |
49 |
| Prints the group destination list registered in the Address Book. |
49 |
| • Quick Dial Label |
49 |
| • Quick Dial Label |
49 |
| • Quick Dial Label |
49 |
| To print the Quick Dial label: |
49 |
| A Select the item using |
49 |
| A Select the item using |
49 |
| A Select the item using |
49 |
| When selecting |
49 |
| When selecting |
49 |
| B Press the |
49 |
| B Press the |
49 |
| The list prints out. |
49 |
| AOF (Always On) |
49 |
| AOF (Always On) |
49 |
| AOF (Always On) |
49 |
| AOF (Always On) |
49 |
| Specify whether or not to use Auto Off. |
49 |
| Specify whether or not to use Auto Off. |
49 |
| Default: |
49 |
| Default: |
49 |
| User Code |
50 |
| User Code |
50 |
| User Code |
50 |
| User code (for machines with copier function only) |
50 |
| Register user codes to restrict copier functions to certain users, and check on their use of copi... |
50 |
| Register user codes to restrict copier functions to certain users, and check on their use of copi... |
50 |
| Registering a New User Code |
50 |
| Registering a New User Code |
50 |
| Registering a new user code:for machines with copier function only |
50 |
| A Press the |
50 |
| A Press the |
50 |
| A Press the |
50 |
| A Press the |
50 |
| <GRAPHIC> |
50 |
| B Select |
50 |
| <GRAPHIC> |
50 |
| C Select |
50 |
| <GRAPHIC> |
50 |
| D Select |
50 |
| <GRAPHIC> |
50 |
| E Select |
50 |
| <GRAPHIC> |
50 |
| F Enter the user code using the number keys, and then press the |
50 |
| <GRAPHIC> |
50 |
| The “ |
50 |
| G Press the |
50 |
| G Press the |
50 |
| Changing a User Code |
51 |
| Changing a User Code |
51 |
| Changing a user code:for machines with copier function only |
51 |
| Even if you change a user code, the counter value will not be cleared. |
51 |
| Even if you change a user code, the counter value will not be cleared. |
51 |
| Even if you change a user code, the counter value will not be cleared. |
51 |
| A Press the |
51 |
| A Press the |
51 |
| A Press the |
51 |
| B Select |
51 |
| B Select |
51 |
| C Select |
51 |
| C Select |
51 |
| D Select |
51 |
| D Select |
51 |
| E Select |
51 |
| E Select |
51 |
| F Enter the registered user code you want to change using the number keys, and then press the |
51 |
| F Enter the registered user code you want to change using the number keys, and then press the |
51 |
| <GRAPHIC> |
51 |
| When you select the user code from the User Code List, press |
51 |
| When you select the user code from the User Code List, press |
51 |
| G Enter the new user code using the number keys, and then press the |
51 |
| G Enter the new user code using the number keys, and then press the |
51 |
| <GRAPHIC> |
51 |
| The “ |
51 |
| H Press the |
51 |
| H Press the |
51 |
| Deleting a User Code |
51 |
| Deleting a User Code |
51 |
| Deleting a user code:for machines with copier function only |
51 |
| This operation also deletes user codes registered to multiple functions. User control via the del... |
51 |
| This operation also deletes user codes registered to multiple functions. User control via the del... |
51 |
| This operation also deletes user codes registered to multiple functions. User control via the del... |
51 |
| A Press the |
51 |
| A Press the |
51 |
| A Press the |
51 |
| B Select |
51 |
| B Select |
51 |
| C Select |
51 |
| C Select |
51 |
| D Select |
51 |
| D Select |
51 |
| E Select |
51 |
| E Select |
51 |
| F Select |
52 |
| F Select |
52 |
| <GRAPHIC> |
52 |
| When selecting |
52 |
| G Enter the registered user code you want to delete using the number keys, and then press the |
52 |
| G Enter the registered user code you want to delete using the number keys, and then press the |
52 |
| <GRAPHIC> |
52 |
| When you select the user code from the User Code List, press |
52 |
| When you select the user code from the User Code List, press |
52 |
| A confirmation message appears. |
52 |
| H Press |
52 |
| H Press |
52 |
| The “Deleted.” message appears, and then the “User Code” display returns. |
52 |
| I Press the |
52 |
| I Press the |
52 |
| Displaying the Counter for Each User Code |
52 |
| Displaying the Counter for Each User Code |
52 |
| Displaying the counter for each user code:for machines with copier function only |
52 |
| You can check the counter for each user code. |
52 |
| You can check the counter for each user code. |
52 |
| A Press the |
52 |
| A Press the |
52 |
| A Press the |
52 |
| B Select |
52 |
| B Select |
52 |
| C Select |
52 |
| C Select |
52 |
| D Select |
52 |
| D Select |
52 |
| E Select |
52 |
| E Select |
52 |
| <GRAPHIC> |
52 |
| The counter for each user code will be displayed. |
52 |
| F Press the |
52 |
| F Press the |
52 |
| Printing the Counter for Each User Code |
53 |
| Printing the Counter for Each User Code |
53 |
| Printing the counter for each user code:for machines with copier function only |
53 |
| You can print out the counter for each user code. |
53 |
| You can print out the counter for each user code. |
53 |
| A Press the |
53 |
| A Press the |
53 |
| A Press the |
53 |
| B Select |
53 |
| B Select |
53 |
| C Select |
53 |
| C Select |
53 |
| D Select |
53 |
| D Select |
53 |
| E Select |
53 |
| E Select |
53 |
| F Press the |
53 |
| F Press the |
53 |
| The counter list prints out. |
53 |
| G Press the |
53 |
| G Press the |
53 |
| Clearing the Counter |
53 |
| Clearing the Counter |
53 |
| Clearing the counter:for machines with copier function only |
53 |
| A Press the |
53 |
| A Press the |
53 |
| A Press the |
53 |
| A Press the |
53 |
| B Select |
53 |
| B Select |
53 |
| C Select |
53 |
| C Select |
53 |
| D Select |
53 |
| D Select |
53 |
| E Select |
53 |
| E Select |
53 |
| A confirmation message appears. |
53 |
| F Press |
53 |
| F Press |
53 |
| The “ |
53 |
| G Press the |
53 |
| G Press the |
53 |
| Address Book |
54 |
| Address Book |
54 |
| Address Book |
54 |
| Address Book |
54 |
| Registering user information, such as fax numbers and e-mail addresses, in the Address Book allow... |
54 |
| Registering user information, such as fax numbers and e-mail addresses, in the Address Book allow... |
54 |
| Address Book data is stored in memory. It can be lost if there is some kind of memory failure. Th... |
54 |
| Address Book data is stored in memory. It can be lost if there is some kind of memory failure. Th... |
54 |
| You can backup Address Book data using |
54 |
| You can backup Address Book data using |
54 |
| For details about SmartDeviceMonitor for Admin and how to install it, see |
54 |
| For details about SmartDeviceMonitor for Admin and how to install it, see |
54 |
| For operating instructions, see SmartDeviceMonitor for Admin Help. |
54 |
| You can register and manage the following items in the Address Book: |
54 |
| To manage registered items |
54 |
| To manage registered items |
54 |
| To manage registered items |
54 |
| • User Code |
54 |
| • User Code |
54 |
| • User Code |
54 |
| • User Code |
54 |
| • User Code |
54 |
| Register user codes to restrict particular functions to certain users, and check their use of eac... |
54 |
| p.45 “User Code (MFP)” |
54 |
| p.45 “User Code (MFP)” |
54 |
| p.45 “User Code (MFP)” |
54 |
| • Sender's Password |
54 |
| • Sender's Password |
54 |
| • Sender's Password |
54 |
| p.44 “Registering Sender Information” |
54 |
| p.44 “Registering Sender Information” |
54 |
| p.44 “Registering Sender Information” |
54 |
| • Program Group |
54 |
| • Program Group |
54 |
| Use this to display the group the selected user (destination) belongs to. |
54 |
| You can group registered fax destinations and e-mail destinations to manage them better. For deta... |
54 |
| Items to register |
55 |
| Items to register |
55 |
| • User Name |
55 |
| • User Name |
55 |
| • User Name |
55 |
| • User Name |
55 |
| • User Name |
55 |
| p.43 “Registering the destination name” |
55 |
| p.43 “Registering the destination name” |
55 |
| p.43 “Registering the destination name” |
55 |
| p.44 “Registering Sender Information” |
55 |
| p.44 “Registering Sender Information” |
55 |
| <GRAPHIC> |
55 |
| • Fax Settings |
55 |
| • Fax Settings |
55 |
| p.43 “When using the fax function” |
55 |
| p.43 “When using the fax function” |
55 |
| p.43 “When using the fax function” |
55 |
| <GRAPHIC> |
55 |
| • E-mail Settings |
55 |
| • E-mail Settings |
55 |
| p.43 “When using the fax function” |
55 |
| p.43 “When using the fax function” |
55 |
| p.43 “When using the fax function” |
55 |
| p.44 “When using the scanner function” |
55 |
| p.44 “When using the scanner function” |
55 |
| p.44 “Registering Sender Information” |
55 |
| p.44 “Registering Sender Information” |
55 |
| <GRAPHIC> |
55 |
| Registering Destination Information |
55 |
| Registering the destination name |
55 |
| Registering the destination name |
55 |
| Registering the destination name |
55 |
| Registering the destination name |
55 |
| • User Name |
55 |
| • User Name |
55 |
| • User Name |
55 |
| • User Name |
55 |
| • User Name |
55 |
| Register the destination name. This is the basic information required for managing destinations. |
55 |
| p.45 “User Code (MFP)” |
55 |
| p.45 “User Code (MFP)” |
55 |
| p.45 “User Code (MFP)” |
55 |
| When using the fax function |
55 |
| When using the fax function |
55 |
| • Fax Settings |
55 |
| • Fax Settings |
55 |
| • Fax Settings |
55 |
| • Fax Settings |
55 |
| • Fax Settings |
55 |
| Register fax numbers in the Address Book. To send a fax, select the destination from the Destinat... |
55 |
| p.52 “Fax Destination” |
55 |
| p.52 “Fax Destination” |
55 |
| p.52 “Fax Destination” |
55 |
| • E-mail Settings |
55 |
| • E-mail Settings |
55 |
| • E-mail Settings |
55 |
| Register e-mail addresses in the Address Book. To send an Internet Fax document, select the desti... |
55 |
| p.57 “E-mail Destination” |
55 |
| p.57 “E-mail Destination” |
55 |
| p.57 “E-mail Destination” |
55 |
| When using the scanner function |
56 |
| When using the scanner function |
56 |
| • E-mail |
56 |
| • E-mail |
56 |
| • E-mail |
56 |
| • E-mail |
56 |
| Register e-mail addresses in the Address Book. To send scan files by e-mail, select the destinati... |
56 |
| p.57 “E-mail Destination” |
56 |
| p.57 “E-mail Destination” |
56 |
| p.57 “E-mail Destination” |
56 |
| Registering Sender Information |
56 |
| Registering Sender Information |
56 |
| Registering sender information |
56 |
| When using the scanner function |
56 |
| When using the scanner function |
56 |
| When using the scanner function |
56 |
| When using the scanner function |
56 |
| You can set Register as Sender to |
56 |
| You can set Register as Sender to |
56 |
| • User Name |
56 |
| • User Name |
56 |
| • User Name |
56 |
| • User Name |
56 |
| Register the user name. This is useful when selecting the sender from the Destination List. |
56 |
| Also, the user name automatically appears in the From field of the e-mail. |
56 |
| p.45 “User Code (MFP)” |
56 |
| p.45 “User Code (MFP)” |
56 |
| p.45 “User Code (MFP)” |
56 |
| • E-mail Settings |
56 |
| • E-mail Settings |
56 |
| • E-mail Settings |
56 |
| Register the e-mail address. You can use it as the sender address when sending scan files by e- m... |
56 |
| p.57 “E-mail Destination” |
56 |
| p.57 “E-mail Destination” |
56 |
| p.57 “E-mail Destination” |
56 |
| You can prevent misuse of sender name by setting sender's password on the e-mail address. |
56 |
| User Code |
57 |
| User Code |
57 |
| User Code |
57 |
| User code (MFP) |
57 |
| Register user codes to restrict the following functions to certain users, and check their use of ... |
57 |
| Register user codes to restrict the following functions to certain users, and check their use of ... |
57 |
| The number of copies scanned in using the scanner function is counted for each user code. This al... |
57 |
| The number of copies scanned in using the scanner function is counted for each user code. This al... |
57 |
| To automatically register the printer driver user code, select |
57 |
| For details about setting user codes for the printer driver, see |
57 |
| For details about setting user codes for the printer driver, see |
57 |
| The functions associated with each user code are the same. If you change or delete user codes, ma... |
57 |
| The functions associated with each user code are the same. If you change or delete user codes, ma... |
57 |
| Registering a New User Code |
57 |
| Registering a New User Code |
57 |
| Registering a new user code:for MFP |
57 |
| A Press the |
57 |
| A Press the |
57 |
| A Press the |
57 |
| A Press the |
57 |
| <GRAPHIC> |
57 |
| B Select |
57 |
| <GRAPHIC> |
57 |
| C Select |
57 |
| <GRAPHIC> |
57 |
| D Select |
57 |
| <GRAPHIC> |
58 |
| E Select |
58 |
| <GRAPHIC> |
58 |
| F Enter the registration number you want to program using the number keys or the Quick Dial keys,... |
58 |
| <GRAPHIC> |
58 |
| G Enter the user (destination) name using the number keys and the Quick Dial keys, and then press... |
58 |
| <GRAPHIC> |
58 |
| For details about entering text, see |
58 |
| For details about entering text, see |
58 |
| H Press |
58 |
| H Press |
58 |
| <GRAPHIC> |
58 |
| I Enter the user code using the number keys, and then press the |
58 |
| <GRAPHIC> |
58 |
| J Select the function using |
58 |
| <GRAPHIC> |
58 |
| Repeat this step when you want to apply more than one function. |
58 |
| Repeat this step when you want to apply more than one function. |
58 |
| K Press the |
58 |
| K Press the |
58 |
| The “ |
58 |
| L Press the |
58 |
| L Press the |
58 |
| Changing a User Code |
58 |
| Changing a User Code |
58 |
| Changing a user code:for MFP |
58 |
| A Press the |
58 |
| A Press the |
58 |
| A Press the |
58 |
| A Press the |
58 |
| B Select |
58 |
| B Select |
58 |
| C Select |
58 |
| C Select |
58 |
| D Select |
58 |
| D Select |
58 |
| E Select |
59 |
| E Select |
59 |
| F Press |
59 |
| F Press |
59 |
| <GRAPHIC> |
59 |
| You can also enter the registration number of the user (destination) using the number keys or the... |
59 |
| You can also enter the registration number of the user (destination) using the number keys or the... |
59 |
| You can also search the registered user code by name, registered number, user code, fax number or... |
59 |
| G Select |
59 |
| G Select |
59 |
| <GRAPHIC> |
59 |
| H Select the user (destination) whose code you want to change using |
59 |
| <GRAPHIC> |
59 |
| I Press the |
59 |
| J Press |
59 |
| J Press |
59 |
| <GRAPHIC> |
59 |
| K Enter the new user code using the number keys, and then press the |
59 |
| <GRAPHIC> |
59 |
| L Select the function using |
59 |
| <GRAPHIC> |
59 |
| Repeat this step when you want to apply more than one function. |
59 |
| Repeat this step when you want to apply more than one function. |
59 |
| M Press the |
59 |
| M Press the |
59 |
| The “ |
59 |
| N Press the |
59 |
| N Press the |
59 |
| Deleting a User Code |
60 |
| Deleting a User Code |
60 |
| Deleting a user code:for MFP |
60 |
| A Press the |
60 |
| A Press the |
60 |
| A Press the |
60 |
| A Press the |
60 |
| B Select |
60 |
| B Select |
60 |
| C Select |
60 |
| C Select |
60 |
| D Select |
60 |
| D Select |
60 |
| E Select |
60 |
| E Select |
60 |
| <GRAPHIC> |
60 |
| Select |
60 |
| Select |
60 |
| F Press |
60 |
| F Press |
60 |
| <GRAPHIC> |
60 |
| You can also enter the registration number of the user (destination) using the number keys or the... |
60 |
| You can also enter the registration number of the user (destination) using the number keys or the... |
60 |
| You can also search the registered user code by name, registered number, user code, fax number or... |
60 |
| G Select |
60 |
| G Select |
60 |
| <GRAPHIC> |
60 |
| H Select the user (destination) whose code is to be deleted using |
60 |
| <GRAPHIC> |
60 |
| I Press the |
60 |
| J Press |
60 |
| J Press |
60 |
| <GRAPHIC> |
60 |
| If you selected |
60 |
| If you selected |
60 |
| K Press the |
60 |
| K Press the |
60 |
| <GRAPHIC> |
60 |
| L Press the |
60 |
| The “ |
60 |
| M Press the |
61 |
| M Press the |
61 |
| Displaying the Counter for Each User Code |
61 |
| Displaying the Counter for Each User Code |
61 |
| Displaying the counter for each user code:for MFP |
61 |
| You can check the counter made under each function's user code. |
61 |
| You can check the counter made under each function's user code. |
61 |
| A Press the |
61 |
| A Press the |
61 |
| A Press the |
61 |
| B Select |
61 |
| B Select |
61 |
| C Select |
61 |
| C Select |
61 |
| D Select |
61 |
| D Select |
61 |
| E Select |
61 |
| E Select |
61 |
| <GRAPHIC> |
61 |
| F Select the counter you want to display using |
61 |
| <GRAPHIC> |
61 |
| The counter for each user code will be displayed. |
61 |
| G Press the |
61 |
| G Press the |
61 |
| Printing the Counter for Each User Code |
61 |
| Printing the Counter for Each User Code |
61 |
| Printing the counter for each user code:for MFP |
61 |
| You can print out the counter made under each user code using |
61 |
| You can print out the counter made under each user code using |
61 |
| A Press the |
61 |
| A Press the |
61 |
| A Press the |
61 |
| B Select |
61 |
| B Select |
61 |
| C Select |
61 |
| C Select |
61 |
| D Select |
61 |
| D Select |
61 |
| E Select |
61 |
| E Select |
61 |
| To print the counter for all user codes |
61 |
| To print the counter for all user codes |
61 |
| A Select |
61 |
| A Select |
61 |
| <GRAPHIC> |
61 |
| B Select the counter using |
61 |
| <GRAPHIC> |
62 |
| Repeat this step when you want to print more than one counter. |
62 |
| Repeat this step when you want to print more than one counter. |
62 |
| C Press the |
62 |
| C Press the |
62 |
| D Press the |
62 |
| D Press the |
62 |
| The counter list prints out. |
62 |
| To print the counter for each user code |
62 |
| To print the counter for each user code |
62 |
| A Select |
62 |
| A Select |
62 |
| B Enter the user code you want to print the counter for, and then press the |
62 |
| B Enter the user code you want to print the counter for, and then press the |
62 |
| <GRAPHIC> |
62 |
| When you select the user code from the User Code List, press |
62 |
| When you select the user code from the User Code List, press |
62 |
| C Select the counter using |
62 |
| C Select the counter using |
62 |
| <GRAPHIC> |
62 |
| Repeat this step when you want to print more than one counter. |
62 |
| Repeat this step when you want to print more than one counter. |
62 |
| D Press the |
62 |
| D Press the |
62 |
| E Press the |
62 |
| E Press the |
62 |
| The counter list prints out. |
62 |
| F Press the |
62 |
| F Press the |
62 |
| Clearing the Counter |
62 |
| Clearing the Counter |
62 |
| Clearing the counter:for MFP |
62 |
| A Press the |
62 |
| A Press the |
62 |
| A Press the |
62 |
| A Press the |
62 |
| B Select |
62 |
| B Select |
62 |
| C Select |
62 |
| C Select |
62 |
| D Select |
62 |
| D Select |
62 |
| E Select |
62 |
| E Select |
62 |
| To clear the counter for all use codes |
62 |
| To clear the counter for all use codes |
62 |
| A Select |
62 |
| A Select |
62 |
| <GRAPHIC> |
62 |
| B Select the counter using |
62 |
| <GRAPHIC> |
63 |
| Repeat this step when you want to clear more than one counter. |
63 |
| Repeat this step when you want to clear more than one counter. |
63 |
| C Press the |
63 |
| C Press the |
63 |
| A confirmation message appears. |
63 |
| D Press |
63 |
| D Press |
63 |
| The “ |
63 |
| To clear the counter for each user code |
63 |
| To clear the counter for each user code |
63 |
| A Select |
63 |
| A Select |
63 |
| B Enter the user code you want to clear the counter for, and then press the |
63 |
| B Enter the user code you want to clear the counter for, and then press the |
63 |
| <GRAPHIC> |
63 |
| When you select the user code from the User Code List, press |
63 |
| When you select the user code from the User Code List, press |
63 |
| C Select the counter using |
63 |
| C Select the counter using |
63 |
| <GRAPHIC> |
63 |
| Repeat this step when you want to clear more than one counter. |
63 |
| Repeat this step when you want to clear more than one counter. |
63 |
| D Press the |
63 |
| D Press the |
63 |
| A confirmation message appears. |
63 |
| E Press |
63 |
| E Press |
63 |
| The “ |
63 |
| F Press the |
63 |
| F Press the |
63 |
| Fax Destination |
64 |
| Fax Destination |
64 |
| Fax destination |
64 |
| Register fax destinations, so you do not need to enter them each time, and can send documents sca... |
64 |
| Register fax destinations, so you do not need to enter them each time, and can send documents sca... |
64 |
| You can program the following items in a fax destination: |
64 |
| Fax number |
64 |
| Fax number |
64 |
| Fax number |
64 |
| Registers the destination's fax number. You can enter a fax number using up to 128 digits. You mu... |
64 |
| Registers the destination's fax number. You can enter a fax number using up to 128 digits. You mu... |
64 |
| Label Insertion |
64 |
| Label Insertion |
64 |
| Label Insertion |
64 |
| With this function you can have the receiver's name printed on the message when it is received at... |
64 |
| With this function you can have the receiver's name printed on the message when it is received at... |
64 |
| Label insertions are also printed when sending by e-mail using fax functions. |
64 |
| Label insertions are also printed when sending by e-mail using fax functions. |
64 |
| International TX mode |
64 |
| International TX mode |
64 |
| When setting the International TX mode to |
64 |
| When setting the International TX mode to |
64 |
| Registering a Fax Destination |
64 |
| Registering a Fax Destination |
64 |
| Registering a fax destination |
64 |
| A Press the |
64 |
| A Press the |
64 |
| A Press the |
64 |
| A Press the |
64 |
| <GRAPHIC> |
64 |
| B Select |
64 |
| <GRAPHIC> |
64 |
| C Select |
64 |
| <GRAPHIC> |
64 |
| D Select |
64 |
| <GRAPHIC> |
65 |
| E Select |
65 |
| <GRAPHIC> |
65 |
| F Enter the registration number you want to program using the number keys or the Quick Dial keys,... |
65 |
| <GRAPHIC> |
65 |
| G Enter the user (destination) name using the number keys and the Quick Dial keys, and then press... |
65 |
| <GRAPHIC> |
65 |
| You can use the user name when selecting a fax destination. |
65 |
| You can use the user name when selecting a fax destination. |
65 |
| You can register the user code after the user name. For details, see |
65 |
| For details about entering text, see |
65 |
| For details about entering text, see |
65 |
| H Press |
65 |
| H Press |
65 |
| <GRAPHIC> |
65 |
| I Select |
65 |
| <GRAPHIC> |
65 |
| J Enter the fax number using the number keys, and then press the |
65 |
| <GRAPHIC> |
65 |
| To set the International TX mode and label insertion |
65 |
| To set the International TX mode and label insertion |
65 |
| A Press |
65 |
| A Press |
65 |
| <GRAPHIC> |
65 |
| B Select |
65 |
| <GRAPHIC> |
66 |
| C Select |
66 |
| <GRAPHIC> |
66 |
| To use the Tone function |
66 |
| This function allows the machine to send tonal signals when it is connected to a pulse dialing li... |
66 |
| A Press |
66 |
| A Press |
66 |
| B Enter the number you want to tone dial using the number keys. |
66 |
| B Enter the number you want to tone dial using the number keys. |
66 |
| A tone is shown as a “0 “ on the display. |
66 |
| <GRAPHIC> |
66 |
| C Press the |
66 |
| K Press the |
66 |
| K Press the |
66 |
| L Press the |
66 |
| L Press the |
66 |
| The “ |
66 |
| To register the destination to a group, see |
66 |
| To register the destination to a group, see |
66 |
| M Press the |
66 |
| M Press the |
66 |
| Changing a Registered Fax Destination |
66 |
| Changing a Registered Fax Destination |
66 |
| Changing a registered fax destination |
66 |
| A Press the |
66 |
| A Press the |
66 |
| A Press the |
66 |
| A Press the |
66 |
| B Select |
66 |
| B Select |
66 |
| C Select |
66 |
| C Select |
66 |
| D Select |
66 |
| D Select |
66 |
| E Select |
66 |
| E Select |
66 |
| F Press |
66 |
| F Press |
66 |
| <GRAPHIC> |
66 |
| You can also enter the registration number of the user (destination) using the number keys or the... |
66 |
| You can also enter the registration number of the user (destination) using the number keys or the... |
66 |
| You can also search the registered destination by name, registered number, user code, fax number ... |
66 |
| G Select |
67 |
| G Select |
67 |
| <GRAPHIC> |
67 |
| H Select the fax destination user you want to change using |
67 |
| <GRAPHIC> |
67 |
| I Press the |
67 |
| J Press |
67 |
| J Press |
67 |
| <GRAPHIC> |
67 |
| K Select |
67 |
| <GRAPHIC> |
67 |
| L Enter the new fax number using the number keys, and then press the |
67 |
| <GRAPHIC> |
67 |
| M Press the |
67 |
| N Press the |
67 |
| N Press the |
67 |
| The “ |
67 |
| O Press the |
67 |
| O Press the |
67 |
| Deleting a Registered Fax Destination |
67 |
| Deleting a Registered Fax Destination |
67 |
| Deleting a registered fax destination |
67 |
| A Press the |
67 |
| A Press the |
67 |
| A Press the |
67 |
| A Press the |
67 |
| B Select |
67 |
| B Select |
67 |
| C Select |
67 |
| C Select |
67 |
| D Select |
67 |
| D Select |
67 |
| E Select |
67 |
| E Select |
67 |
| <GRAPHIC> |
67 |
| Select |
67 |
| Select |
67 |
| Select |
67 |
| F Press |
68 |
| F Press |
68 |
| <GRAPHIC> |
68 |
| You can also enter the registration number of the user (destination) using the number keys or the... |
68 |
| You can also enter the registration number of the user (destination) using the number keys or the... |
68 |
| You can also search the registered destination by name, registered number, user code, fax number ... |
68 |
| G Select |
68 |
| G Select |
68 |
| <GRAPHIC> |
68 |
| H Select the fax destination user you want to delete using |
68 |
| <GRAPHIC> |
68 |
| I Press the |
68 |
| J Press |
68 |
| J Press |
68 |
| <GRAPHIC> |
68 |
| If you selected |
68 |
| If you selected |
68 |
| K Select |
68 |
| K Select |
68 |
| <GRAPHIC> |
68 |
| L Press the |
68 |
| <GRAPHIC> |
68 |
| M Press the |
68 |
| N Press the |
68 |
| N Press the |
68 |
| The “ |
68 |
| O Press the |
68 |
| O Press the |
68 |
| E-mail Destination |
69 |
| E-mail Destination |
69 |
| E-mail destination |
69 |
| Register e-mail destinations, so you do not need to enter e-mail addresses every time, and can se... |
69 |
| Register e-mail destinations, so you do not need to enter e-mail addresses every time, and can se... |
69 |
| Registering an E-mail Destination |
69 |
| Registering an E-mail Destination |
69 |
| Registering an e-mail destination |
69 |
| A Press the |
69 |
| A Press the |
69 |
| A Press the |
69 |
| A Press the |
69 |
| <GRAPHIC> |
69 |
| B Select |
69 |
| <GRAPHIC> |
69 |
| C Select |
69 |
| <GRAPHIC> |
69 |
| D Select |
69 |
| <GRAPHIC> |
69 |
| E Select |
69 |
| <GRAPHIC> |
70 |
| F Enter the registration number you want to program using the number keys or the Quick Dial keys,... |
70 |
| <GRAPHIC> |
70 |
| G Enter the user (destination) name using the number keys and the Quick Dial keys, and then press... |
70 |
| <GRAPHIC> |
70 |
| You can use the user name when selecting an address to send to. |
70 |
| You can use the user name when selecting an address to send to. |
70 |
| You can register the user code after the user name. For details, see |
70 |
| For details about entering text, see |
70 |
| For details about entering text, see |
70 |
| H Press |
70 |
| H Press |
70 |
| <GRAPHIC> |
70 |
| I Select |
70 |
| <GRAPHIC> |
70 |
| J Enter the e-mail address using the number keys and the Quick Dial keys, and then press the |
70 |
| <GRAPHIC> |
70 |
| You can register the e-mail address up to 128 characters. |
70 |
| You can register the e-mail address up to 128 characters. |
70 |
| K To use the e-mail address as the sender, select |
70 |
| K To use the e-mail address as the sender, select |
70 |
| <GRAPHIC> |
70 |
| If you select |
70 |
| If you select |
70 |
| L Select |
70 |
| L Select |
70 |
| <GRAPHIC> |
70 |
| You can stop sender's names being accessed by setting a sender's password. |
70 |
| You can stop sender's names being accessed by setting a sender's password. |
70 |
| This function is not available when using Internet Fax to send e-mails. |
70 |
| If you select |
70 |
| M Enter the sender's password using the number keys, and then press the |
71 |
| M Enter the sender's password using the number keys, and then press the |
71 |
| <GRAPHIC> |
71 |
| You can enter up to eight digits. |
71 |
| You can enter up to eight digits. |
71 |
| N Press the |
71 |
| N Press the |
71 |
| O Press the |
71 |
| O Press the |
71 |
| The “ |
71 |
| To register the destination to a group, see |
71 |
| To register the destination to a group, see |
71 |
| P Press the |
71 |
| P Press the |
71 |
| Changing a Registered E-mail Destination |
71 |
| Changing a Registered E-mail Destination |
71 |
| Changing a registered e-mail destination |
71 |
| A Press the |
71 |
| A Press the |
71 |
| A Press the |
71 |
| A Press the |
71 |
| B Select |
71 |
| B Select |
71 |
| C Select |
71 |
| C Select |
71 |
| D Select |
71 |
| D Select |
71 |
| E Select |
71 |
| E Select |
71 |
| F Press |
71 |
| F Press |
71 |
| <GRAPHIC> |
71 |
| You can also enter the registration number of the user (destination) using the number keys or the... |
71 |
| You can also enter the registration number of the user (destination) using the number keys or the... |
71 |
| You can also search the registered destination by name, registered number, user code, fax number ... |
71 |
| G Select |
71 |
| G Select |
71 |
| <GRAPHIC> |
71 |
| H Select the e-mail destination user you want to change using |
71 |
| <GRAPHIC> |
71 |
| I Press the |
71 |
| J Press |
72 |
| J Press |
72 |
| <GRAPHIC> |
72 |
| K Select |
72 |
| <GRAPHIC> |
72 |
| L Enter the new e-mail address using the number keys and the Quick Dial keys, and then press the |
72 |
| M To use the e-mail address as a sender, select |
72 |
| M To use the e-mail address as a sender, select |
72 |
| If you select |
72 |
| <GRAPHIC> |
72 |
| N To set a sender's password, select |
72 |
| If you select |
72 |
| <GRAPHIC> |
72 |
| O Enter the sender's password using the number keys, and then press the |
72 |
| <GRAPHIC> |
72 |
| P Press the |
72 |
| Q Press the |
72 |
| Q Press the |
72 |
| The “ |
72 |
| R Press the |
72 |
| R Press the |
72 |
| Deleting a Registered E-mail Destination |
72 |
| Deleting a Registered E-mail Destination |
72 |
| Deleting a registered e-mail destination |
72 |
| A Press the |
72 |
| A Press the |
72 |
| A Press the |
72 |
| A Press the |
72 |
| B Select |
72 |
| B Select |
72 |
| C Select |
72 |
| C Select |
72 |
| D Select |
72 |
| D Select |
72 |
| E Select |
72 |
| E Select |
72 |
| <GRAPHIC> |
73 |
| Select |
73 |
| Select |
73 |
| Select |
73 |
| F Press |
73 |
| F Press |
73 |
| <GRAPHIC> |
73 |
| You can also enter the registration number of the user (destination) using the number keys or the... |
73 |
| You can also enter the registration number of the user (destination) using the number keys or the... |
73 |
| You can also search the registered destination by name, registered number, user code, fax number ... |
73 |
| G Select |
73 |
| G Select |
73 |
| <GRAPHIC> |
73 |
| H Select the e-mail destination user you want to delete using |
73 |
| <GRAPHIC> |
73 |
| I Press the |
73 |
| J Press |
73 |
| J Press |
73 |
| <GRAPHIC> |
73 |
| If you selected |
73 |
| If you selected |
73 |
| K Select |
73 |
| K Select |
73 |
| <GRAPHIC> |
73 |
| L Press the |
73 |
| M Select |
73 |
| M Select |
73 |
| <GRAPHIC> |
73 |
| N Press the |
73 |
| O Press the |
73 |
| O Press the |
73 |
| The “ |
73 |
| P Press the |
73 |
| P Press the |
73 |
| Registering Destinations to a Group |
74 |
| Registering Destinations to a Group |
74 |
| Registering destinations to a group |
74 |
| Register destinations to a group to easily control registered fax and e- mail address for each gr... |
74 |
| Register destinations to a group to easily control registered fax and e- mail address for each gr... |
74 |
| To group destinations, the groups must be registered beforehand. |
74 |
| You can register up to 10 groups. |
74 |
| You can register up to 10 groups. |
74 |
| Registering a New Group |
74 |
| Registering a New Group |
74 |
| Registering a new group |
74 |
| A Press the |
74 |
| A Press the |
74 |
| A Press the |
74 |
| A Press the |
74 |
| <GRAPHIC> |
74 |
| B Select |
74 |
| <GRAPHIC> |
74 |
| C Select |
74 |
| <GRAPHIC> |
74 |
| D Select |
74 |
| <GRAPHIC> |
74 |
| E Select |
74 |
| <GRAPHIC> |
74 |
| F Enter the registration number you want to program using the number keys or the Quick Dial keys,... |
74 |
| <GRAPHIC> |
74 |
| G Enter the group name using the number keys and the Quick Dial keys, and then press the |
74 |
| <GRAPHIC> |
74 |
| For details about entering text, see |
74 |
| For details about entering text, see |
74 |
| H Press the |
75 |
| H Press the |
75 |
| The “ |
75 |
| I Press the |
75 |
| I Press the |
75 |
| Registering a Destination to a Group |
75 |
| Registering a Destination to a Group |
75 |
| A Press the |
75 |
| A Press the |
75 |
| A Press the |
75 |
| A Press the |
75 |
| B Select |
75 |
| B Select |
75 |
| C Select |
75 |
| C Select |
75 |
| D Select |
75 |
| D Select |
75 |
| E Select |
75 |
| E Select |
75 |
| <GRAPHIC> |
75 |
| F Press |
75 |
| <GRAPHIC> |
75 |
| You can also enter the registration number of the user (destination) using the number keys or the... |
75 |
| You can also enter the registration number of the user (destination) using the number keys or the... |
75 |
| You can also search the registered destination by name, registration number, user code, fax numbe... |
75 |
| G Select |
75 |
| G Select |
75 |
| <GRAPHIC> |
75 |
| H Select the destination you want to register to a group using |
75 |
| <GRAPHIC> |
75 |
| I Press the |
75 |
| J Press |
75 |
| J Press |
75 |
| <GRAPHIC> |
76 |
| K Select |
76 |
| <GRAPHIC> |
76 |
| L Select the group name to which you want to register using |
76 |
| <GRAPHIC> |
76 |
| M Press the |
76 |
| N Press the |
76 |
| N Press the |
76 |
| O Press the |
76 |
| O Press the |
76 |
| The “ |
76 |
| P Press the |
76 |
| P Press the |
76 |
| Removing a Destination from a Group |
76 |
| Removing a Destination from a Group |
76 |
| Removing a destination from a group |
76 |
| A Press the |
76 |
| A Press the |
76 |
| A Press the |
76 |
| A Press the |
76 |
| B Select |
76 |
| B Select |
76 |
| C Select |
76 |
| C Select |
76 |
| D Select |
76 |
| D Select |
76 |
| E Select |
76 |
| E Select |
76 |
| F Press |
76 |
| F Press |
76 |
| <GRAPHIC> |
76 |
| You can also enter the registration number of the user (destination) using the number keys or the... |
76 |
| You can also enter the registration number of the user (destination) using the number keys or the... |
76 |
| You can also search the registered destination by name, registration number, user code, fax numbe... |
76 |
| G Select |
76 |
| G Select |
76 |
| <GRAPHIC> |
76 |
| H Select the destination you want to remove from a group using |
76 |
| <GRAPHIC> |
76 |
| I Press the |
76 |
| J Press |
77 |
| J Press |
77 |
| <GRAPHIC> |
77 |
| K Select |
77 |
| <GRAPHIC> |
77 |
| L Select the group name from which you want to remove the user (destination) using |
77 |
| M Press the |
77 |
| M Press the |
77 |
| N Press the |
77 |
| N Press the |
77 |
| O Press the |
77 |
| O Press the |
77 |
| The “ |
77 |
| P Press the |
77 |
| P Press the |
77 |
| Displaying the Destinations Registered in Groups |
77 |
| Displaying the Destinations Registered in Groups |
77 |
| Displaying the destinations registered in groups |
77 |
| A Press the |
77 |
| A Press the |
77 |
| A Press the |
77 |
| A Press the |
77 |
| B Select |
77 |
| B Select |
77 |
| C Select |
77 |
| C Select |
77 |
| D Select |
77 |
| D Select |
77 |
| E Select |
77 |
| E Select |
77 |
| F Press |
77 |
| F Press |
77 |
| <GRAPHIC> |
77 |
| You can also enter the registration number of the group using the number keys or the Quick Dial k... |
77 |
| You can also enter the registration number of the group using the number keys or the Quick Dial k... |
77 |
| Searching to select a registered group by name |
77 |
| Searching to select a registered group by name |
77 |
| A Select |
77 |
| A Select |
77 |
| <GRAPHIC> |
77 |
| B Enter the characters of the destination you want to display using the number keys and the Quick... |
77 |
| <GRAPHIC> |
78 |
| For details about entering text, see |
78 |
| For details about entering text, see |
78 |
| C Press the |
78 |
| C Press the |
78 |
| <GRAPHIC> |
78 |
| D Select the group you want to display using |
78 |
| <GRAPHIC> |
78 |
| Searching to select a registered group from Destination List |
78 |
| A Select |
78 |
| A Select |
78 |
| <GRAPHIC> |
78 |
| B Select the group you want to display using |
78 |
| <GRAPHIC> |
78 |
| Searching to select a registered group by registration number |
78 |
| A Select |
78 |
| A Select |
78 |
| B Enter the registration number of the group you want to display using the number keys, and then ... |
78 |
| B Enter the registration number of the group you want to display using the number keys, and then ... |
78 |
| <GRAPHIC> |
78 |
| C Press the |
78 |
| G Press the |
78 |
| G Press the |
78 |
| H Press |
78 |
| H Press |
78 |
| <GRAPHIC> |
78 |
| All the user (destination) names in the specified group appear. |
78 |
| I Press the |
78 |
| I Press the |
78 |
| Changing a Group Name |
79 |
| Changing a Group Name |
79 |
| Changing a group name |
79 |
| A Press the |
79 |
| A Press the |
79 |
| A Press the |
79 |
| A Press the |
79 |
| B Select |
79 |
| B Select |
79 |
| C Select |
79 |
| C Select |
79 |
| D Select |
79 |
| D Select |
79 |
| E Select |
79 |
| E Select |
79 |
| F Press |
79 |
| F Press |
79 |
| <GRAPHIC> |
79 |
| You can also enter the registration number of the group using the number keys or the Quick Dial k... |
79 |
| You can also enter the registration number of the group using the number keys or the Quick Dial k... |
79 |
| Searching to select a registered group by name |
79 |
| Searching to select a registered group by name |
79 |
| A Select |
79 |
| A Select |
79 |
| <GRAPHIC> |
79 |
| B Enter the characters of the destination you want to change using the number keys and the Quick ... |
79 |
| <GRAPHIC> |
79 |
| For details about entering text, see |
79 |
| For details about entering text, see |
79 |
| C Press the |
79 |
| C Press the |
79 |
| <GRAPHIC> |
79 |
| D Select the group you want to change using |
79 |
| <GRAPHIC> |
79 |
| Searching to select a registered group from Destination List |
79 |
| A Select |
79 |
| A Select |
79 |
| B Select the group you want to change using |
79 |
| B Select the group you want to change using |
79 |
| <GRAPHIC> |
80 |
| Searching to select a registered group by registration number |
80 |
| A Select |
80 |
| A Select |
80 |
| B Enter the registration number of the group you want to change using the number keys, and then p... |
80 |
| B Enter the registration number of the group you want to change using the number keys, and then p... |
80 |
| <GRAPHIC> |
80 |
| C Press the |
80 |
| G Enter the new group name using the number keys and the Quick Dial keys, and then press the |
80 |
| G Enter the new group name using the number keys and the Quick Dial keys, and then press the |
80 |
| For details about entering text, see |
80 |
| For details about entering text, see |
80 |
| H Press the |
80 |
| H Press the |
80 |
| The “ |
80 |
| I Press the |
80 |
| I Press the |
80 |
| Deleting a Group |
80 |
| Deleting a Group |
80 |
| Deleting a group |
80 |
| A Press the |
80 |
| A Press the |
80 |
| A Press the |
80 |
| A Press the |
80 |
| B Select |
80 |
| B Select |
80 |
| C Select |
80 |
| C Select |
80 |
| D Select |
80 |
| D Select |
80 |
| E Select |
80 |
| E Select |
80 |
| F Press |
80 |
| F Press |
80 |
| <GRAPHIC> |
80 |
| You can also enter the registration number of the group using the number keys or the Quick Dial k... |
80 |
| You can also enter the registration number of the group using the number keys or the Quick Dial k... |
80 |
| Searching to select a registered group by name |
80 |
| Searching to select a registered group by name |
80 |
| A Select |
80 |
| A Select |
80 |
| <GRAPHIC> |
81 |
| B Enter the characters of the destination you want to delete using the number keys and the Quick ... |
81 |
| <GRAPHIC> |
81 |
| For details about entering text, see |
81 |
| For details about entering text, see |
81 |
| C Press the |
81 |
| C Press the |
81 |
| <GRAPHIC> |
81 |
| D Select the group you want to delete using |
81 |
| <GRAPHIC> |
81 |
| Searching to select a registered group from Destination List |
81 |
| A Select |
81 |
| A Select |
81 |
| B Select the group you want to delete using |
81 |
| B Select the group you want to delete using |
81 |
| <GRAPHIC> |
81 |
| Searching to select a registered group by registration number |
81 |
| A Select |
81 |
| A Select |
81 |
| B Enter the registration number of the group you want to delete using the number keys, and then p... |
81 |
| B Enter the registration number of the group you want to delete using the number keys, and then p... |
81 |
| <GRAPHIC> |
81 |
| C Press the |
81 |
| A confirmation message appears. |
81 |
| G Press |
81 |
| G Press |
81 |
| The “Deleted.” message appears, and then the “Group” display returns. |
81 |
| H Press the |
81 |
| H Press the |
81 |
| Using the Search Function to Select a Destination |
82 |
| Using the Search Function to Select a Destination |
82 |
| You can use the search function to select a registered destination by name, registered number, us... |
82 |
| You can use the search function to select a registered destination by name, registered number, us... |
82 |
| A Press the |
82 |
| A Press the |
82 |
| A Press the |
82 |
| B Select |
82 |
| B Select |
82 |
| C Select |
82 |
| C Select |
82 |
| D Select |
82 |
| D Select |
82 |
| E Select |
82 |
| E Select |
82 |
| F Press |
82 |
| F Press |
82 |
| <GRAPHIC> |
82 |
| Searching to select a registered destination by name |
82 |
| Searching to select a registered destination by name |
82 |
| A Select |
82 |
| A Select |
82 |
| <GRAPHIC> |
82 |
| B Enter the characters of the user (destination) you want to change or delete using the number ke... |
82 |
| <GRAPHIC> |
82 |
| For details about entering text, see |
82 |
| For details about entering text, see |
82 |
| C Press the |
82 |
| C Press the |
82 |
| <GRAPHIC> |
83 |
| D Select the user (destination) you want to change or delete using |
83 |
| <GRAPHIC> |
83 |
| Searching to select a registered destination by registration number |
83 |
| A Select |
83 |
| A Select |
83 |
| <GRAPHIC> |
83 |
| B Enter the registration number of the user (destination) you want to change or delete using the ... |
83 |
| <GRAPHIC> |
83 |
| C Press the |
83 |
| Searching to select a registered destination by user code |
83 |
| Searching to select a registered destination by user code |
83 |
| A Select |
83 |
| A Select |
83 |
| <GRAPHIC> |
83 |
| B Enter the user code of the user (destination) you want to change or delete using the number key... |
83 |
| <GRAPHIC> |
83 |
| C Press the |
83 |
| <GRAPHIC> |
83 |
| D Press the |
83 |
| Searching to select a registered destination by fax number |
84 |
| Searching to select a registered destination by fax number |
84 |
| A Select |
84 |
| A Select |
84 |
| <GRAPHIC> |
84 |
| B Enter the fax number of the user (destination) you want to change or delete using the number ke... |
84 |
| <GRAPHIC> |
84 |
| C Press the |
84 |
| <GRAPHIC> |
84 |
| D Select the user (destination) you want to change or delete using |
84 |
| <GRAPHIC> |
84 |
| Searching to select a registered destination by e-mail address |
84 |
| A Select |
84 |
| A Select |
84 |
| <GRAPHIC> |
84 |
| B Enter the e-mail address of the user (destination) you want to change or delete using the numbe... |
84 |
| <GRAPHIC> |
84 |
| For details about entering text, see |
84 |
| For details about entering text, see |
84 |
| C Press the |
84 |
| C Press the |
84 |
| <GRAPHIC> |
84 |
| D Select the user (destination) you want to change or delete using |
84 |
| <GRAPHIC> |
85 |
| 4.� Troubleshooting |
85 |
| Troubleshooting |
85 |
| If Your Machine Does Not Operate As You Want |
85 |
| If Your Machine Does Not Operate As You Want |
85 |
| If your machine does not operate as you want |
85 |
| The following chart gives explanations of common problems and messages. If other messages appear,... |
85 |
| The following chart gives explanations of common problems and messages. If other messages appear,... |
85 |
| For further “Troubleshooting”, refer to the other manuals for this machine. See |
85 |
| For further “Troubleshooting”, refer to the other manuals for this machine. See |
85 |
| <TABLE> |
85 |
| <TABLE> |
85 |
| <TABLE HEADING> |
85 |
| <TABLE ROW> |
85 |
| Problem |
85 |
| Causes |
85 |
| Solutions |
85 |
| <TABLE BODY> |
85 |
| <TABLE ROW> |
85 |
| “Please wait.” appears. |
85 |
| This message appears when you turn on the operation switch or change the toner bottle. |
85 |
| Wait for the machine to get ready. |
85 |
| Wait for the machine to get ready. |
85 |
| <TABLE ROW> |
85 |
| The display is off. |
85 |
| The machine is in Energy Saver mode. |
85 |
| Turn on the operation switch. |
85 |
| <TABLE ROW> |
85 |
| The operation switch is turned off. |
85 |
| <TABLE ROW> |
85 |
| Nothing happens when the operation switch is turned on. |
85 |
| The main power switch is turned off. |
85 |
| Turn on the main power switch. |
85 |
| <TABLE ROW> |
85 |
| The user code entry display appears. |
85 |
| Users are restricted by user management. |
85 |
| Enter the user code (up to eight digits), and then press the {OK} or {#} key. |
85 |
| Enter the user code (up to eight digits), and then press the |
85 |
| <TABLE> |
85 |
| <TABLE> |
85 |
| <TABLE HEADING> |
85 |
| <TABLE ROW> |
85 |
| Problem |
85 |
| Causes |
85 |
| Solutions |
85 |
| <TABLE BODY> |
85 |
| <TABLE ROW> |
85 |
| The main power indicator continues blinking and does not turn off when pressed. |
85 |
| The main power indicator continues blinking and does not turn off when pressed. |
85 |
| The machine is communicating with external equipment. |
85 |
| The machine is communicating with external equipment. |
85 |
| Check if the machine is communicating with a computer. |
85 |
| Check if the machine is communicating with a computer. |
85 |
| <TABLE ROW> |
85 |
| Original images are printed on the reverse side of the paper. |
85 |
| Original images are printed on the reverse side of the paper. |
85 |
| You may have loaded the paper incorrectly. |
85 |
| You may have loaded the paper incorrectly. |
85 |
| Load paper correctly. Load paper into Tray 1-2 with the print side up, and bypass tray with the p... |
85 |
| Load paper correctly. Load paper into Tray 1-2 with the print side up, and bypass tray with the p... |
85 |
| <TABLE ROW> |
85 |
| Misfeeds occur frequently. |
85 |
| Misfeeds occur frequently. |
85 |
| Copy paper size setting is not correct. |
85 |
| Copy paper size setting is not correct. |
85 |
| Set the proper paper size. See p.29 “Tray Paper Size:Tray 1–2” and p.94 “Copy Paper”. |
85 |
| Set the proper paper size. See |
85 |
| <TABLE ROW> |
85 |
| The tray's back fence may not be set properly. |
85 |
| The tray's back fence may not be set properly. |
85 |
| Check the back fence is set properly. See p.77 “Changing the Paper Size”. |
85 |
| Check the back fence is set properly. See |
85 |
| <TABLE ROW> |
85 |
| An error message remains, even if misfed paper is removed. |
85 |
| An error message remains, even if misfed paper is removed. |
85 |
| When a misfeed message appears, it remains until you open and close the cover, as required. |
85 |
| When a misfeed message appears, it remains until you open and close the cover, as required. |
85 |
| Clear misfed paper, and then open and close the cover. See p.75 “x Clearing Misfeeds”. |
85 |
| Clear misfed paper, and then open and close the cover. See |
85 |
| <TABLE ROW> |
86 |
| Cannot print in duplex mode. |
86 |
| Cannot print in duplex mode. |
86 |
| You cannot use paper in the bypass tray for duplex printing. |
86 |
| You cannot use paper in the bypass tray for duplex printing. |
86 |
| For duplex printing, select Tray 1-2 in copier mode or with the printer driver. |
86 |
| For duplex printing, select Tray 1-2 in copier mode or with the printer driver. |
86 |
| <TABLE ROW> |
86 |
| [Off] is selected for [Duplex] in Paper Type: Tray 1-2. |
86 |
| Off |
86 |
| Off |
86 |
| Select [On] for [Duplex] in Paper Type: Tray 1-2. See p.30 “Paper Type:Tray 1– 2”. |
86 |
| Select |
86 |
| <TABLE ROW> |
86 |
| You forgot your key operator code. |
86 |
| — |
86 |
| Contact your service representative. |
86 |
| x Clearing Misfeeds |
87 |
| x Clearing Misfeeds |
87 |
| Clearing misfeeds |
87 |
| <GRAPHIC> |
87 |
| <GRAPHIC> |
87 |
| <TABLE> |
87 |
| <TABLE> |
87 |
| <TABLE> |
87 |
| <TABLE> |
87 |
| <TABLE BODY> |
87 |
| <TABLE ROW> |
87 |
| • The fusing section of this machine might be very hot. Caution should be taken when removing mis... |
87 |
| • The fusing section of this machine might be very hot. Caution should be taken when removing mis... |
87 |
| When clearing misfeeds, do not turn off the power switch. If you do, your copy settings are cleared. |
87 |
| When clearing misfeeds, do not turn off the power switch. If you do, your copy settings are cleared. |
87 |
| To prevent misfeeds, do not leave any torn scraps of paper inside the machine. |
87 |
| If paper misfeeds occur repeatedly, contact your service representative. |
87 |
| More than one misfeed area may be indicated. If this is the case, check every applicable area. Re... |
87 |
| More than one misfeed area may be indicated. If this is the case, check every applicable area. Re... |
87 |
| You can find a sticker explaining how to remove misfed paper inside the right cover. |
87 |
| When the machine instructs you to reset originals, reset them in the feeding position. The displa... |
87 |
| <GRAPHIC> |
89 |
| Changing the Paper Size |
89 |
| Changing the paper size |
89 |
| Be sure to select the paper size with User Tools. If you do not, misfeeds might occur. See |
89 |
| Be sure to select the paper size with User Tools. If you do not, misfeeds might occur. See |
89 |
| For details about paper sizes and types, see |
89 |
| For details about paper sizes and types, see |
89 |
| For details about paper sizes and types, see |
89 |
| Changing the Paper Size of the Paper Tray (Tray 1) |
89 |
| Changing the Paper Size of the Paper Tray (Tray 1) |
89 |
| Changing the paper size of the paper tray |
89 |
| A Make sure the paper tray is not in use. |
89 |
| A Make sure the paper tray is not in use. |
89 |
| A Make sure the paper tray is not in use. |
89 |
| A Make sure the paper tray is not in use. |
89 |
| B Pull the paper tray out slowly until it stops. |
89 |
| B Pull the paper tray out slowly until it stops. |
89 |
| Remove any remaining copy paper. |
89 |
| Remove any remaining copy paper. |
89 |
| C While pressing the release lever, pull the back fence off from the tray. |
89 |
| C While pressing the release lever, pull the back fence off from the tray. |
89 |
| <GRAPHIC> |
89 |
| When loading A4L size paper |
89 |
| When loading A4L size paper |
89 |
| A Place the back fence in the corner pocket on the left. |
89 |
| A Place the back fence in the corner pocket on the left. |
89 |
| D While pressing the release lever, adjust the side fences. |
89 |
| D While pressing the release lever, adjust the side fences. |
89 |
| <GRAPHIC> |
89 |
| E Push the metal plate down. |
89 |
| <GRAPHIC> |
90 |
| F Square the paper and load it in the tray. |
90 |
| <GRAPHIC> |
90 |
| Be sure to load the paper under the roller. |
90 |
| Be sure to load the paper under the roller. |
90 |
| Do not stack paper over the limit mark. |
90 |
| G While pressing the release lever, adjust the side fences to the new paper size. |
90 |
| G While pressing the release lever, adjust the side fences to the new paper size. |
90 |
| <GRAPHIC> |
90 |
| When setting small quantities of copy paper, be careful not to squeeze in the side fences too muc... |
90 |
| When setting small quantities of copy paper, be careful not to squeeze in the side fences too muc... |
90 |
| H While pressing the release lever, set the back fence to the new size. |
90 |
| H While pressing the release lever, set the back fence to the new size. |
90 |
| <GRAPHIC> |
90 |
| I Push the paper tray in until it stops. |
90 |
| Changing the Paper Size in the Paper Tray Unit (Tray 2) |
90 |
| Changing the Paper Size in the Paper Tray Unit (Tray 2) |
90 |
| Changing the paper size in the paper tray unit |
90 |
| A Make sure the paper tray is not in use. |
90 |
| A Make sure the paper tray is not in use. |
90 |
| A Make sure the paper tray is not in use. |
90 |
| A Make sure the paper tray is not in use. |
90 |
| B Pull out the paper tray until it stops. |
90 |
| B Pull out the paper tray until it stops. |
90 |
| Remove any remaining copy paper. |
90 |
| Remove any remaining copy paper. |
90 |
| C While pinching the release lever, adjust the back fence. |
90 |
| C While pinching the release lever, adjust the back fence. |
90 |
| <GRAPHIC> |
91 |
| When loading 8 |
91 |
| When loading 8 |
91 |
| A Pull the back fence off from the tray. |
91 |
| A Pull the back fence off from the tray. |
91 |
| B Place it in the corner pocket on the left. |
91 |
| B Place it in the corner pocket on the left. |
91 |
| D While pressing the release lever, adjust the side fences. |
91 |
| D While pressing the release lever, adjust the side fences. |
91 |
| <GRAPHIC> |
91 |
| E Push the metal plate down, and then square the paper and load it in the tray. |
91 |
| <GRAPHIC> |
91 |
| Do not stack paper over the limit mark. |
91 |
| Do not stack paper over the limit mark. |
91 |
| Load paper so that the paper touches the right side of the tray, or misfeeds might occur. |
91 |
| F While pinching the release lever, adjust the side and back fences to the new paper size. |
91 |
| F While pinching the release lever, adjust the side and back fences to the new paper size. |
91 |
| When loading small quantities of copy paper, be careful not to squeeze in the side fence too much... |
91 |
| When loading small quantities of copy paper, be careful not to squeeze in the side fence too much... |
91 |
| G Push the paper tray in until it stops. |
91 |
| G Push the paper tray in until it stops. |
91 |
| Selecting the Paper Size with User Tools |
92 |
| Selecting the Paper Size with User Tools |
92 |
| A Press the |
92 |
| A Press the |
92 |
| A Press the |
92 |
| A Press the |
92 |
| <GRAPHIC> |
92 |
| B Select |
92 |
| <GRAPHIC> |
92 |
| C Select |
92 |
| <GRAPHIC> |
92 |
| D Select the paper tray you want to change the paper size for using |
92 |
| <GRAPHIC> |
92 |
| E Select the paper size using the scroll keys, and then press the |
92 |
| <GRAPHIC> |
92 |
| The “ |
92 |
| F Press the |
92 |
| F Press the |
92 |
| 5.� Other Functions |
93 |
| 5.� Other Functions |
93 |
| Other Functions |
93 |
| Other Functions |
93 |
| Displaying the Total Counter |
93 |
| Displaying the Total Counter |
93 |
| Displaying the total counter |
93 |
| Counter |
93 |
| You can display the total counter value used for all functions. |
93 |
| You can display the total counter value used for all functions. |
93 |
| A Press the |
93 |
| A Press the |
93 |
| A Press the |
93 |
| <GRAPHIC> |
93 |
| B Select |
93 |
| <GRAPHIC> |
93 |
| C To print the counter list, press |
93 |
| <GRAPHIC> |
93 |
| To print the counter list, load A4 Lor 8 |
93 |
| To print the counter list, load A4 Lor 8 |
93 |
| D Press the |
93 |
| D Press the |
93 |
| A counter list prints out. |
93 |
| E Press the |
93 |
| E Press the |
93 |
| Changing the Language |
93 |
| Changing the Language |
93 |
| Changing the language |
93 |
| Language |
93 |
| You can change the language used on the display. English is set as default. |
93 |
| You can change the language used on the display. English is set as default. |
93 |
| A Press the |
93 |
| A Press the |
93 |
| A Press the |
93 |
| <GRAPHIC> |
93 |
| B Select |
93 |
| <GRAPHIC> |
93 |
| C Select the language using |
93 |
| <GRAPHIC> |
93 |
| The “ |
93 |
| D Press the |
93 |
| D Press the |
93 |
| 6.� Entering Text |
95 |
| 6.� Entering Text |
95 |
| Entering Text |
95 |
| Entering Text |
95 |
| This section describes how to enter characters. When you enter a character, it appears at the cur... |
95 |
| This section describes how to enter characters. When you enter a character, it appears at the cur... |
95 |
| Available Characters |
95 |
| Available Characters |
95 |
| Entering text:available characters |
95 |
| • Alphabetic characters |
95 |
| • Alphabetic characters |
95 |
| • Alphabetic characters |
95 |
| • Alphabetic characters |
95 |
| ABCDEFGHIJKLMNOPQRSTUVWXYZabcdefghijklmnopqrstuvwxyz |
95 |
| • Symbols |
95 |
| • Symbols |
95 |
| • Numerals |
95 |
| • Numerals |
95 |
| 0123456789 |
95 |
| Keys |
95 |
| Keys |
95 |
| Entering text:keys |
95 |
| Number keys |
95 |
| Number keys |
95 |
| Number keys |
95 |
| Number keys |
95 |
| Use to enter numbers. |
95 |
| Use to enter numbers. |
95 |
| Quick Dial 01 to Quick Dial 09 (A to Z) |
95 |
| Quick Dial 01 to Quick Dial 09 (A to Z) |
95 |
| Press these to enter upper and lower case letters. |
95 |
| Press these to enter upper and lower case letters. |
95 |
| Shift |
95 |
| Shift |
95 |
| Shift |
95 |
| Use to switch between uppercase and lowercase. |
95 |
| Use to switch between uppercase and lowercase. |
95 |
| Space |
95 |
| Space |
95 |
| Space |
95 |
| Press to enter a space. |
95 |
| Press to enter a space. |
95 |
| Clear/Stop |
95 |
| Clear/Stop |
95 |
| Clear/Stop |
95 |
| Deletes a character at the cursor position. You can delete a character at the right end of a line... |
95 |
| Deletes a character at the cursor position. You can delete a character at the right end of a line... |
95 |
| W |
95 |
| W |
95 |
| W |
95 |
| Use to move the cursor left or right. |
95 |
| Use to move the cursor left or right. |
95 |
| To enter symbols, press the |
95 |
| To enter symbols, press the |
95 |
| <GRAPHIC> |
95 |
| How to Enter Text |
95 |
| Use the Quick Dial keys 01 to 09 for entering letters. |
95 |
| Use the Quick Dial keys 01 to 09 for entering letters. |
95 |
| To enter letter, press the key again until it appears. |
95 |
| <TABLE> |
95 |
| <TABLE> |
95 |
| <TABLE BODY> |
95 |
| <TABLE ROW> |
95 |
| Quick Dial Key |
95 |
| Letters |
95 |
| Quick Dial Key |
95 |
| Letters |
95 |
| <TABLE ROW> |
95 |
| 01 |
95 |
| A, B, C |
95 |
| 09 |
95 |
| Y, Z |
95 |
| <TABLE ROW> |
95 |
| 02 |
95 |
| D, E, F |
95 |
| 10 |
95 |
| @, ., _ |
95 |
| <TABLE ROW> |
95 |
| 03 |
95 |
| G, H, I |
95 |
| 11 |
95 |
| -, & |
95 |
| <TABLE ROW> |
95 |
| 04 |
95 |
| J, K, L |
95 |
| 12 |
95 |
| Nothing |
95 |
| <TABLE ROW> |
95 |
| 05 |
95 |
| M, N, O |
95 |
| 13 |
95 |
| Shift |
95 |
| <TABLE ROW> |
95 |
| 06 |
95 |
| P, Q, R |
95 |
| 14 |
95 |
| Space |
95 |
| <TABLE ROW> |
95 |
| 07 |
95 |
| S, T, U |
95 |
| 15 |
95 |
| Symbols |
95 |
| <TABLE ROW> |
95 |
| 08 |
95 |
| V, W, X |
95 |
| 16 |
95 |
| Nothing |
95 |
| Entering letters |
96 |
| Entering letters |
96 |
| A Press the |
96 |
| A Press the |
96 |
| A Press the |
96 |
| A Press the |
96 |
| <GRAPHIC> |
96 |
| B Press a Quick Dial keys. |
96 |
| A letter is entered and the cursor moves along one space. |
96 |
| To enter a character repeatedly, repeat step B. |
96 |
| To enter a character repeatedly, repeat step B. |
96 |
| To insert a character, press |
96 |
| Entering symbols |
96 |
| Entering symbols |
96 |
| A Press the |
96 |
| A Press the |
96 |
| A Press the |
96 |
| A Press the |
96 |
| <GRAPHIC> |
96 |
| B Select the desired symbol using the scroll keys, and then press the |
96 |
| <GRAPHIC> |
96 |
| <GRAPHIC> |
96 |
| To enter another symbol, repeat steps A to B. |
96 |
| To enter another symbol, repeat steps A to B. |
96 |
| Entering numbers |
96 |
| Entering numbers |
96 |
| A Press a number key. |
96 |
| A Press a number key. |
96 |
| A Press a number key. |
96 |
| A Press a number key. |
96 |
| The numeral is entered and the cursor moves. |
96 |
| To insert a character, press |
96 |
| To insert a character, press |
96 |
| Deleting characters |
96 |
| Deleting characters |
96 |
| Entering text:deleting characters |
96 |
| A Move the cursor to the character you want to delete using |
96 |
| A Move the cursor to the character you want to delete using |
96 |
| A Move the cursor to the character you want to delete using |
96 |
| A Move the cursor to the character you want to delete using |
96 |
| B Press the |
96 |
| B Press the |
96 |
| The character at the cursor position is deleted . |
96 |
| To delete another character, repeat steps A and B. |
96 |
| To delete another character, repeat steps A and B. |
96 |
| 7.� Security |
97 |
| 7.� Security |
97 |
| Security |
97 |
| Security |
97 |
| Security |
97 |
| Confidential information is always at risk of being copied without permission or subject to unaut... |
97 |
| Confidential information is always at risk of being copied without permission or subject to unaut... |
97 |
| For those who require increased document protection, we recommend the |
97 |
| Primary Security Functions |
97 |
| Primary Security Functions |
97 |
| Primary security functions |
97 |
| Protecting Image Data Remaining in Memory |
97 |
| Protecting Image Data Remaining in Memory |
97 |
| Protecting Image Data Remaining in Memory |
97 |
| Protecting Image Data Remaining in Memory |
97 |
| Protects image data remaining in memory. When a copy or print job is completed, or a job is cance... |
97 |
| Protects image data remaining in memory. When a copy or print job is completed, or a job is cance... |
97 |
| Protecting against Unauthorized Access via Phone Line |
97 |
| Protecting against Unauthorized Access via Phone Line |
97 |
| Accepts only facsimile calls. |
97 |
| Accepts only facsimile calls. |
97 |
| Authenticating Administrator |
97 |
| Authenticating Administrator |
97 |
| Protects essential functions for administrating document security using an access code. See |
97 |
| Protects essential functions for administrating document security using an access code. See |
97 |
| Extended Security |
97 |
| Extended Security |
97 |
| Extended Security |
97 |
| Extended Security<Default Para Font> Function |
97 |
| When the |
97 |
| When the |
97 |
| When the |
97 |
| Setting |
97 |
| Setting |
97 |
| The |
97 |
| The |
97 |
| To ensure increased document protection under the |
97 |
| To ensure increased document protection under the |
97 |
| To ensure increased document protection under the |
97 |
| A Press the |
98 |
| A Press the |
98 |
| A Press the |
98 |
| <GRAPHIC> |
98 |
| B Select |
98 |
| <GRAPHIC> |
98 |
| C Select |
98 |
| <GRAPHIC> |
98 |
| D Select |
98 |
| <GRAPHIC> |
98 |
| E Select |
98 |
| <GRAPHIC> |
98 |
| The“ |
98 |
| F Press the |
98 |
| F Press the |
98 |
| Operating Environment and Notes |
99 |
| Operating Environment and Notes |
99 |
| Security for this machine is assured on the premises that the machine is used under the following... |
99 |
| Security for this machine is assured on the premises that the machine is used under the following... |
99 |
| Operating Environment |
99 |
| Operating Environment |
99 |
| Operating environment |
99 |
| • The condition of the machine is normal. (For example, it is not damaged, modified, or lacking c... |
99 |
| • The condition of the machine is normal. (For example, it is not damaged, modified, or lacking c... |
99 |
| • The condition of the machine is normal. (For example, it is not damaged, modified, or lacking c... |
99 |
| • The condition of the machine is normal. (For example, it is not damaged, modified, or lacking c... |
99 |
| • When the machine is connected to a network, the machine is protected from illegitimate access i... |
99 |
| • When the machine is connected to a network, the machine is protected from illegitimate access i... |
99 |
| • The machine is managed by an administrator with thorough knowledge of the machine and capable o... |
99 |
| • The machine is managed by an administrator with thorough knowledge of the machine and capable o... |
99 |
| For Administrator |
99 |
| For Administrator |
99 |
| • This machine does not protect against illegitimate actions on the network. To avoid any risks o... |
99 |
| • This machine does not protect against illegitimate actions on the network. To avoid any risks o... |
99 |
| • This machine does not protect against illegitimate actions on the network. To avoid any risks o... |
99 |
| • This machine does not protect against illegitimate actions on the network. To avoid any risks o... |
99 |
| • Security of this machine cannot be assured if any hardware component is detached or replaced wi... |
99 |
| • Security of this machine cannot be assured if any hardware component is detached or replaced wi... |
99 |
| • Regularly check that the |
99 |
| • Regularly check that the |
99 |
| • Avoid using a single number or consecutive numbers for a key operator code such as “00000000” o... |
99 |
| • Avoid using a single number or consecutive numbers for a key operator code such as “00000000” o... |
99 |
| • Remote document management using SmartDeviceMonitor for Admin is not available when the |
99 |
| • Remote document management using SmartDeviceMonitor for Admin is not available when the |
99 |
| • User code is a function to help manage the use of the machine. It is not to protect confidentia... |
99 |
| • User code is a function to help manage the use of the machine. It is not to protect confidentia... |
99 |
| For User |
99 |
| For User |
99 |
| • Before scanning originals using the scanner function, make sure all other operations are complete. |
99 |
| • Before scanning originals using the scanner function, make sure all other operations are complete. |
99 |
| • Before scanning originals using the scanner function, make sure all other operations are complete. |
99 |
| • Before scanning originals using the scanner function, make sure all other operations are complete. |
99 |
| 8.� Specifications |
101 |
| 8.� Specifications |
101 |
| Specifications |
101 |
| Main Unit |
101 |
| Main Unit |
101 |
| Main unit |
101 |
| Configuration: |
101 |
| Configuration: |
101 |
| Configuration: |
101 |
| Configuration: |
101 |
| Desktop |
101 |
| Desktop |
101 |
| Photosensitivity type: |
101 |
| Photosensitivity type: |
101 |
| OPC drum |
101 |
| OPC drum |
101 |
| Original scanning: |
101 |
| Original scanning: |
101 |
| One-dimensional solid scanning system through CCD |
101 |
| One-dimensional solid scanning system through CCD |
101 |
| Copy process: |
101 |
| Copy process: |
101 |
| Dry electrostatic transfer system |
101 |
| Dry electrostatic transfer system |
101 |
| Development: |
101 |
| Development: |
101 |
| Dry two-component magnetic brush development system |
101 |
| Dry two-component magnetic brush development system |
101 |
| Fusing: |
101 |
| Fusing: |
101 |
| Heating roll pressure system |
101 |
| Heating roll pressure system |
101 |
| Resolution: |
101 |
| Resolution: |
101 |
| 600 dpi |
101 |
| 600 dpi |
101 |
| Exposure glass: |
101 |
| Exposure glass: |
101 |
| Stationary original exposure type |
101 |
| Stationary original exposure type |
101 |
| Original reference position: |
101 |
| Original reference position: |
101 |
| Rear left corner |
101 |
| Rear left corner |
101 |
| Warm-up time: |
101 |
| Warm-up time: |
101 |
| From the main power switch |
101 |
| From the main power switch |
101 |
| From the operation switch |
101 |
| 10 seconds or less (20 °C) |
101 |
| Originals: |
101 |
| Originals: |
101 |
| Sheet/book/objects |
101 |
| Sheet/book/objects |
101 |
| Maximum original size: |
101 |
| Maximum original size: |
101 |
| • Exposure glass: A4L, 8 |
101 |
| • Exposure glass: A4L, 8 |
101 |
| • Exposure glass: A4L, 8 |
101 |
| • Exposure glass: A4L, 8 |
101 |
| • ADF: A4L, 8 |
101 |
| • ADF: A4L, 8 |
101 |
| Copy paper size: |
102 |
| Copy paper size: |
102 |
| • Tray: A4L, B5 JISL, A5K, 8 |
102 |
| • Tray: A4L, B5 JISL, A5K, 8 |
102 |
| • Tray: A4L, B5 JISL, A5K, 8 |
102 |
| • Tray: A4L, B5 JISL, A5K, 8 |
102 |
| • Bypass: A4L, A5KL, B5 JISL, 8 |
102 |
| • Bypass: A4L, A5KL, B5 JISL, 8 |
102 |
| • Bypass (custom size): |
102 |
| • Bypass (custom size): |
102 |
| Vertical: 90 – 216 mm, 3.55\ |
102 |
| Horizontal: 139 – 600 mm, 5.48\ |
102 |
| • Duplex unit: A4L, B5 JISL, 8 |
102 |
| • Duplex unit: A4L, B5 JISL, 8 |
102 |
| Copy paper weight: |
102 |
| Copy paper weight: |
102 |
| • Paper tray (Standard size): 60 – 90 g/m |
102 |
| • Paper tray (Standard size): 60 – 90 g/m |
102 |
| • Paper tray (Standard size): 60 – 90 g/m |
102 |
| • Paper tray (Standard size): 60 – 90 g/m |
102 |
| • Bypass tray: 60 – 157 g/m |
102 |
| • Bypass tray: 60 – 157 g/m |
102 |
| • Duplex unit: 64 – 90 g/m |
102 |
| • Duplex unit: 64 – 90 g/m |
102 |
| Non-reproduction area: |
102 |
| Non-reproduction area: |
102 |
| • Leading edge: 3 ± 2 mm (0.12 ± 0.08 inch) |
102 |
| • Leading edge: 3 ± 2 mm (0.12 ± 0.08 inch) |
102 |
| • Leading edge: 3 ± 2 mm (0.12 ± 0.08 inch) |
102 |
| • Leading edge: 3 ± 2 mm (0.12 ± 0.08 inch) |
102 |
| • Trailing edge: 3 ± 2 mm (0.12 ± 0.08 inch) |
102 |
| • Trailing edge: 3 ± 2 mm (0.12 ± 0.08 inch) |
102 |
| (the back side of a 2-sided copy: 4.2 ± 2 mm, 0.17 ± 0.08 inch ) |
102 |
| • Left edge: 2 ± 1.5 mm (0.08 ± 0.06 inch) |
102 |
| • Left edge: 2 ± 1.5 mm (0.08 ± 0.06 inch) |
102 |
| • Right edge: more than 0.5 mm (0.02 inch) |
102 |
| • Right edge: more than 0.5 mm (0.02 inch) |
102 |
| First copy time: |
102 |
| First copy time: |
102 |
| 7.5 seconds or less |
102 |
| 7.5 seconds or less |
102 |
| (A4L, 8 |
102 |
| Copying speed: |
102 |
| Copying speed: |
102 |
| • 15 copies/minute (A4L, 8 |
102 |
| • 15 copies/minute (A4L, 8 |
102 |
| • 15 copies/minute (A4L, 8 |
102 |
| • 15 copies/minute (A4L, 8 |
102 |
| Reproduction ratio: |
102 |
| Reproduction ratio: |
102 |
| Preset reproduction ratios: |
102 |
| Preset reproduction ratios: |
102 |
| Continuous copying count: |
102 |
| Continuous copying count: |
102 |
| 1 – 99 copies |
102 |
| 1 – 99 copies |
102 |
| Copy paper capacity: |
103 |
| Copy paper capacity: |
103 |
| • Tray 1: 250 sheets (80 g/m |
103 |
| • Tray 1: 250 sheets (80 g/m |
103 |
| • Tray 1: 250 sheets (80 g/m |
103 |
| • Tray 1: 250 sheets (80 g/m |
103 |
| • Bypass: 100 sheets (80 g/m |
103 |
| • Bypass: 100 sheets (80 g/m |
103 |
| Power consumption: |
103 |
| Power consumption: |
103 |
| <TABLE> |
103 |
| <TABLE> |
103 |
| <TABLE> |
103 |
| <TABLE HEADING> |
103 |
| <TABLE ROW> |
103 |
| Main unit only |
103 |
| Complete system *1 |
103 |
| <TABLE BODY> |
103 |
| <TABLE ROW> |
103 |
| Warm up |
103 |
| Less than 890 W |
103 |
| Less than 890 W |
103 |
| <TABLE ROW> |
103 |
| Stand-by |
103 |
| About 90 Wh |
103 |
| About 100 Wh |
103 |
| <TABLE ROW> |
103 |
| During printing |
103 |
| About 480 Wh |
103 |
| About 480 Wh |
103 |
| <TABLE ROW> |
103 |
| Maximum |
103 |
| Less than 1 kW |
103 |
| Less than 1 kW |
103 |
| *1 Main unit with the ADF, fax unit, printer/scanner unit, and paper tray unit. |
103 |
| *1 Main unit with the ADF, fax unit, printer/scanner unit, and paper tray unit. |
103 |
| *1 Main unit with the ADF, fax unit, printer/scanner unit, and paper tray unit. |
103 |
| Dimensions (W ¥ D ¥ H up to exposure glass): |
103 |
| Dimensions (W ¥ D ¥ H up to exposure glass): |
103 |
| Main unit only: 468 ¥ 450 ¥ 371 mm |
103 |
| Main unit only: 468 ¥ 450 ¥ 371 mm |
103 |
| Main unit including the paper tray unit: 468 ¥ 450 ¥ 511 mm |
103 |
| Noise Emission |
103 |
| Noise Emission |
103 |
| • Sound power level |
103 |
| • Sound power level |
103 |
| • Sound power level |
103 |
| • Sound power level |
103 |
| <TABLE> |
103 |
| <TABLE> |
103 |
| <TABLE> |
103 |
| <TABLE HEADING> |
103 |
| <TABLE ROW> |
103 |
| Main unit only |
103 |
| Complete system *3 |
103 |
| <TABLE BODY> |
103 |
| <TABLE ROW> |
103 |
| Stand-by |
103 |
| 40 dB (A) |
103 |
| 40 dB (A) |
103 |
| <TABLE ROW> |
103 |
| During printing |
103 |
| 62 dB (A) |
103 |
| 66 dB (A) |
103 |
| • Sound pressure level |
103 |
| • Sound pressure level |
103 |
| • Sound pressure level |
103 |
| <TABLE> |
103 |
| <TABLE> |
103 |
| <TABLE> |
103 |
| <TABLE> |
103 |
| <TABLE HEADING> |
103 |
| <TABLE ROW> |
103 |
| Main unit only |
103 |
| Complete system *3 |
103 |
| <TABLE BODY> |
103 |
| <TABLE ROW> |
103 |
| Stand-by |
103 |
| 34 dB (A) |
103 |
| 34 dB (A) |
103 |
| <TABLE ROW> |
103 |
| During printing |
103 |
| 57 dB (A) |
103 |
| 60 dB (A) |
103 |
| *1 The above measurements made in accordance with ISO 7779 are actual values. |
103 |
| *1 The above measurements made in accordance with ISO 7779 are actual values. |
103 |
| *2 Measured at the position of the operator. |
103 |
| *2 Measured at the position of the operator. |
103 |
| *3 The complete system consists of a main unit with full items installed. |
103 |
| *3 The complete system consists of a main unit with full items installed. |
103 |
| Weight: |
103 |
| Weight: |
103 |
| 22 kg (44.09 lb) or less |
103 |
| 22 kg (44.09 lb) or less |
103 |
| Specifications are subject to change without notice. |
103 |
| Specifications are subject to change without notice. |
103 |
| Auto Document Feeder (ADF) |
104 |
| Auto Document Feeder (ADF) |
104 |
| Auto Document Feeder |
104 |
| ADF |
104 |
| Mode: |
104 |
| Mode: |
104 |
| Mode: |
104 |
| Mode: |
104 |
| • ADF mode |
104 |
| • ADF mode |
104 |
| • ADF mode |
104 |
| • ADF mode |
104 |
| • ADF mode |
104 |
| Original size: |
104 |
| Original size: |
104 |
| • A4L – A5KL |
104 |
| • A4L – A5KL |
104 |
| • A4L – A5KL |
104 |
| • A4L – A5KL |
104 |
| • 8 |
104 |
| • 8 |
104 |
| Original weight: |
104 |
| Original weight: |
104 |
| • One-sided originals: 52 – 105 g/m |
104 |
| • One-sided originals: 52 – 105 g/m |
104 |
| • One-sided originals: 52 – 105 g/m |
104 |
| • One-sided originals: 52 – 105 g/m |
104 |
| Number of originals to be set: |
104 |
| Number of originals to be set: |
104 |
| • 30 sheets (80 g/m |
104 |
| • 30 sheets (80 g/m |
104 |
| • 30 sheets (80 g/m |
104 |
| • 30 sheets (80 g/m |
104 |
| • 30 sheets (80 g/m |
104 |
| Maximum power consumption: |
104 |
| Maximum power consumption: |
104 |
| • less than 50 W (power is supplied from the main unit.) |
104 |
| • less than 50 W (power is supplied from the main unit.) |
104 |
| • less than 50 W (power is supplied from the main unit.) |
104 |
| • less than 50 W (power is supplied from the main unit.) |
104 |
| • less than 50 W (power is supplied from the main unit.) |
104 |
| Dimensions (W ¥ D ¥ H): |
104 |
| Dimensions (W ¥ D ¥ H): |
104 |
| • 110 ¥ 360 ¥ 95 mm, 4.3\ |
104 |
| • 110 ¥ 360 ¥ 95 mm, 4.3\ |
104 |
| • 110 ¥ 360 ¥ 95 mm, 4.3\ |
104 |
| • 110 ¥ 360 ¥ 95 mm, 4.3\ |
104 |
| Weight: |
104 |
| Weight: |
104 |
| • 2 kg (4.4 lb) or less |
104 |
| • 2 kg (4.4 lb) or less |
104 |
| • 2 kg (4.4 lb) or less |
104 |
| • 2 kg (4.4 lb) or less |
104 |
| Specifications are subject to change without notice. |
104 |
| Specifications are subject to change without notice. |
104 |
| Other Item |
105 |
| Other Item |
105 |
| Other item |
105 |
| Paper Tray Unit (Tray 2) |
105 |
| Paper Tray Unit (Tray 2) |
105 |
| Paper tray unit |
105 |
| Paper weight: |
105 |
| Paper weight: |
105 |
| Paper weight: |
105 |
| Paper weight: |
105 |
| 60 – 90 g/m |
105 |
| 60 – 90 g/m |
105 |
| Paper size: |
105 |
| Paper size: |
105 |
| A4L, 8 |
105 |
| A4L, 8 |
105 |
| Maximum power consumption: |
105 |
| Maximum power consumption: |
105 |
| 15 W (power is supplied from the main unit) |
105 |
| 15 W (power is supplied from the main unit) |
105 |
| Paper capacity: |
105 |
| Paper capacity: |
105 |
| 500 sheets (80 g/m |
105 |
| 500 sheets (80 g/m |
105 |
| Dimensions (W ¥ D ¥ H): |
105 |
| Dimensions (W ¥ D ¥ H): |
105 |
| 430 ¥ 414 ¥ 140 mm, 17.0” ¥ 16.3” ¥ 5.6” |
105 |
| 430 ¥ 414 ¥ 140 mm, 17.0” ¥ 16.3” ¥ 5.6” |
105 |
| Weight: |
105 |
| Weight: |
105 |
| 6 kg (13.3 lb) or less |
105 |
| 6 kg (13.3 lb) or less |
105 |
| Specifications are subject to change without notice. |
105 |
| Specifications are subject to change without notice. |
105 |
| For details about the anti-condensation heater, contact your service representative. |
105 |
| Copy Paper |
106 |
| Copy Paper |
106 |
| Copy paper |
106 |
| Recommended Paper Sizes and Types |
106 |
| Recommended Paper Sizes and Types |
106 |
| Recommended paper sizes and types |
106 |
| The following limitations apply to each tray: |
106 |
| The following limitations apply to each tray: |
106 |
| If you use damp or curled paper, a misfeed might occur. In such a case, try turning over the pape... |
107 |
| If you use damp or curled paper, a misfeed might occur. In such a case, try turning over the pape... |
107 |
| When using the bypass tray, we recommend you set the copy paper direction to L. |
107 |
| When using the bypass tray, we recommend you set the copy paper direction to L. |
107 |
| When printing on envelopes, note the following: |
107 |
| If you load paper of the same size and in the same direction in two trays, the machine automatica... |
107 |
| To add paper, see |
107 |
| To add paper, see |
107 |
| To change the paper size, see |
107 |
| Unusable Paper |
107 |
| Unusable Paper |
107 |
| Unusable paper |
107 |
| <TABLE> |
107 |
| <TABLE> |
107 |
| <TABLE> |
107 |
| <TABLE> |
107 |
| <TABLE> |
107 |
| <TABLE BODY> |
107 |
| <TABLE ROW> |
107 |
| • Do not use aluminum foil, carbon paper, or similar conductive paper to avoid a fire or machine ... |
107 |
| • Do not use aluminum foil, carbon paper, or similar conductive paper to avoid a fire or machine ... |
107 |
| Do not use any of the following kinds of paper or a fault might occur: |
107 |
| Do not use any of the following kinds of paper or a fault might occur: |
107 |
| Do not use copy paper that has been already copied on. Otherwise, a paper misfeed might occur. |
107 |
| Do not use any of the following kinds of paper or a misfeed might occur. |
108 |
| Do not use any of the following kinds of paper or a misfeed might occur. |
108 |
| If you make copies on rough grain paper, the copy image might come out blurred. |
108 |
| Do not use paper already copied or printed on. |
108 |
| Paper Storage |
108 |
| Paper Storage |
108 |
| Paper storage |
108 |
| When storing paper, the following precautions should always be followed: |
108 |
| When storing paper, the following precautions should always be followed: |
108 |
| When storing paper, the following precautions should always be followed: |
108 |
| Keep open reams of papers in the package, and store as you would unopened paper. |
108 |
| Under conditions of high temperature and high humidity, or low temperature and low humidity condi... |
108 |
| INDEX |
109 |
| INDEX |
109 |
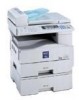
 1
1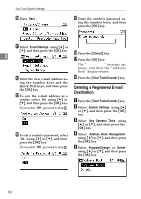 72
72 73
73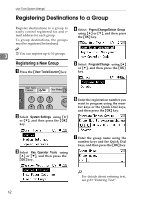 74
74 75
75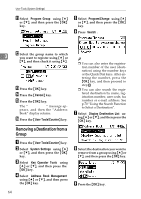 76
76 77
77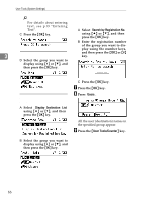 78
78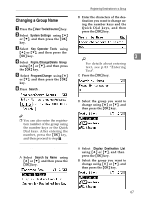 79
79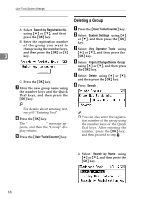 80
80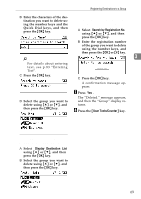 81
81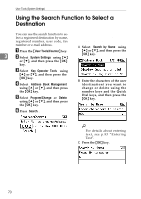 82
82