Ricoh Aficio SP 5100N Quick Installation Guide - Page 45
Troubleshooting, Clearing paper jams
 |
View all Ricoh Aficio SP 5100N manuals
Add to My Manuals
Save this manual to your list of manuals |
Page 45 highlights
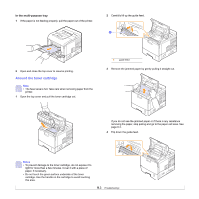
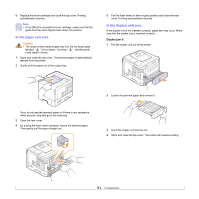
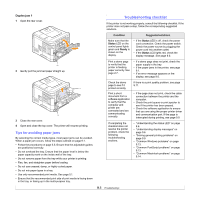
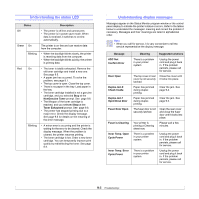
9 Troubleshooting This chapter provides helpful information for what to do if you encounter an error while using your printer. This chapter includes: • Clearing paper jams • Troubleshooting checklist • Understanding the status LED • Understanding display messages • Toner cartridge-related messages • Solving general printing problems • Solving print quality problems • Common Windows problems • Common Macintosh problems • Common PostScript problems Clearing paper jams Note • When removing paper that is jammed in the printer, if possible always pull the paper in the direction that it normally moves so as not to damage internal components. Always pull firmly and evenly; do not jerk the paper. If the paper tears, ensure that all fragments of paper are removed; otherwise a jam will occur again. When a paper jam occurs, the Status LED lights red. Open and close the top cover. The jammed paper automatically exits the printer. If the paper does not exit, check the display on the control panel. The message indicating the corresponding location of the paper jam appears. Refer to the table below to locate the paper jam and to clear it: Message Location of Jam Go To Paper Jam 0 Open/Close Door In the paper feed area (tray 1, optional tray 2, optional tray 3, optional tray 4, multi-purpose tray) the next column Paper Jam 1 Open/Close Door Around the toner cartridge page 9.3 Paper Jam 2 Check Inside In the paper exit area page 9.4 Paper Exit Jam 1 Open/Close Door Between the toner cartridge and the paper exit area page 9.3 Paper Tray 2 Jam Open Tray 2 In the optional tray 2 page 9.2 Paper Tray 3 Jam Open Tray 3 In the optional tray 3 page 9.2 Paper Tray 4 Jam Open Tray 4 Duplex Jam 0a Check Inside Duplex Jam 1a Open/Close Door In the optional tray 4 In the duplex area In the duplex area page 9.2 page 9.4 page 9.5 a. Available with the optional duplex unit. 9.1
-
 1
1 -
2
-
3
-
4
-
5
-
6
-
7
-
8
-
9
-
10
-
11
-
12
-
13
-
14
-
15
-
16
-
17
-
18
-
19
-
20
-
21
-
22
-
23
-
24
-
25
-
26
-
27
-
28
-
29
-
30
-
31
-
32
-
33
-
34
-
35
-
36
-
37
-
38
-
39
-
 40
40 -
 41
41 -
 42
42 -
 43
43 -
 44
44 -
 45
45 -
 46
46 -
 47
47 -
 48
48 -
 49
49 -
 50
50 -
51
-
52
-
53
-
54
-
55
-
56
-
57
-
58
-
59
-
60
-
61
-
62
-
63
-
64
-
65
-
66
-
67
-
68
-
69
-
70
-
71
-
72
-
73
-
74
-
75
-
76
-
77
-
78
-
79
-
80
-
81
-
82
-
83
-
84
-
85
-
86
-
87
-
88
-
89
-
90
-
91
-
92
-
93
-
94
-
95
-
96
-
97
-
98
-
99
-
100
-
101
-
102
-
103
-
104
-
105
-
106
-
107
-
108
-
109
-
110
-
111
-
112
-
113
-
114
-
115
-
116
-
117
-
118
-
119
-
120
-
121
-
122
-
123
-
124
-
125
-
126
-
127
-
128
-
129
-
130
-
131
-
132
-
133
-
134
-
135
-
136
-
137
-
138
-
139
-
140
-
141
-
142
-
143
-
144
-
145
-
146
-
147
-
148
-
149
-
150
-
151
-
152
-
153
-
154
-
155
-
156
-
157
-
158
-
159
-
160
-
161
-
162
-
163
-
164
-
165
-
166
-
167
-
168
-
169
-
170
-
171
-
172
-
173
-
174
-
175
-
176
-
177
-
178
 |
 |
