Ricoh Epson Stylus Pro 7700 User Guide - Page 166
Replacing the Maintenance Tank, The printer will not print if one of the maintenance tanks is full.
 |
View all Ricoh Epson Stylus Pro 7700 manuals
Add to My Manuals
Save this manual to your list of manuals |
Page 166 highlights
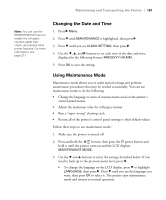
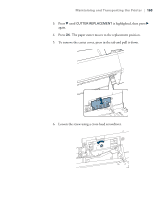
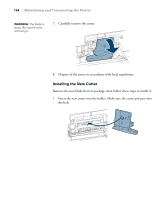
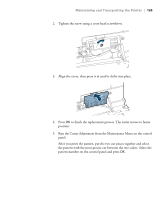
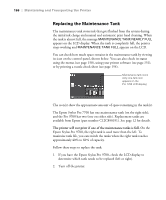
166 | Maintaining and Transporting the Printer Replacing the Maintenance Tank The maintenance tank stores ink that gets flushed from the system during the initial ink charge and manual and automatic print head cleaning. When the tank is almost full, the message MAINTENANCE TANK NEARLY FULL appears on the LCD display. When the tank is completely full, the printer stops working and MAINTENANCE TANK FULL appears on the LCD. You can check how much space remains in the maintenance tank by viewing its icon on the control panel, shown below. You can also check its status using the menus (see page 150), using your printer software (see page 151), or by printing a nozzle check sheet (see page 154). Maintenance tank icons (only one tank icon appears on the Pro 7700 LCD display) The icon(s) show the approximate amount of space remaining in the tank(s). The Epson Stylus Pro 7700 has one maintenance tank (on the right side), and the Pro 9700 has two (one on either side). Replacement tanks are available from Epson (part number C12C890191). See page 12 for details. The printer will not print if one of the maintenance tanks is full. On the Epson Stylus Pro 9700, the right tank is used more than the left. To maximize tank life, you can switch the tanks when the right tank reaches approximately 40% to 60% of capacity. Follow these steps to replace the tank: 1. If you have the Epson Stylus Pro 9700, check the LCD display to determine which tank needs to be replaced (left or right). 2. Turn off the printer. 166
-
 1
1 -
2
-
3
-
4
-
5
-
6
-
7
-
8
-
9
-
10
-
11
-
12
-
13
-
14
-
15
-
16
-
17
-
18
-
19
-
20
-
21
-
22
-
23
-
24
-
25
-
26
-
27
-
28
-
29
-
30
-
31
-
32
-
33
-
34
-
35
-
36
-
37
-
38
-
39
-
40
-
41
-
42
-
43
-
44
-
45
-
46
-
47
-
48
-
49
-
50
-
51
-
52
-
53
-
54
-
55
-
56
-
57
-
58
-
59
-
60
-
61
-
62
-
63
-
64
-
65
-
66
-
67
-
68
-
69
-
70
-
71
-
72
-
73
-
74
-
75
-
76
-
77
-
78
-
79
-
80
-
81
-
82
-
83
-
84
-
85
-
86
-
87
-
88
-
89
-
90
-
91
-
92
-
93
-
94
-
95
-
96
-
97
-
98
-
99
-
100
-
101
-
102
-
103
-
104
-
105
-
106
-
107
-
108
-
109
-
110
-
111
-
112
-
113
-
114
-
115
-
116
-
117
-
118
-
119
-
120
-
121
-
122
-
123
-
124
-
125
-
126
-
127
-
128
-
129
-
130
-
131
-
132
-
133
-
134
-
135
-
136
-
137
-
138
-
139
-
140
-
141
-
142
-
143
-
144
-
145
-
146
-
147
-
148
-
149
-
150
-
151
-
152
-
153
-
154
-
155
-
156
-
157
-
158
-
159
-
160
-
 161
161 -
 162
162 -
 163
163 -
 164
164 -
 165
165 -
 166
166 -
 167
167 -
 168
168 -
 169
169 -
 170
170 -
 171
171 -
172
-
173
-
174
-
175
-
176
-
177
-
178
-
179
-
180
-
181
-
182
-
183
-
184
-
185
-
186
-
187
-
188
-
189
-
190
-
191
-
192
-
193
-
194
-
195
-
196
-
197
-
198
-
199
-
200
-
201
-
202
-
203
-
204
-
205
-
206
-
207
-
208
-
209
-
210
-
211
-
212
-
213
-
214
-
215
-
216
-
217
-
218
-
219
-
220
-
221
-
222
-
223
-
224
-
225
-
226
-
227
-
228
 |
 |