Rocketfish RF-HD3025 User Manual (English) - Page 4
Physical description, Status indicators, Setting up your hard drive, enclosure - usb 3 0 2 5
 |
View all Rocketfish RF-HD3025 manuals
Add to My Manuals
Save this manual to your list of manuals |
Page 4 highlights
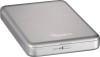
Setting up your hard drive For highest performance and reliability, install the latest updates and service pack (SP). For Windows, enclosure go to the Start menu and select Windows Update. Physical description Installing your hard drive in the enclosure Read the safety precautions before you install your hard drive in the enclosure: • Use only the accessories provided. • Make sure that you first touch an unpainted, grounded metal object to discharge any static electricity stored on your clothing or body before touching any electronic components. • Handle the printed circuit board (PCB) edges only. Avoid touching the onboard electronic components. To install your hard drive in the enclosure: 1 Slide the lock switch to the left to open the enclosure. Front Back Lock switch to open the case USB 3.0 Micro-B port Backup button with power/activity LED Status indicators The following table describes the power-on and backup active LED. Operating mode LED status Starting mode Solid Active mode Flashing Disconnect mode Off Description The hard drive is turned on. Data is being transmitted between your computer and the hard drive. The hard drive is turned off. 2 Remove the four screws from the printed circuit board, then remove the printed circuit board. 4
-
 1
1 -
 2
2 -
 3
3 -
 4
4 -
 5
5 -
 6
6 -
 7
7 -
 8
8 -
 9
9 -
 10
10 -
11
-
12
-
13
-
14
-
15
-
16
 |
 |
